Sheet0 Quick Start
Learn more about Sheet0 at the following channels:- Sheet0 — Official site
- X (Twitter) — New updates
- Instagram — New updates
- LinkedIn — Case sharing
- YouTube — Tutorials & Demos
- Sheet0 Case Library — Free example outputs
- Technical support: help@sheet0.com
Part 1: Sheet0 Quick Start
1-1 What is Sheet0?
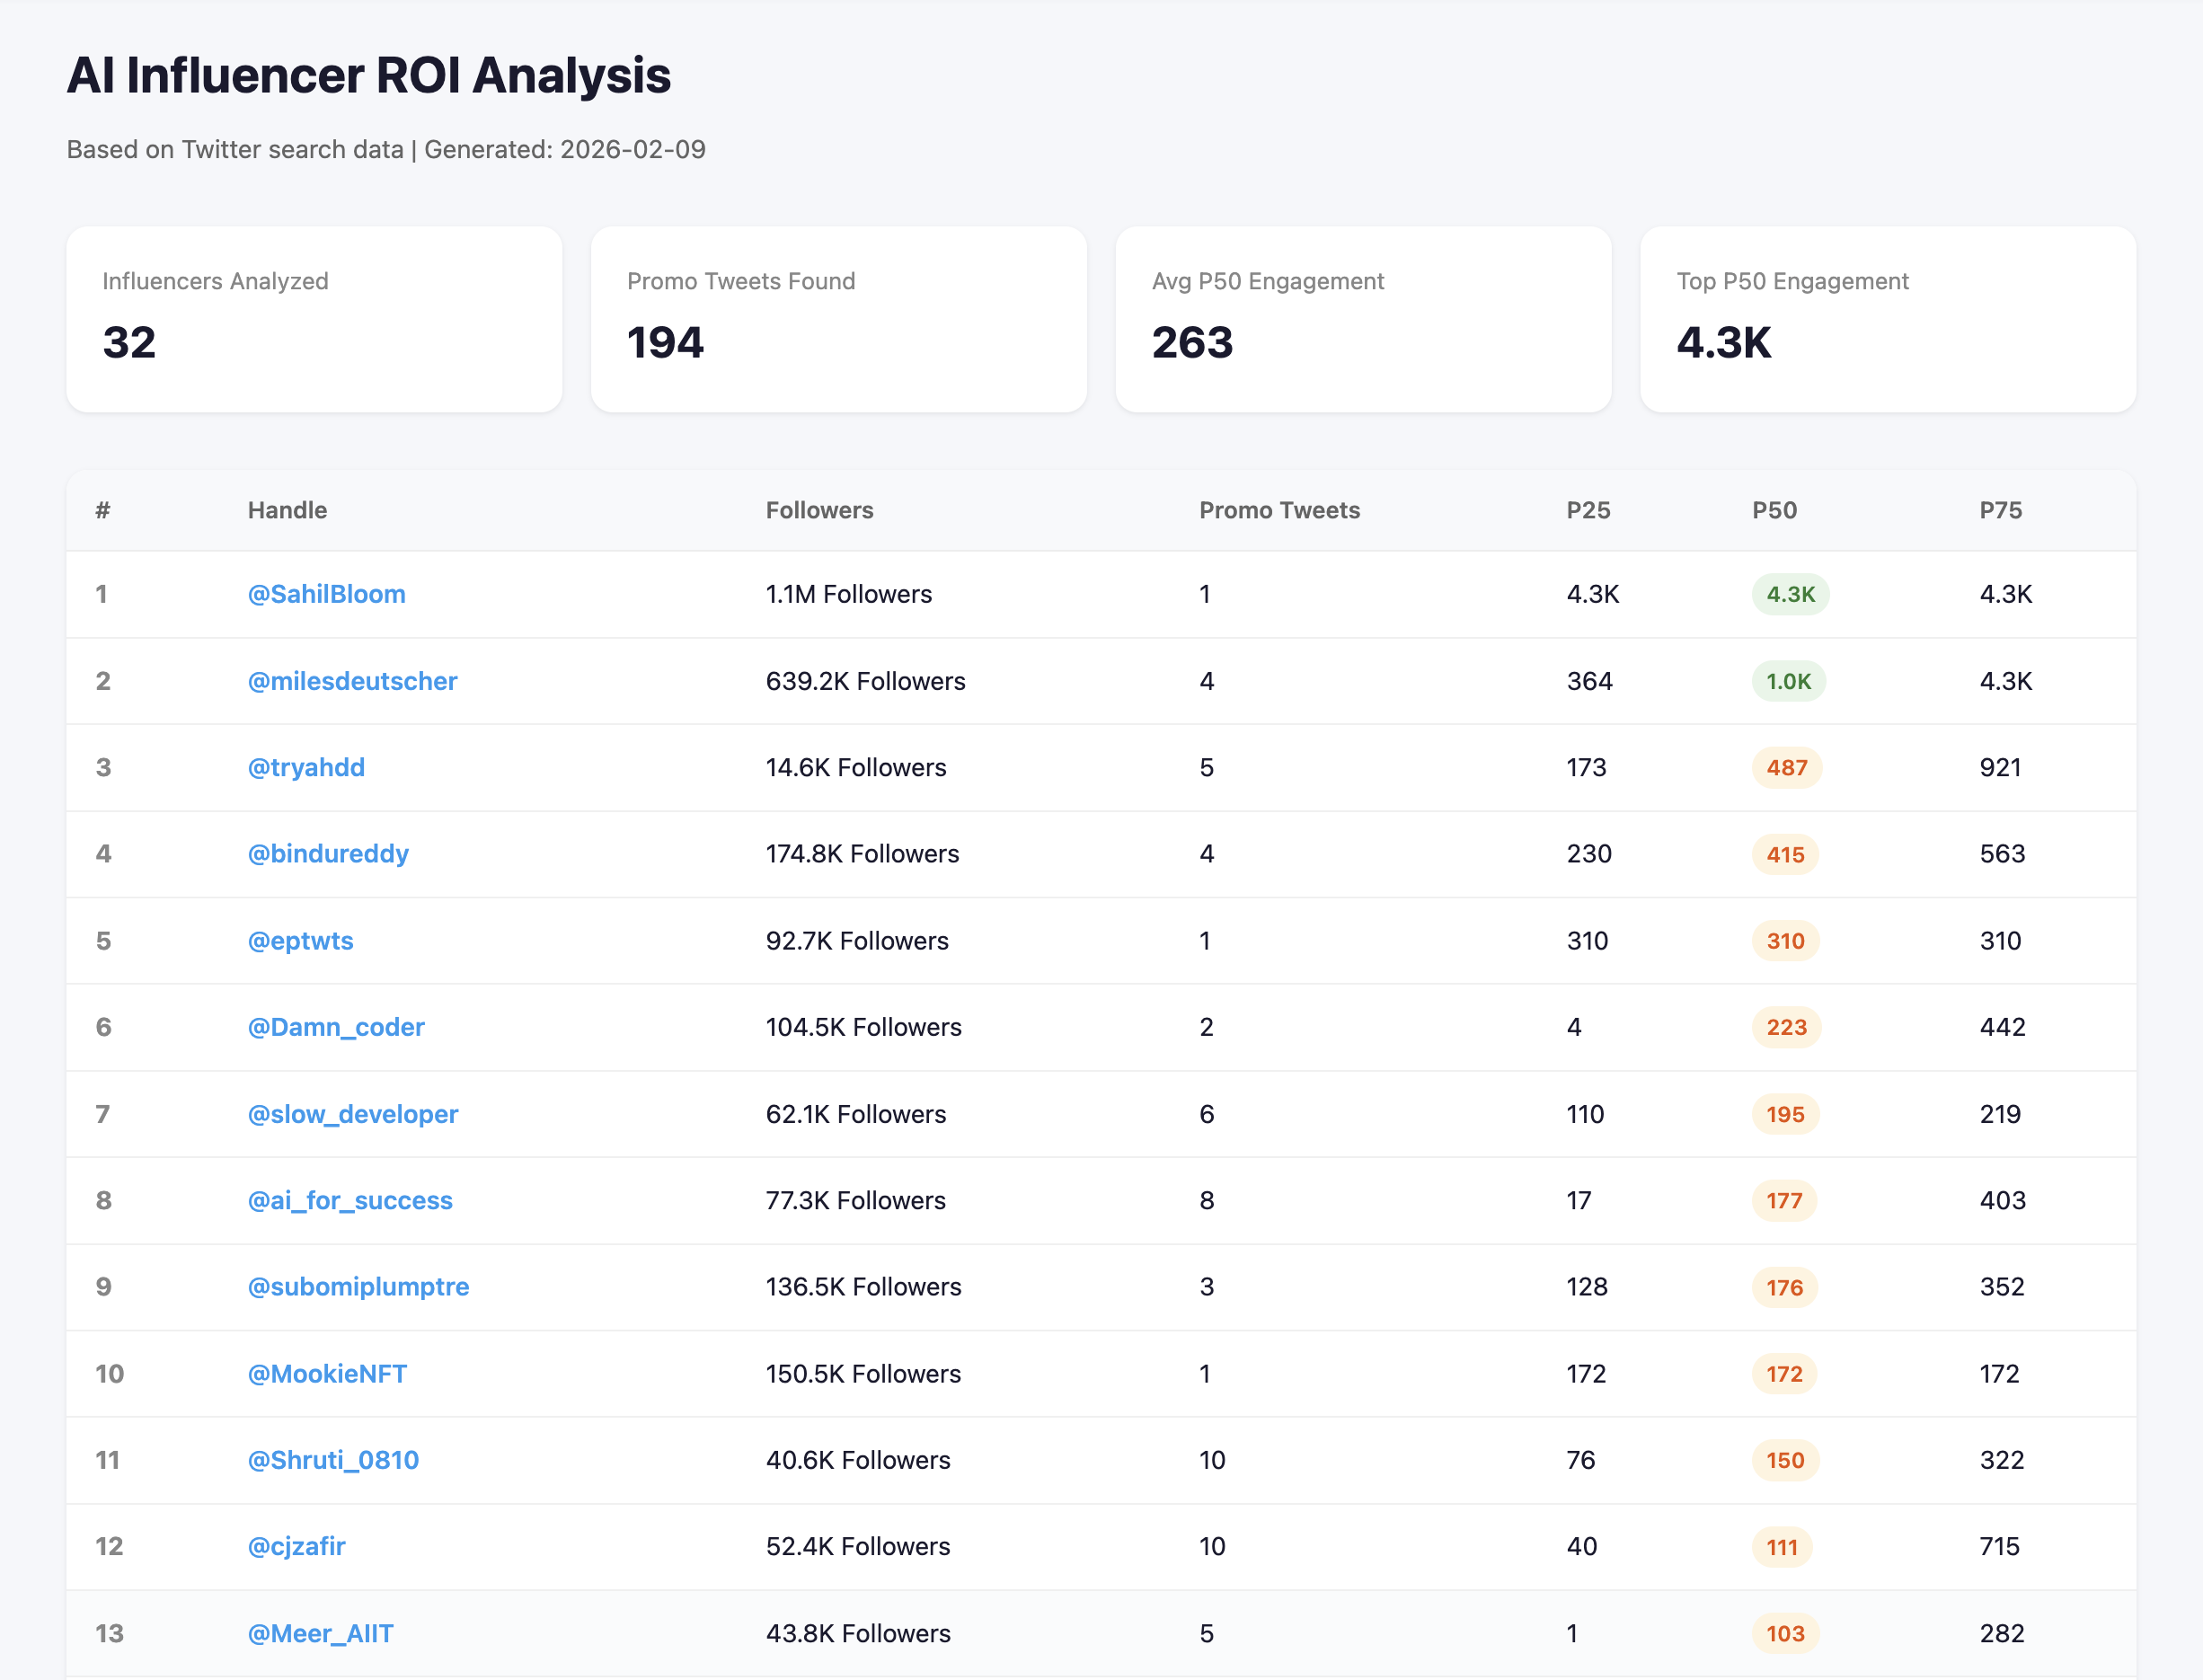
Sheet0 is a universal data agent—think of it as a helper that turns your words into structured data. You only need to describe what data you want in plain language; Sheet0 will then find the data, collect it, and put it into clear tables for you. We now support richer analysis reports and integrations with other platforms, so you can go from raw data to insights and actions more easily. Sheet0 is especially strong in lead generation, data monitoring, and competitor analysis: these scenarios have been significantly improved so you can capture leads, track changes over time, and keep an eye on competitors with less manual work. It’s also handy when you need to pull the same kind of data again and again, or keep it updated over time. For example, imagine you’re looking for AI influencers on Twitter to collaborate with. You don’t have to open each profile one by one anymore. Just tell Sheet0 something like:Help me compile a list of AI tech influencers on Twitter with their ROI data, so that I can communicate with them later.
1-2 What can Sheet0 do for you?
Sheet0 shines in a few typical scenarios (more features for automatic, periodic updates are coming in the next few weeks). Here’s a quick overview:| Core features | Usage scenarios | Case example | Results show |
|---|---|---|---|
| Data Monitoring | Continuously monitor external data changes, such as stock prices, inventory, rankings, content updates, policy information, etc., and automatically update them in a structured form | Automatically track changes in 50+ website data, update to the same Sheet daily, no need for manual repeated checks | 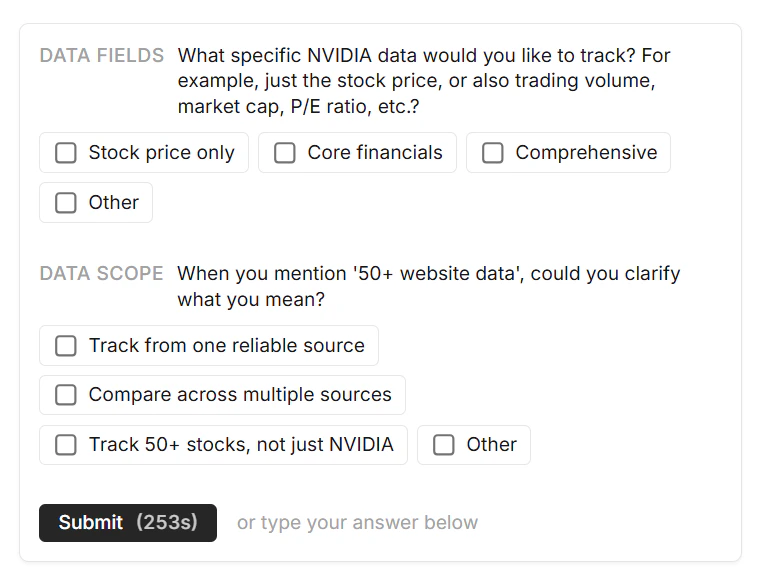 |
| Lead Generation | Batch capture potential customer information from websites, communities, maps, and platform pages and conduct cross-validation for sales, BD, and market expansion | Capture 1,000+ leads from Google Maps and generate usable sales lead sheets directly | 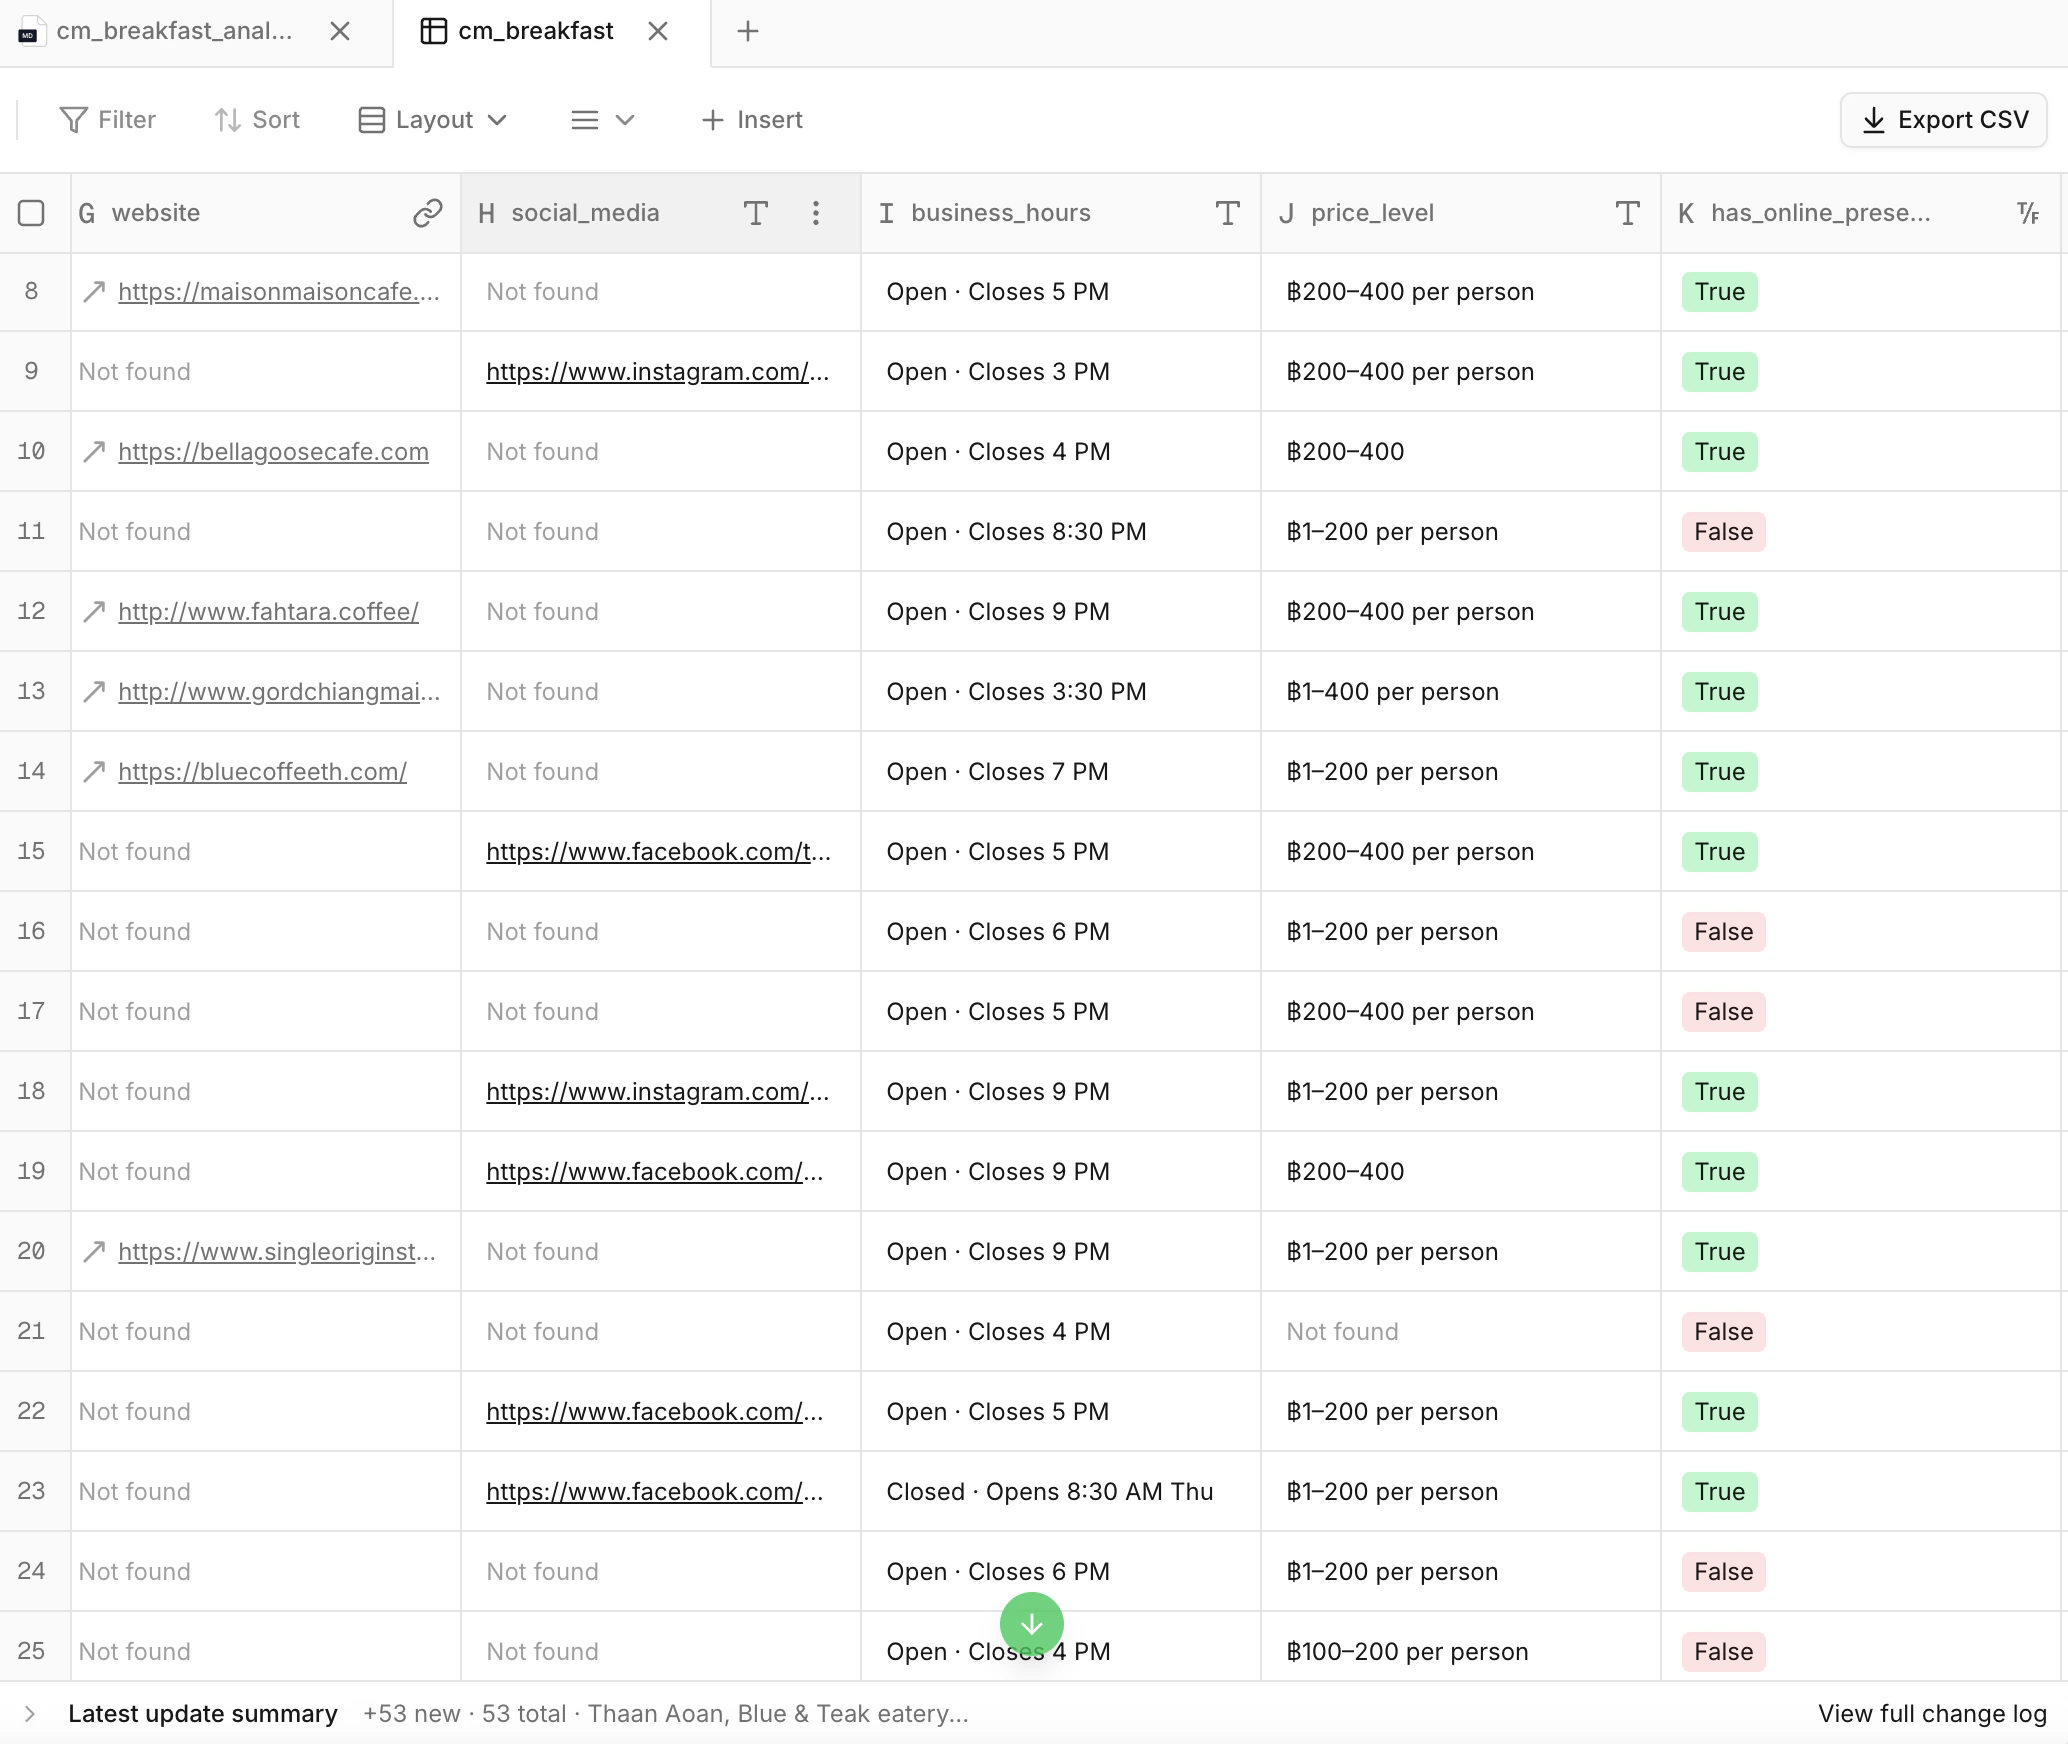 |
| Competitor Intelligence | Systematically collect and analyze competitors’ product information, pricing, advertising content, and channel actions | Summarize the influencer information and content of the social media media buy channel of competing products, compare and discover differentiated marketing opportunities and market gaps, and carry out advertising more efficiently | 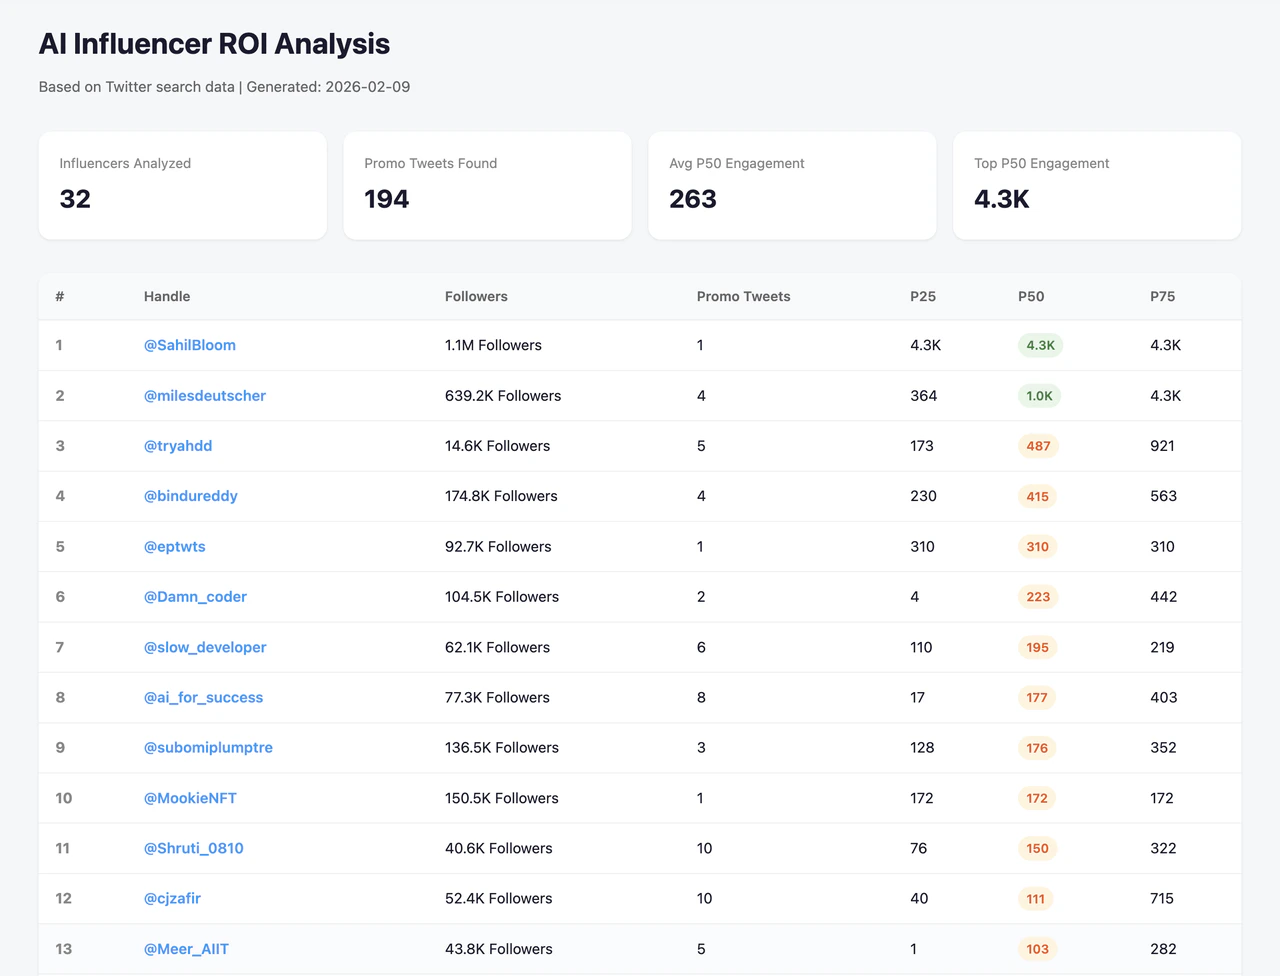 |
Part 2: A Showcase Takes You Through the Process
In this section we’ll walk through one concrete example: “Help me compile a list of high-ROI AI tech influencers on Twitter so I can reach out to them later.” Follow along and you’ll see exactly how to use Sheet0 from start to finish.2-1 Install the browser plug-in
1. Why do I need the browser plugin?
Sheet0 uses your own browser to visit websites, scroll, click, and even log in when needed. That way it can handle real web pages (including ones that need login or have captchas) much more reliably. Installing the plugin is quick—here’s how. Install the extension: Go to the Chrome Web Store – Sheet0 Browser Extension and click Add to Chrome to install. Then follow the steps below.2. Open Chrome’s extension page
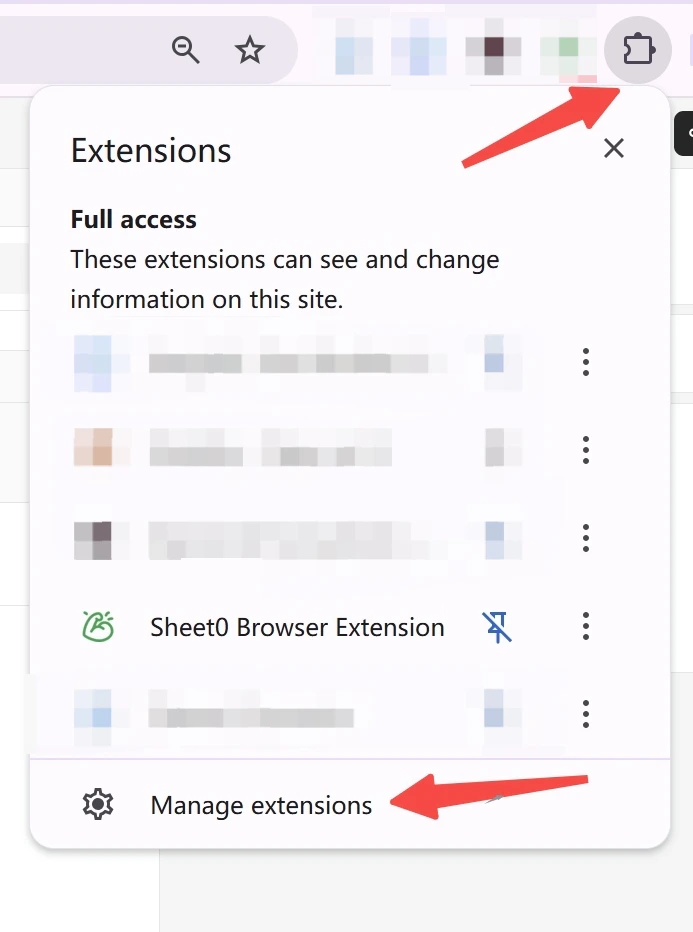
- Click the puzzle icon in the top-right corner of Chrome, then click Manage Extensions at the bottom of the menu.
- Or simply type chrome://extensions in the address bar and press Enter.
3. Turn on Developer mode
On the extensions page, find the Developer mode switch in the top-right corner and turn it on.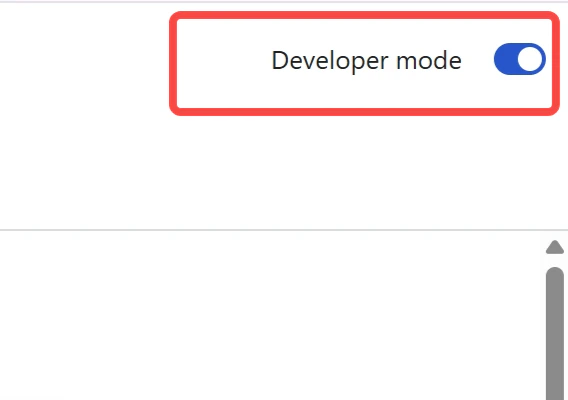
4. Drag and drop to install
Open your file manager, find the.zip file you downloaded, and drag it onto the Chrome extensions page. Chrome will install it automatically—no extra clicks needed.
5. Confirm it’s installed
Once installation is done, you should see Sheet0 Browser Extension in the extension list and a new icon in the browser toolbar.
6. FAQs
-
Q: I don’t see the Sheet0 icon on the toolbar.
Click the puzzle icon in the top-right of Chrome, find Sheet0 Browser Extension, and click the pin on the right to pin it to the toolbar. -
Q: How do I update the plugin?
Download the new.zipfile and drag it onto the chrome://extensions page again; it will overwrite the old version.
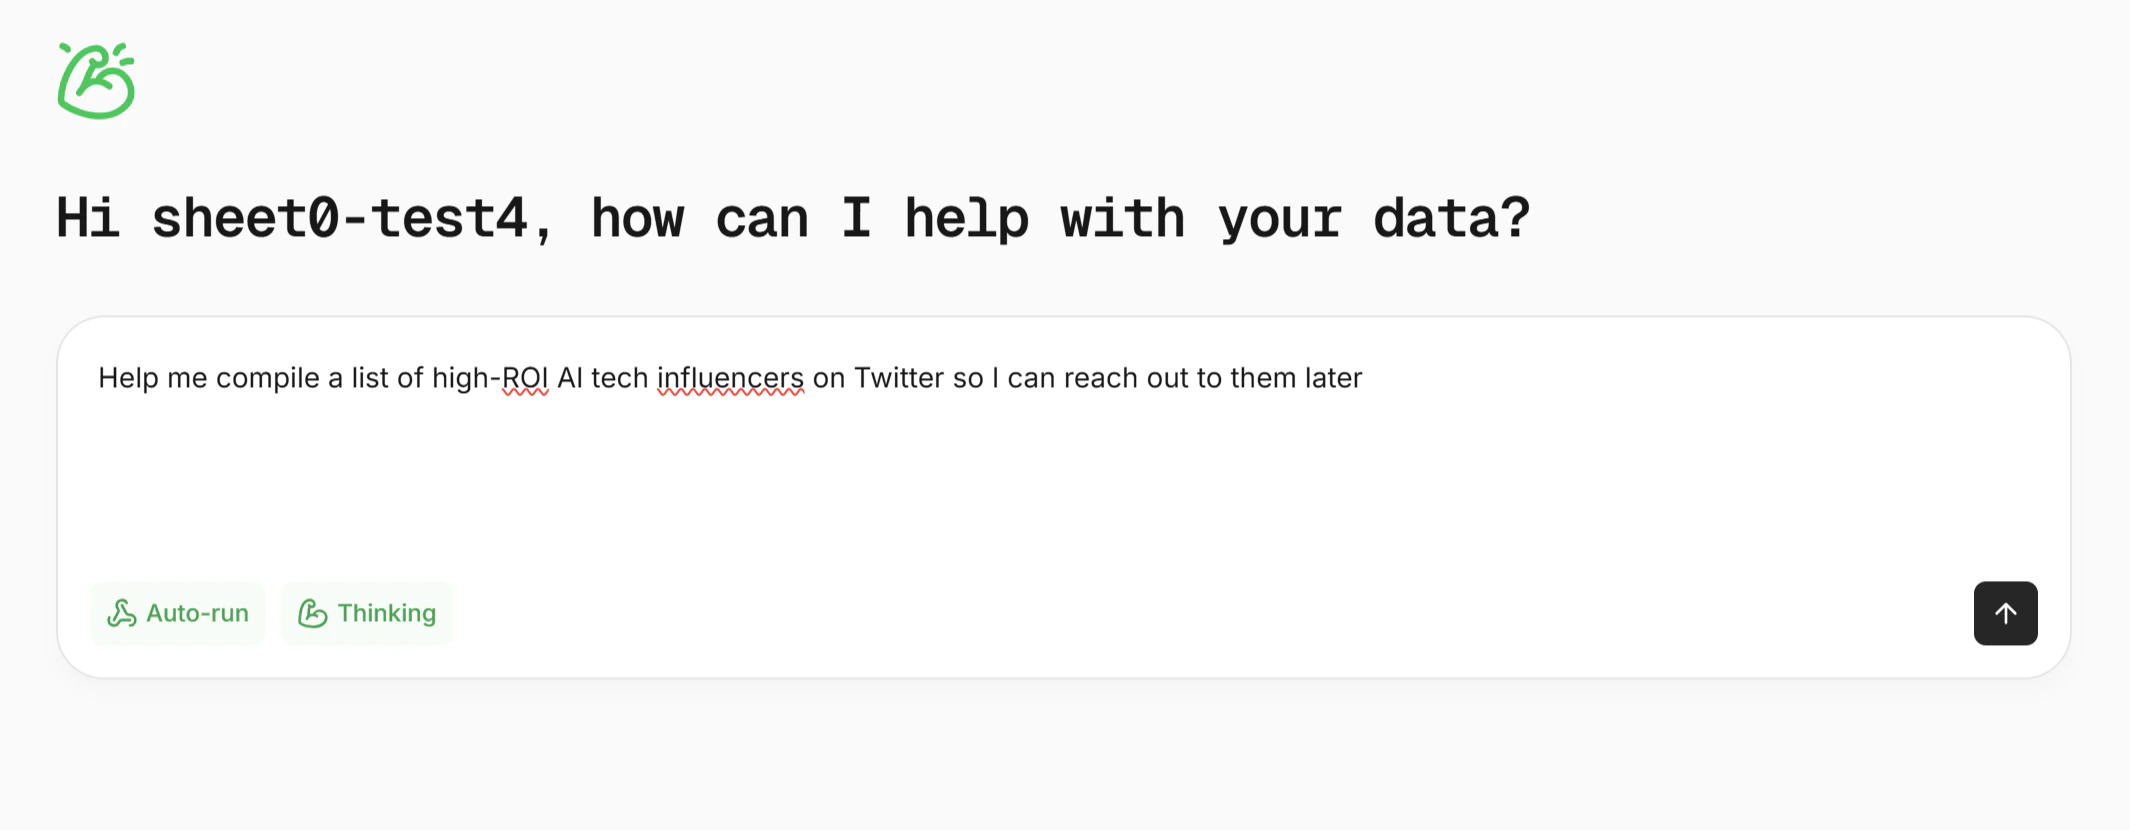
2-2 Submit your first task in one sentence
Plugin ready? Great. Now you can run your first task. We’ll use the same example:Help me compile a list of high‑ROI influencers in the AI tech space on Twitter so I can reach out to them later.
1. Chat with Sheet0 to clarify what you want
Right after you submit, Sheet0 enters a requirements alignment phase.- If your sentence is already clear, it may go straight to execution.
- If something is vague, don’t worry—Sheet0 will ask you a few questions in the chat to nail down the details. Just answer in natural language.
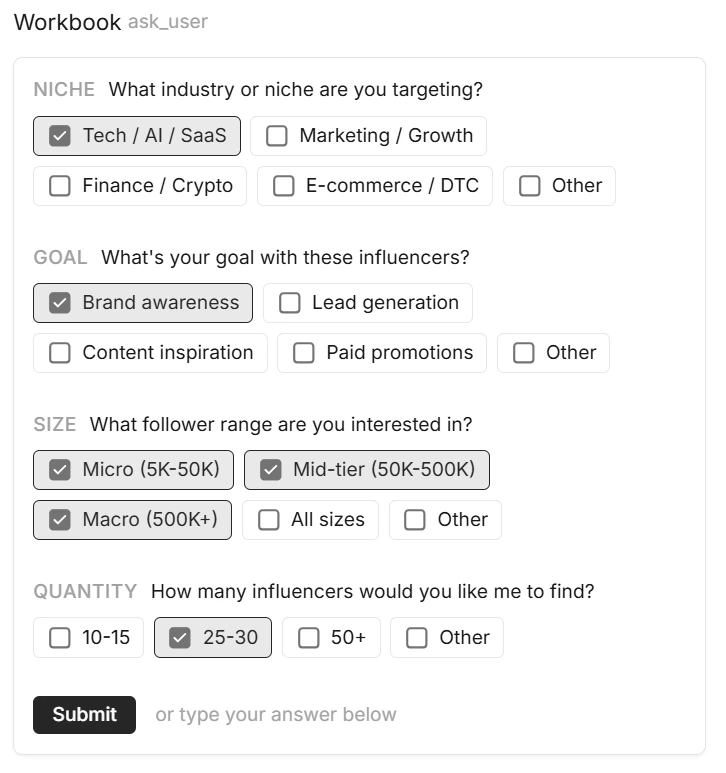
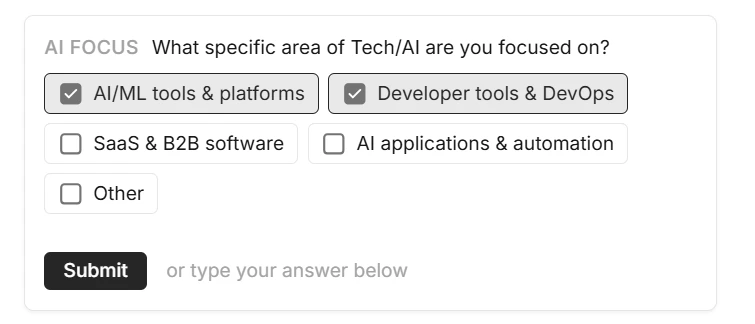
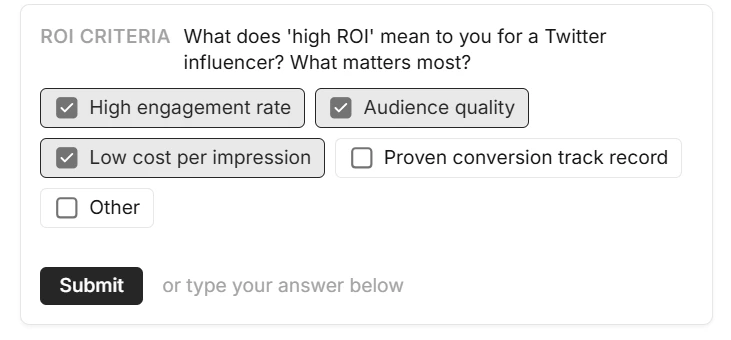
2. Sheet0 uses cards to pin down your needs
Rather than guessing, Sheet0 will show you cards in the chat and ask you to make a few key choices. This way it knows exactly what you want before it starts collecting data. You’ll typically be asked things like:- How do you define your goal? (e.g. how do you measure “ROI”?)
- What fields do you need in the end? (e.g. profile link, followers, tweet engagement)
- Any filters or preferences? (e.g. only accounts with 10K+ followers)
3. Review and confirm the task plan (task.md)
After a few rounds of questions, Sheet0 will draft a task requirement document (task.md) and ask you to review it. This step really matters—it’s your chance to catch anything off before Sheet0 starts scraping. Before you click Confirm, take a quick look at:| Check dimension | Key questions to ask yourself |
|---|---|
| Is the data source correct? | Is it pulling from the right website or page? Any duplicate or wrong entries? Will the page stay accessible? |
| Are the fields complete? | Do you have everything you need for your analysis? Any missing basics (ID, link, time, engagement)? Can you trace results back to the source? |
| Is the structure reasonable? | Do you need one table or several? Is the plan easy to extend later? Anything redundant or overly complicated that could be simplified? |
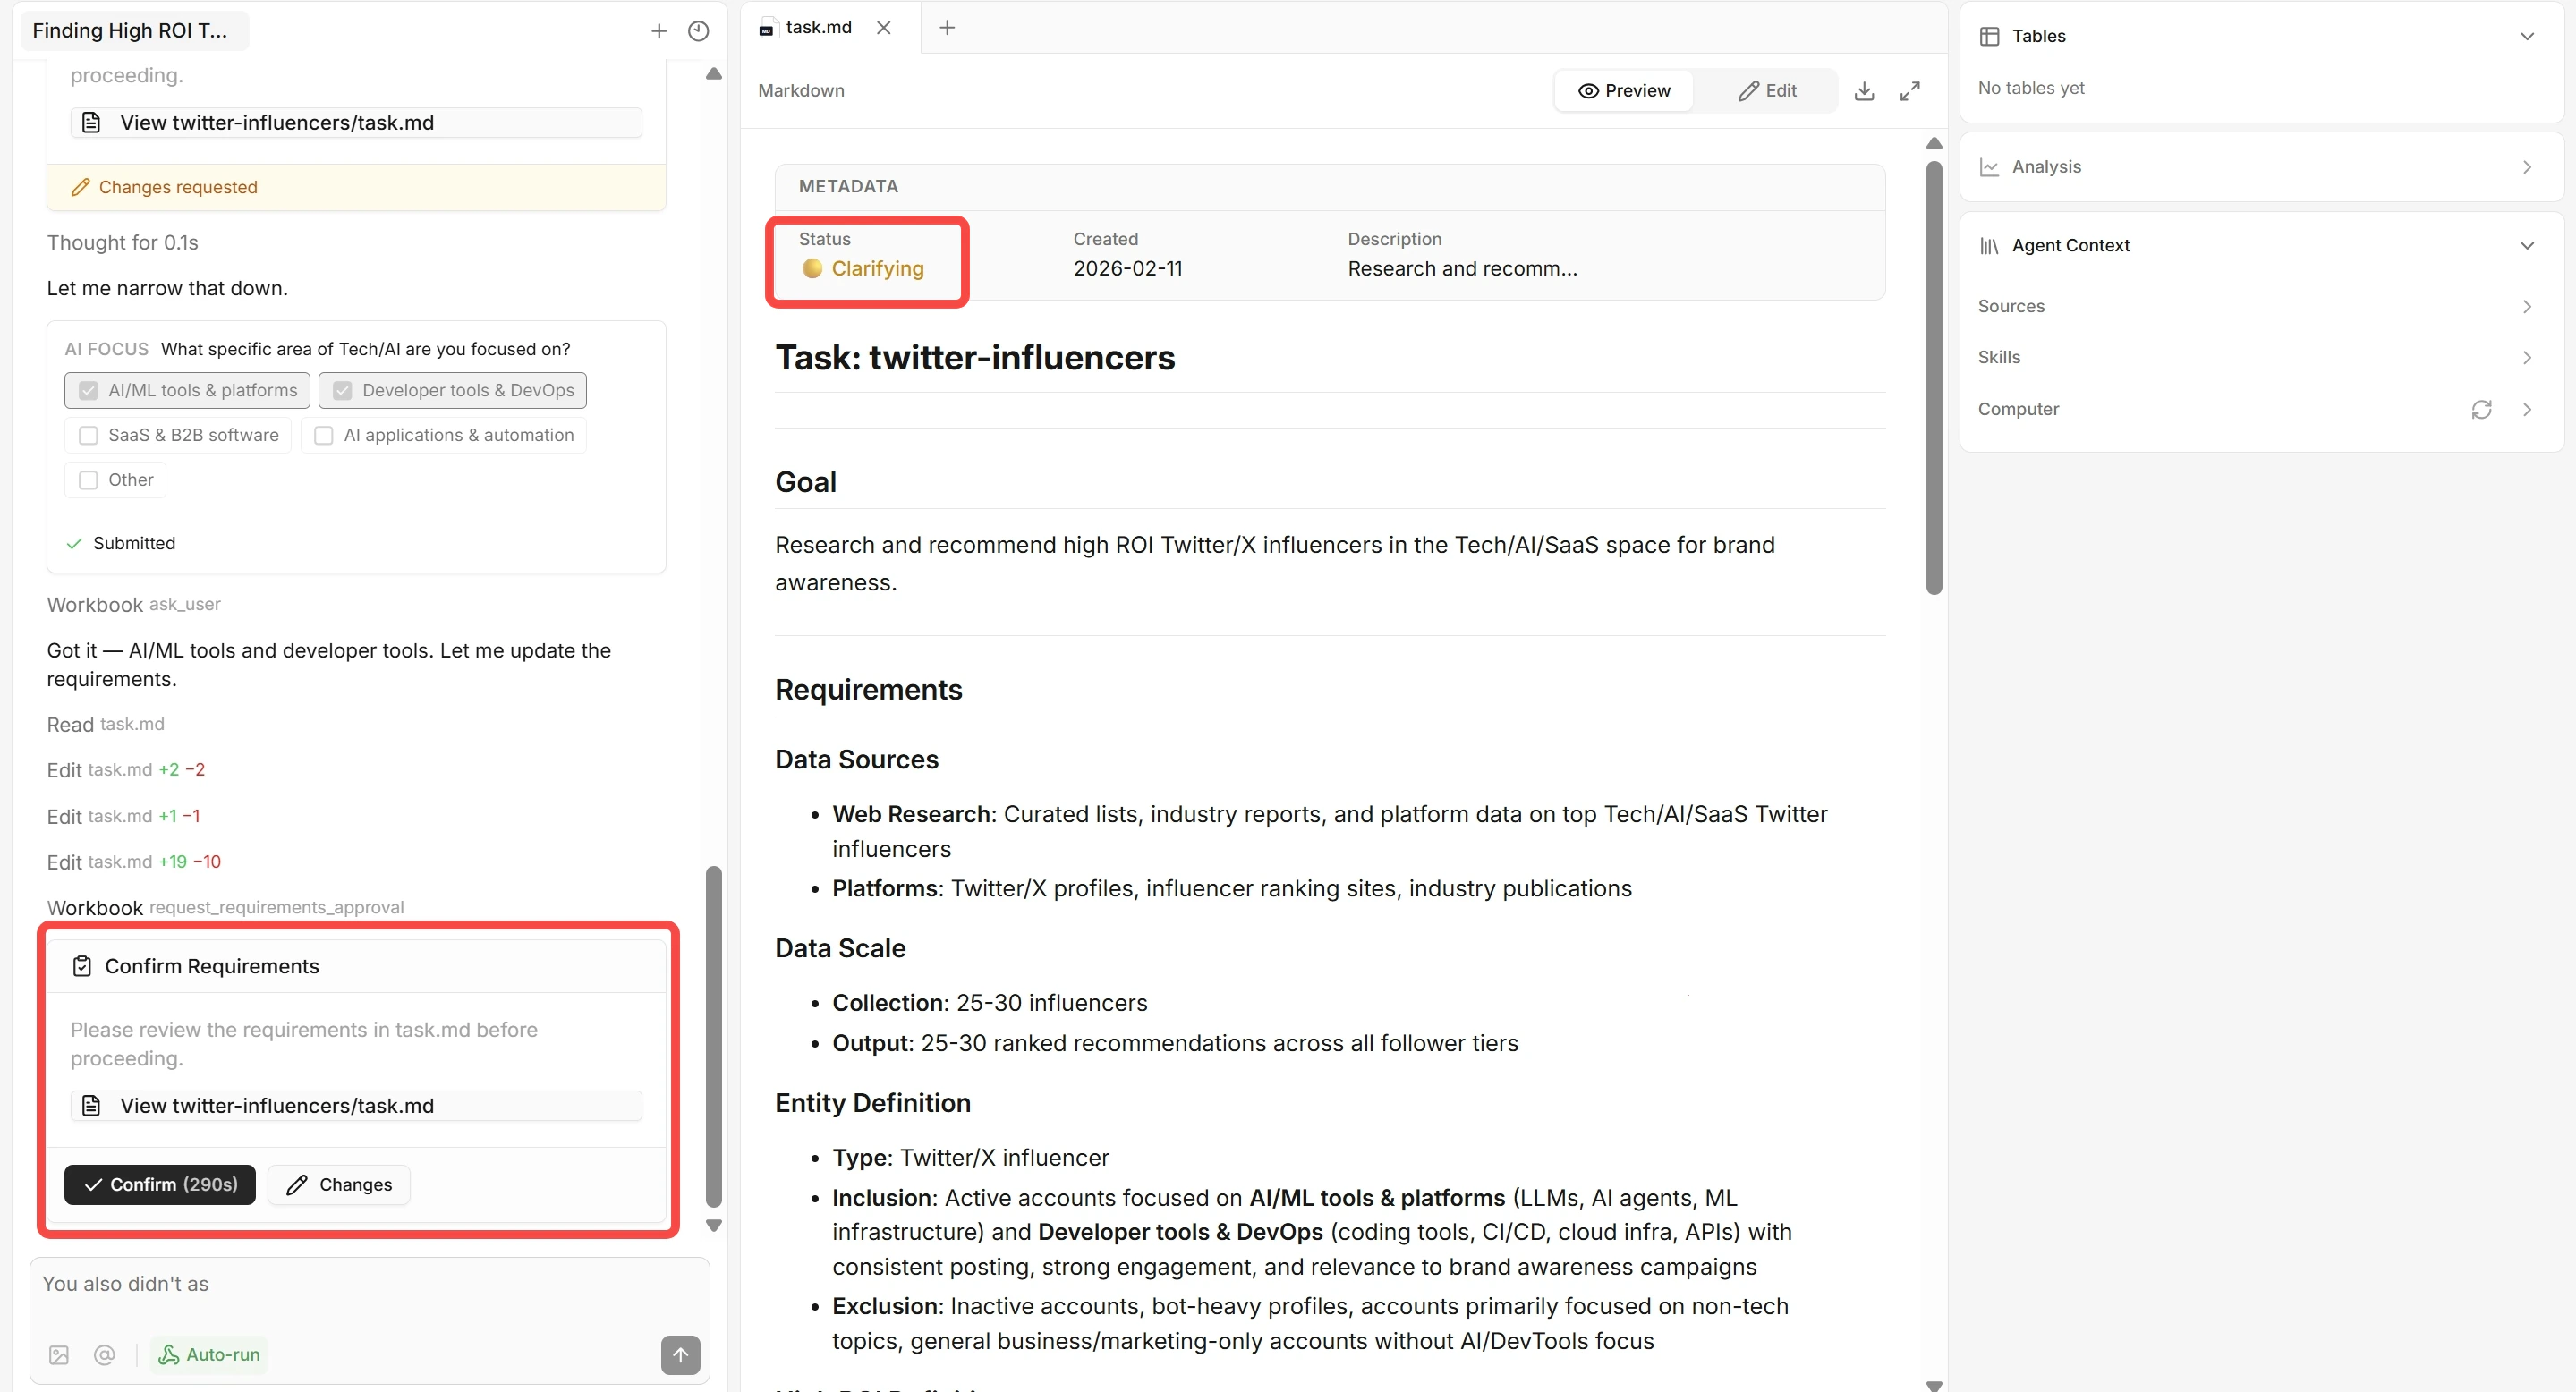

What a ready task.md looks like: For the request “Help me collect the list of KOLs with ROI high in the AI technology circle on Twitter, so that I can communicate and contact them in the future,” Sheet0 might produce something like this:
2-3 Sheet0 runs the task
Once you’ve confirmed the plan, Sheet0 starts working. The run is split into 5 stages so you always know what’s happening.| Stage | Phase | What will Sheet0 do? | What can you do? |
|---|---|---|---|
| 1 | Explore data sources | Scouts the target site: where the data lives, how pages are structured, how to paginate. | Watch the chat and expand To-do Progress to see exploration in real time. |
| 2 | Test flow | Opens the site and pulls a small sample to check that fields and flow are correct. | If something looks wrong, you can confirm or suggest changes before full collection. |
| 3 | Formal collection | Collects data at scale and writes it into the table row by row. | View live data in the sidebar table; you can leave the tab and do other things. Sometimes Sheet0 will ask you to confirm the table columns (column review) before writing; you can approve or ask for changes. |
| 4 | Final report | Summarizes how many rows were collected, which fields they have, and where the data is stored; suggests next steps. | Use the suggested actions (e.g. export CSV, run another analysis). |
| 5 | Generative Skills (Optional) | Can turn this run into a reusable Skill so you can repeat the same workflow later with one click. | Say so in chat or use @create skill. Great for tasks you run often. See 3-3 for more. |
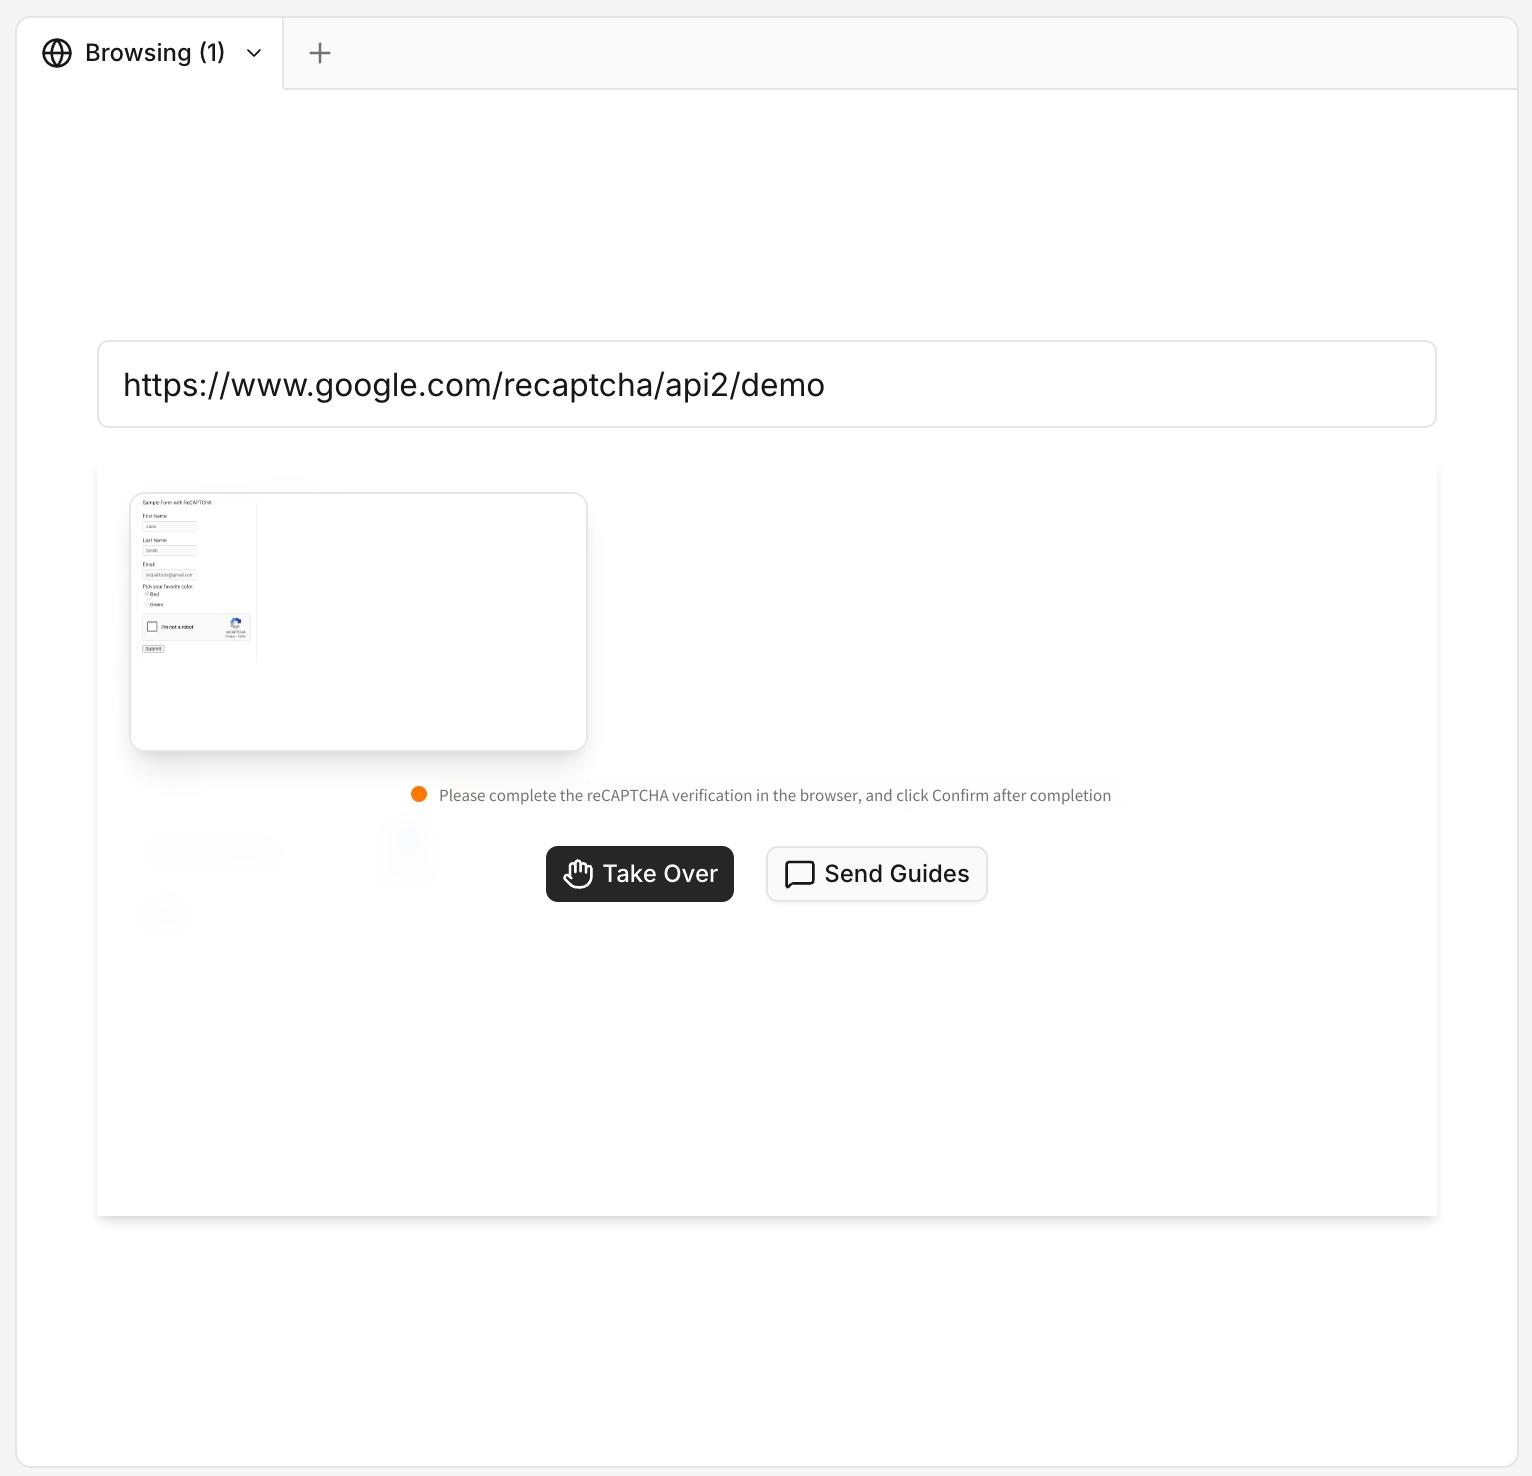
2-4 When Sheet0 needs your help: takeover mode
Some sites require login or show a captcha. When that happens, Sheet0 can’t do it alone—it will ask you to “take over” the browser for a moment. You’ll see a prompt; then you:- Log in — If the target site requires login, log in in the browser window as you normally would. When you’re done, Sheet0 will continue.
- Solve the captcha — If a verification code appears, complete it in the browser. Once you’re done, Sheet0 picks up again.
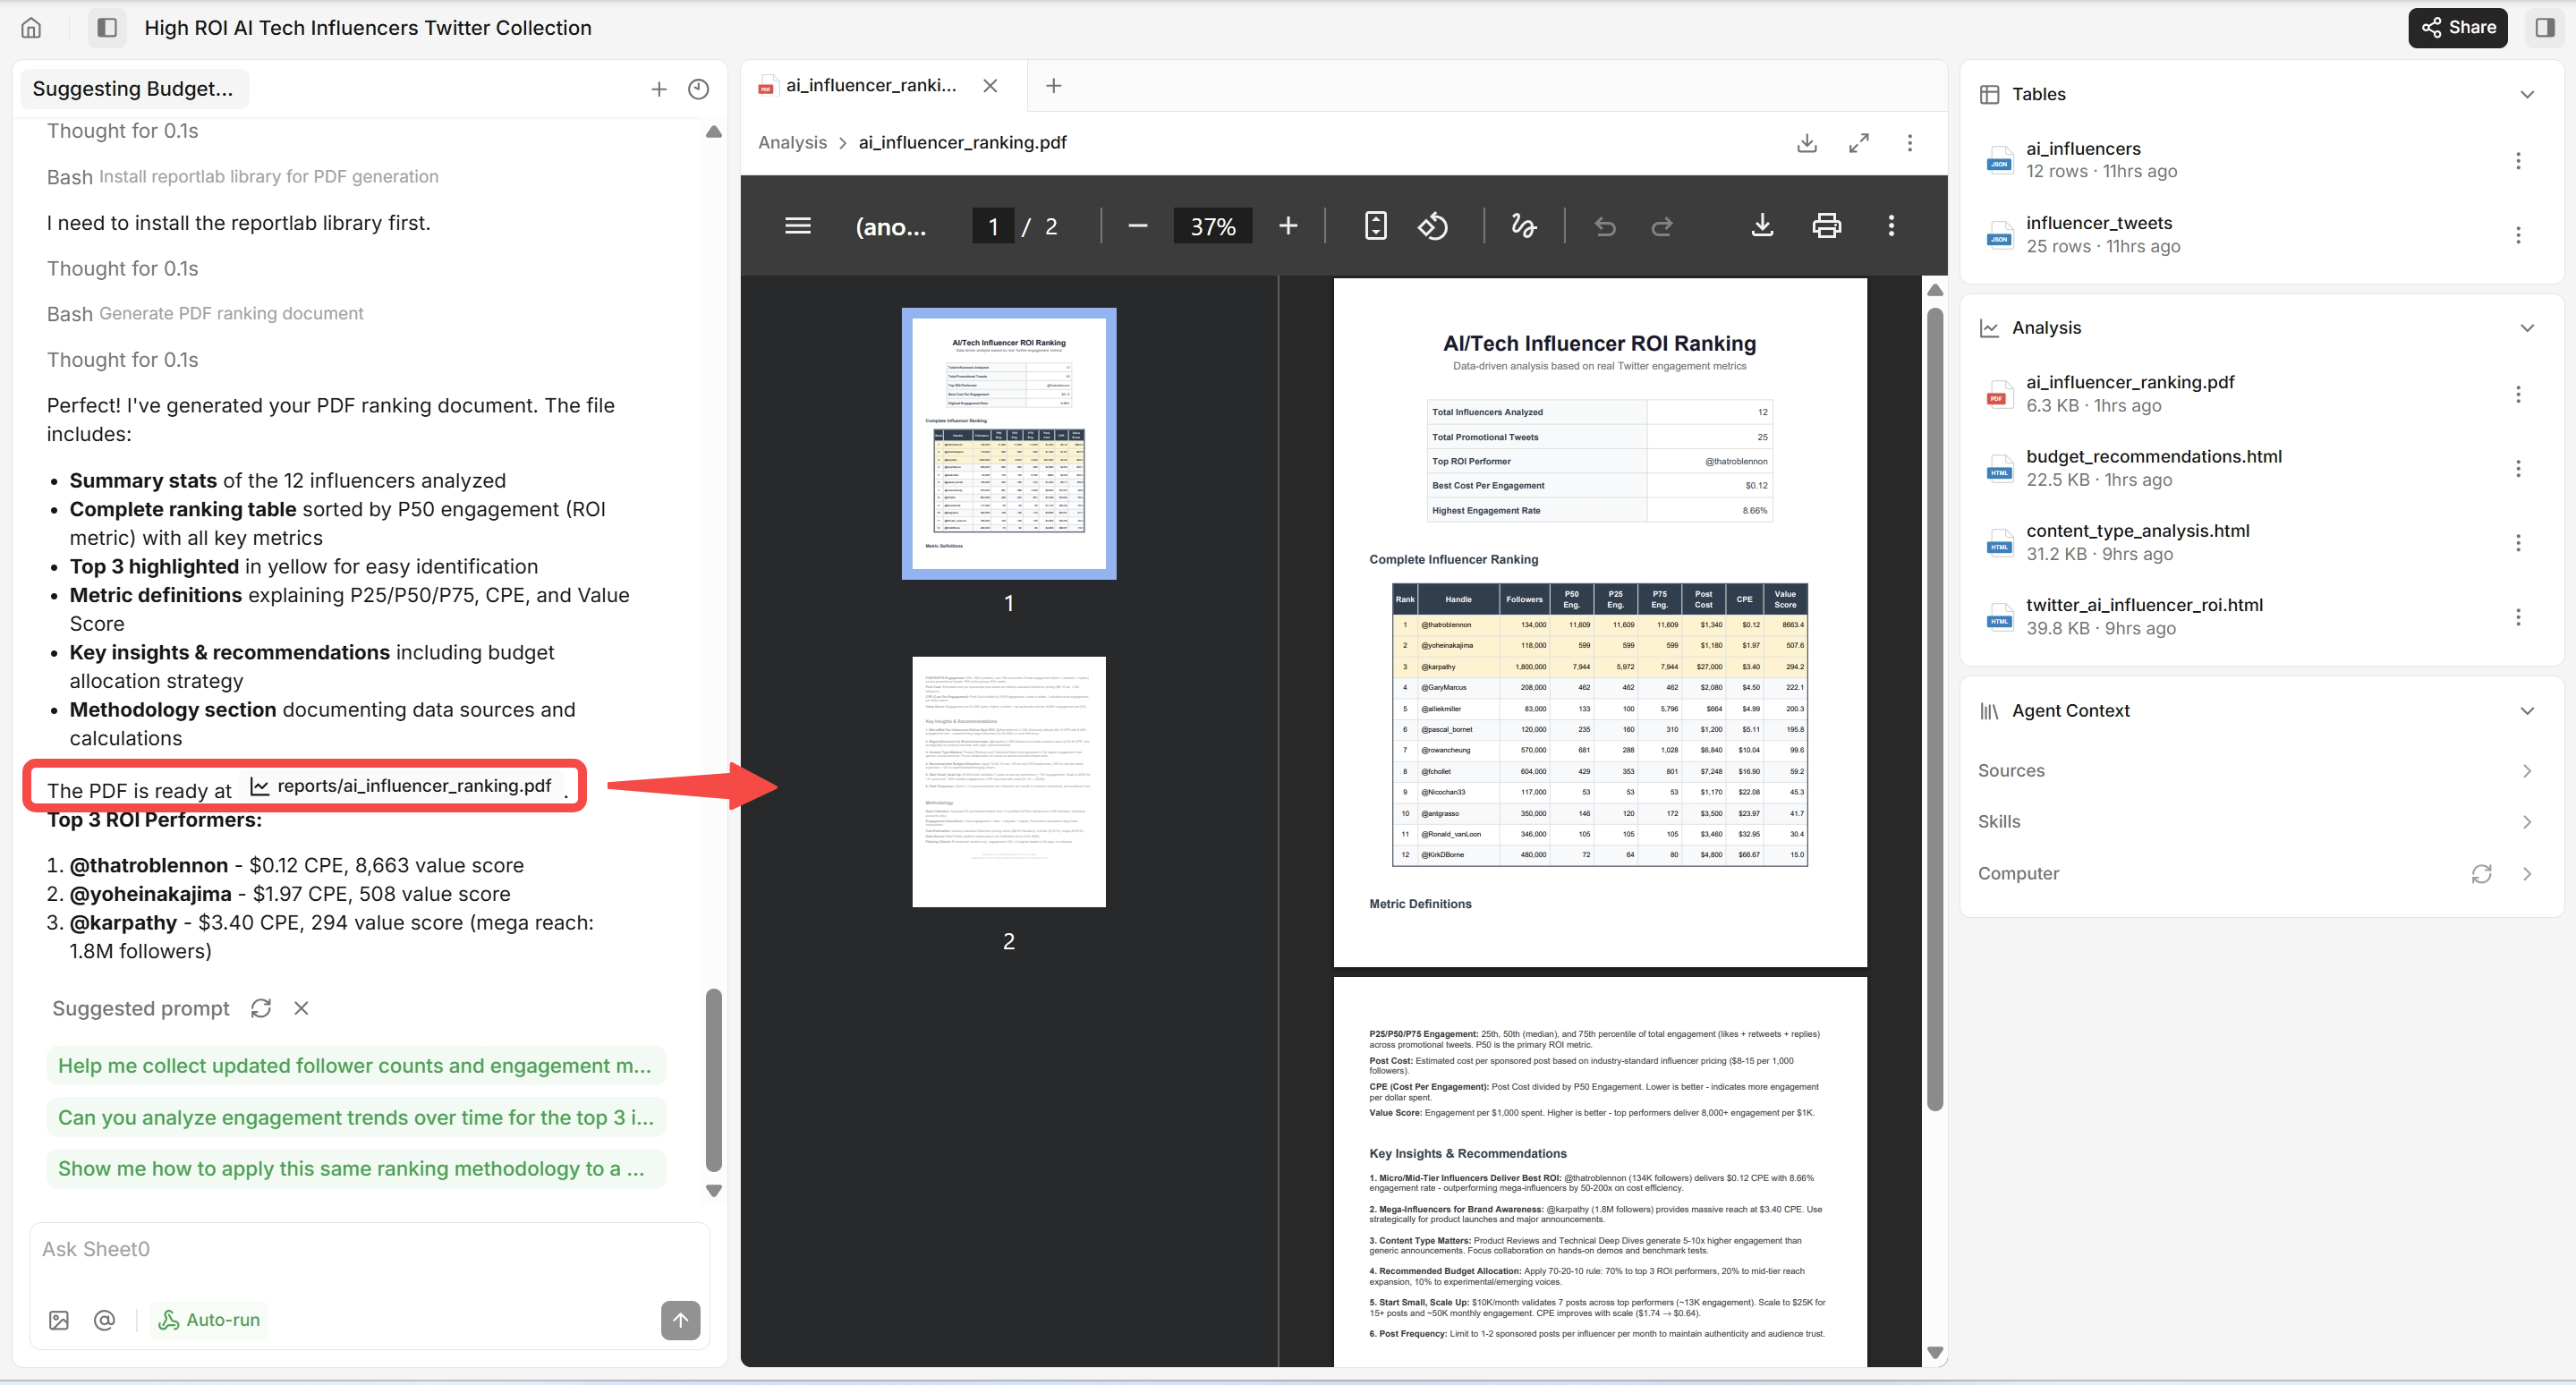
2-5 When collection is done
- Sheet0 will show a completion report: how many rows were collected, what fields they have, and which table they’re in.
- Below the report you’ll usually see suggested next steps—for example download/export CSV, run another analysis, or generate a report. Click whichever you need.
Part 3: Core Concepts of Sheet0
Let’s first recognize a few terms. While using Sheet0, you may encounter new concepts. A preliminary understanding will help you complete your first available Sheet0 task in the shortest possible time.| Term | Meaning |
|---|---|
| Workbook | Your workspace—a folder where you can put multiple different data collection tasks. For example, YC company lists today and new products on Product Hunt tomorrow can all be put in the same Workbook. |
| Task | A specific goal you give to Sheet0. For example, “collect all companies in the YC Winter 2026 batch” is a task. Each task will have its own folder, which records the detailed information of the task. |
| Table | The final place to store data; looks very similar to Excel. After collection, you can see all the data here, or export it as CSV. |
| Schema | Defines what columns the table has and what type of data each column contains (e.g. “company name” is text, “URL” is a link, “financing amount” is a number). Sheet0 will automatically create the appropriate table structure according to your needs. |
| Pipeline | The plan that Sheet0 executes for data collection. You don’t need to care about its details; Sheet0 will help you collect data step by step according to this plan. |
| Operator | A code module that performs specific tasks, such as “extracting data from web pages”, “calling APIs”, etc. You don’t need to write code; Sheet0 will generate them automatically. |
| Test / Production | Two stages of data collection. Sheet0 will first test the process with a small amount of data to confirm whether it is correct, then formally collect the full amount of data. This can avoid wasting time on problematic processes. |
3-1 How to write a detailed task description
If you want to improve the success rate of Sheet0 directly entering the execution phase, you can write your prompt as precise as possible. Here’s a quick guidance with the showcase: Identify and analyze high ROI influencers in the AI community on Twitter.| # | Dimension | What to tell Sheet0 | Example |
|---|---|---|---|
| ① | Data source | Which platform did the data come from? | ”Data source: Twitter (X). Mainly use Twitter search results page + author profile page + tweet details page.” |
| ② | Collection scope | Quantity and scope (how much data; whether to page; which data can be discarded in advance) | “The ultimate goal is to find the top 30 KOLs in ROI. Profile referral scope: Each author only analyzes the last 50 tweets.” |
| ③ | Required fields | What information do you ultimately want? This affects table structure and analysis capabilities. | ”Author dimensions: Profile link, number of followers, whether it is a personal account. Tweet dimensions: Tweet date, Tweet link, number of likes.” |
| ④ | Special processing | Any filtering or calculation rules? (e.g. influencer definition) | “I need influencers who continuously produce original content, can trigger interaction, content is quoted by others or secondary dissemination, long-term attention to the field of AI.” |
- Where to find data?
- How much are you looking for? What is the scope?
- Which fields do I need in the end?
- Are there any filtering, judgment, or calculation rules in the middle?
3-2 Core Concept — Sheet0 Sources
[3-2] explains in detail how to use the “Add Data Source” function to import various types of data into the current workbook: which method to use in which scenarios, and the specific operations and precautions for each step.1. What is the data source and why should it be added?
- A Source is a data entry that can be referenced in a workbook. It can be a web link, uploaded file, folder, connected email account, or a piece of plain text.
- Once added, the data appears in Agent Context → Sources on the left side of the workbook and can be grouped by type (Website, File, Integration, etc.).
- Typical uses: Create table (select an existing data source and generate or populate a table); Analytics and AI (cite these sources in conversations and analytics so the system can answer or generate reports based on the data you provide).
- The “Add Data Source” pop-up window is a unified entry point: whether the data comes from web pages, local files, email integration, or hand-typed text, you can select the type and complete the addition through the same pop-up window.
2. How to open the “Add Data Source” pop-up window
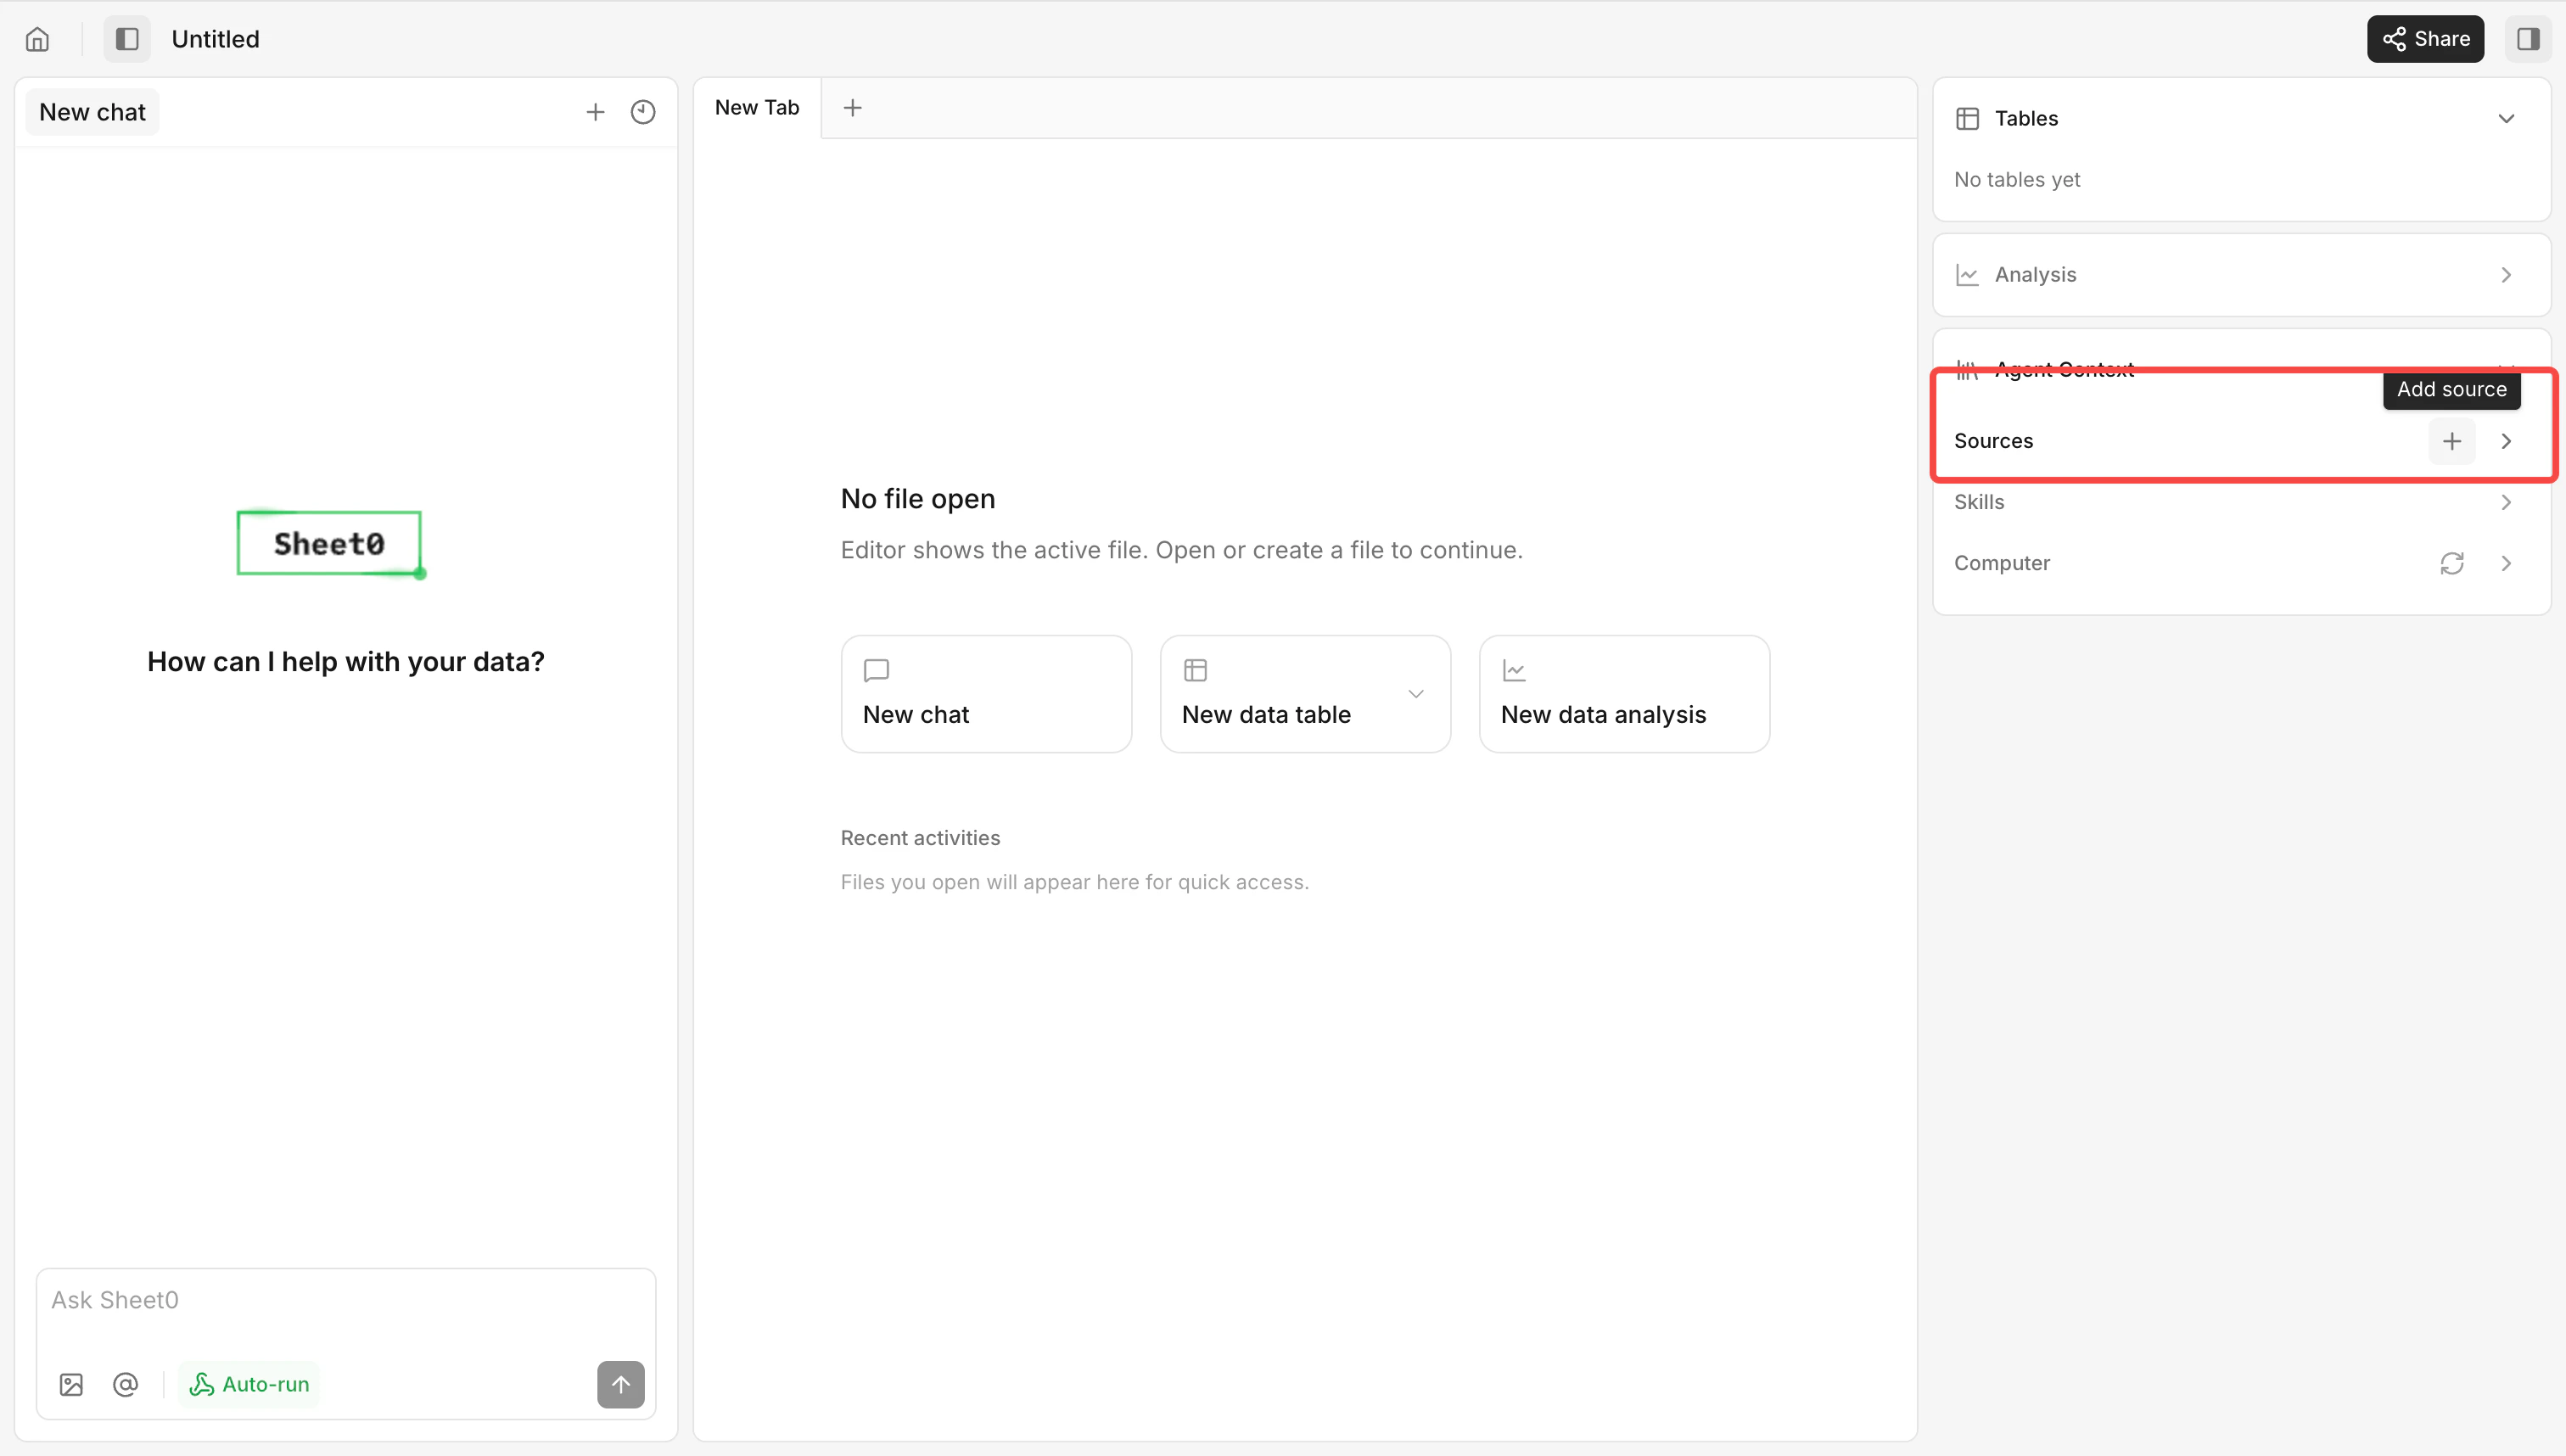
Entry 1: Add from the Sources block (most commonly used)- Find the right work panel on the workbook page. If the left sidebar is collapsed, expand it first; if you can’t see the Agent Context, scroll down.
- Expand the Agent Context card (if not, click the card title).
- Find the Sources block and click the Add button to the right of the block. If there is currently no data source, “No sources yet” will be displayed; if there is a data source, a tree list will be displayed.
- Click to open the Add sources pop-up window.
- Open the Create Table dialog box in the Studio panel through Tables or related entry.
- In the Select Data Source or similar area, if you need to add a data source first, you will see the Add link.
- Clicking on this link will open the same Add sources pop-up window; after adding and closing the pop-up window, you can return to the form creation process to continue selecting the newly added sources.
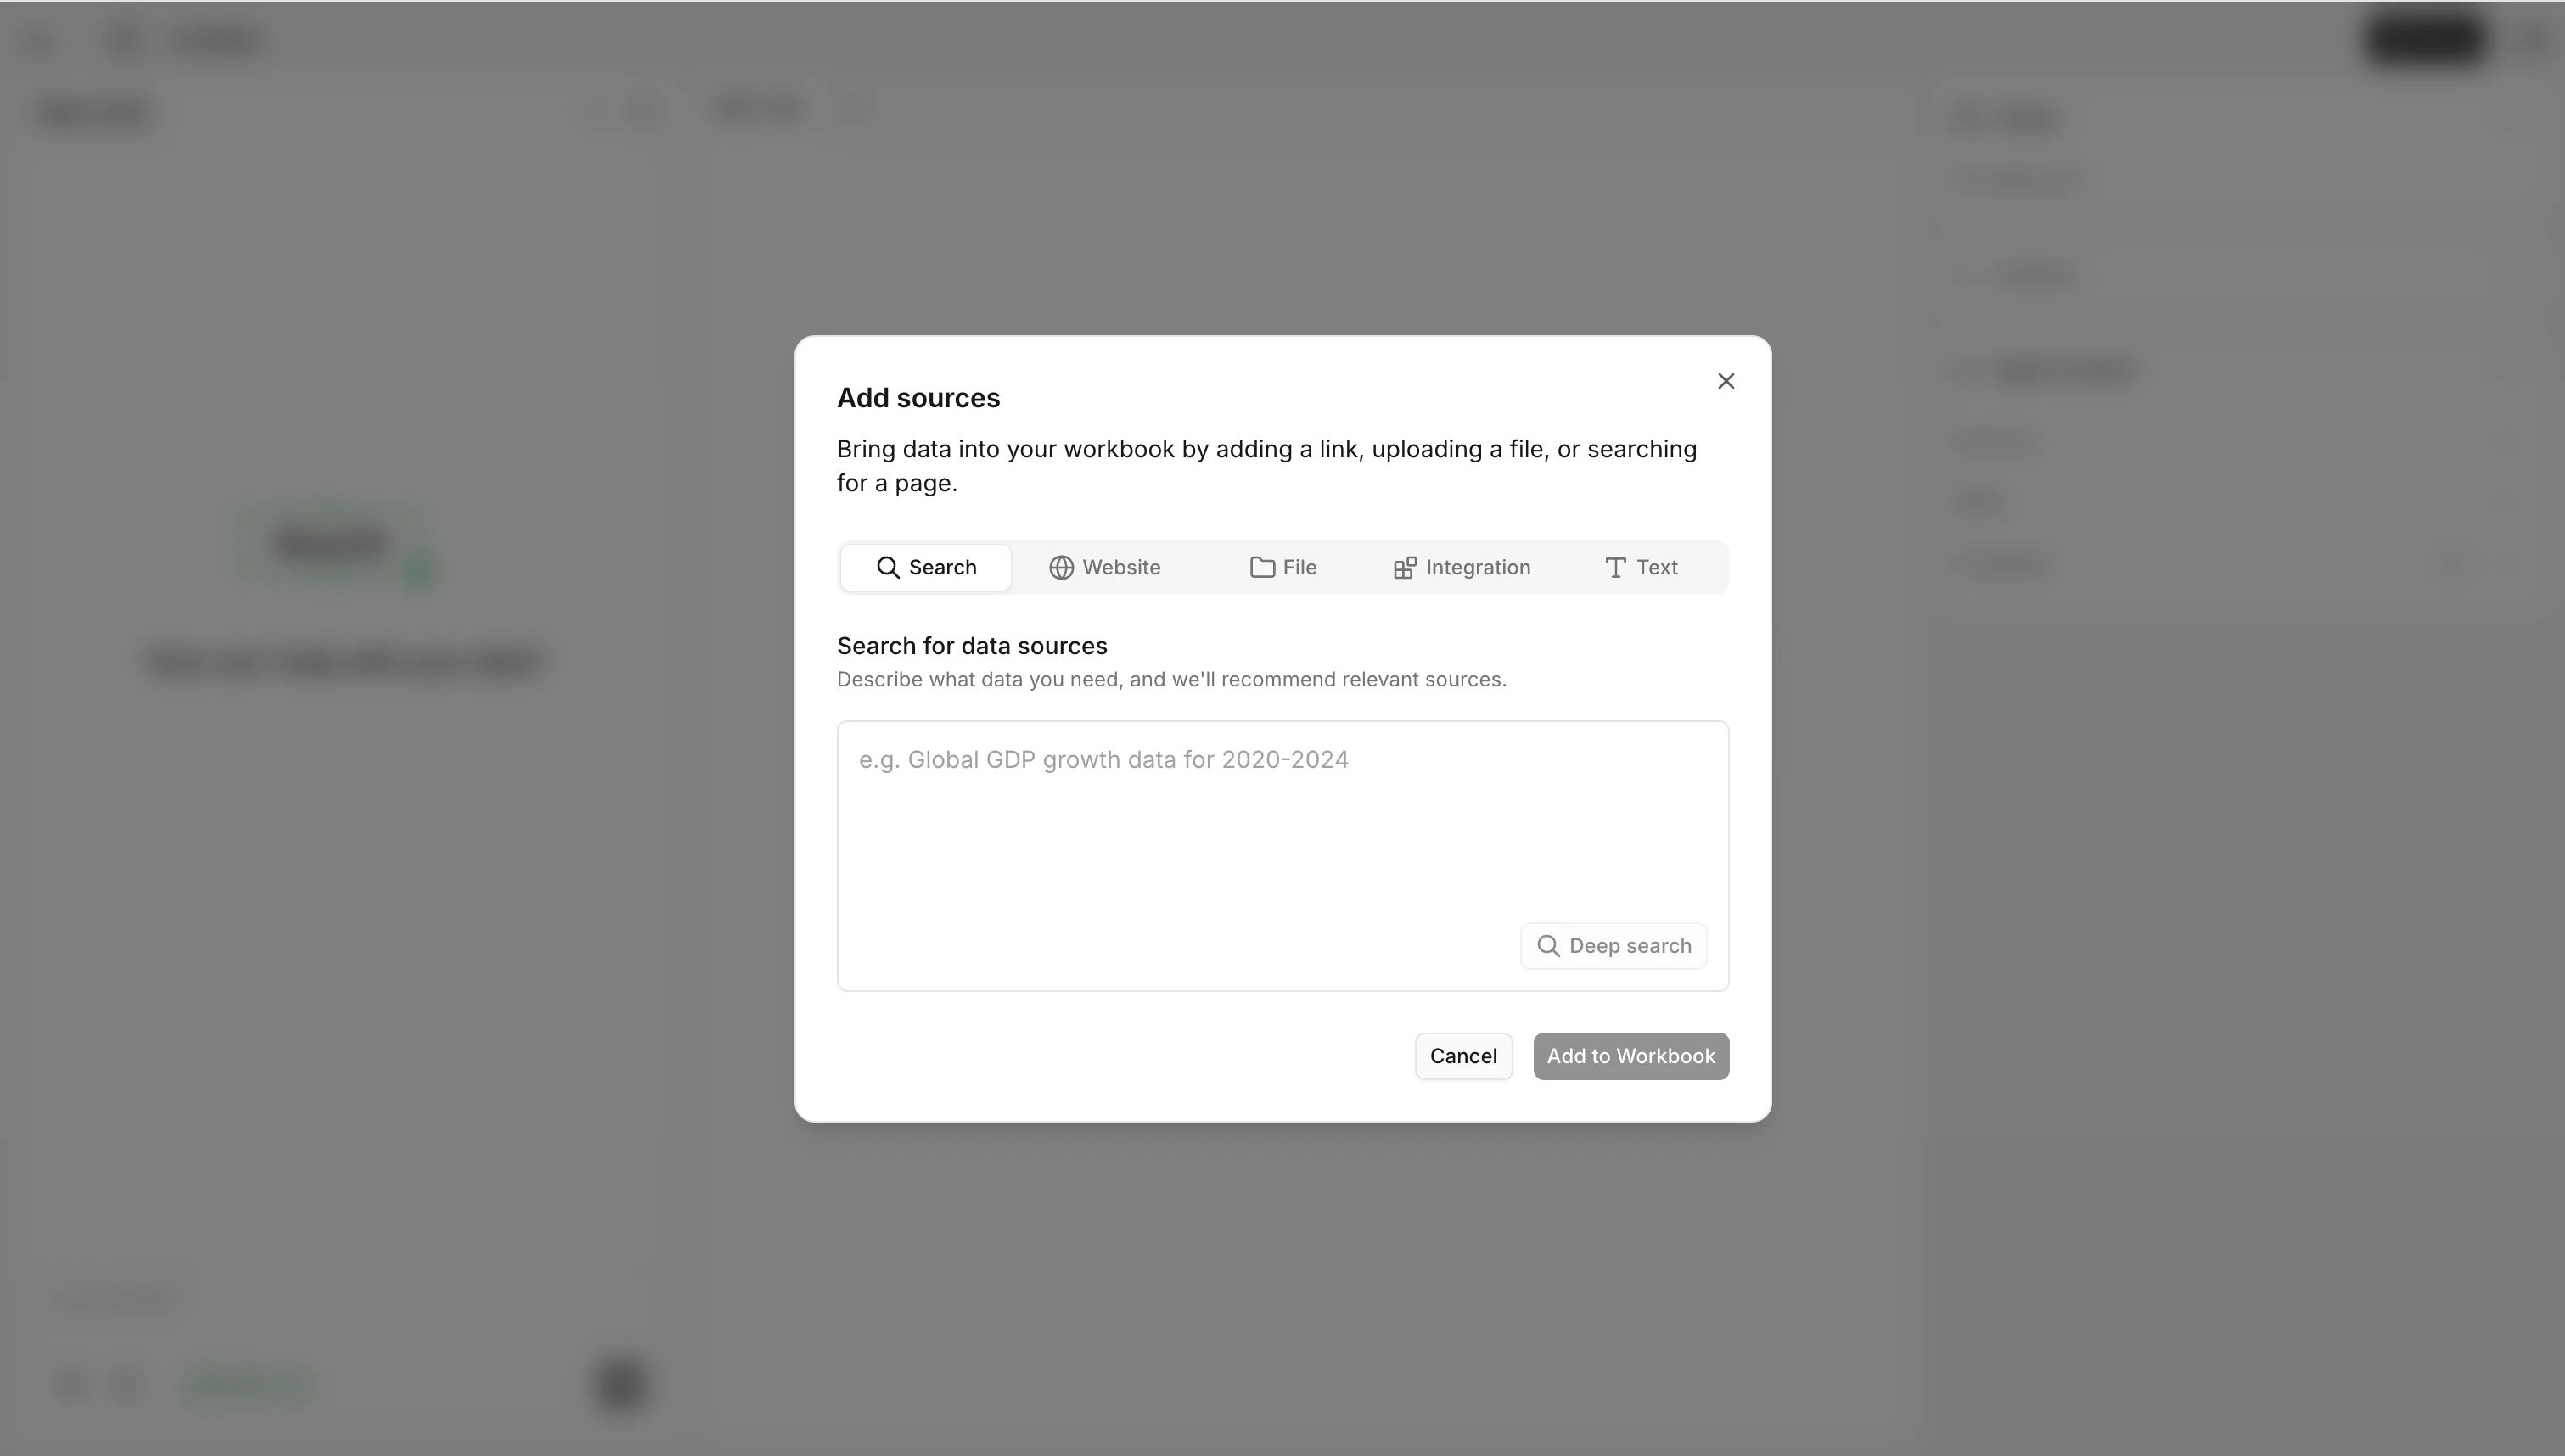
- Top: Title “Add sources”, subtitle “Bring data into your workbook by adding a link, uploading a file, or searching for a page.”; close button ”×” in the upper right.
- Tab bar: Five tabs—Search, Website, File, Integration, Text—click to switch.
- Main content area: Displays the corresponding input area (search box, URL box, upload area, integration list, text box, etc.) according to the currently selected tab.
- List to be added: Below the content area and above the bottom bar; displays entries “About to be added to the workbook” grouped by type; you can add a note or remove each one.
- Bottom bar: Left shows “X source(s) will be added”; right shows Cancel and Add to Workbook; upload/processing progress may be displayed during submission.
3. Overview and applicable scenarios of five addition methods
| Method | Use case | What you need | Result |
|---|---|---|---|
| Search | You don’t know the exact URL but can describe what data you need | Describe the data type or topic in one sentence (e.g. time range, metric name, company name) | The system suggests several web pages; you select them and they are added as “URL” type data sources |
| Website | You have a specific webpage URL and want to extract data from it | One or more publicly accessible URLs | Each URL becomes one “URL” type data source |
| File | The data is in a file on your computer | File(s) in supported format (PDF, CSV, Excel, images, Markdown, etc.); total ≤ 128MB | A single file or an entire folder (counts as one “file” or “folder” source) |
| Integration | You want data from connected apps (e.g. email) | You have connected Gmail, Outlook, etc. in Settings | The selected account appears as an “Integration” type data source in this workbook’s Sources |
| Text | You only have a block of plain text, with no links or files | Text you can paste or type directly | Each block of text becomes one “Text” type data source with a timestamp title |
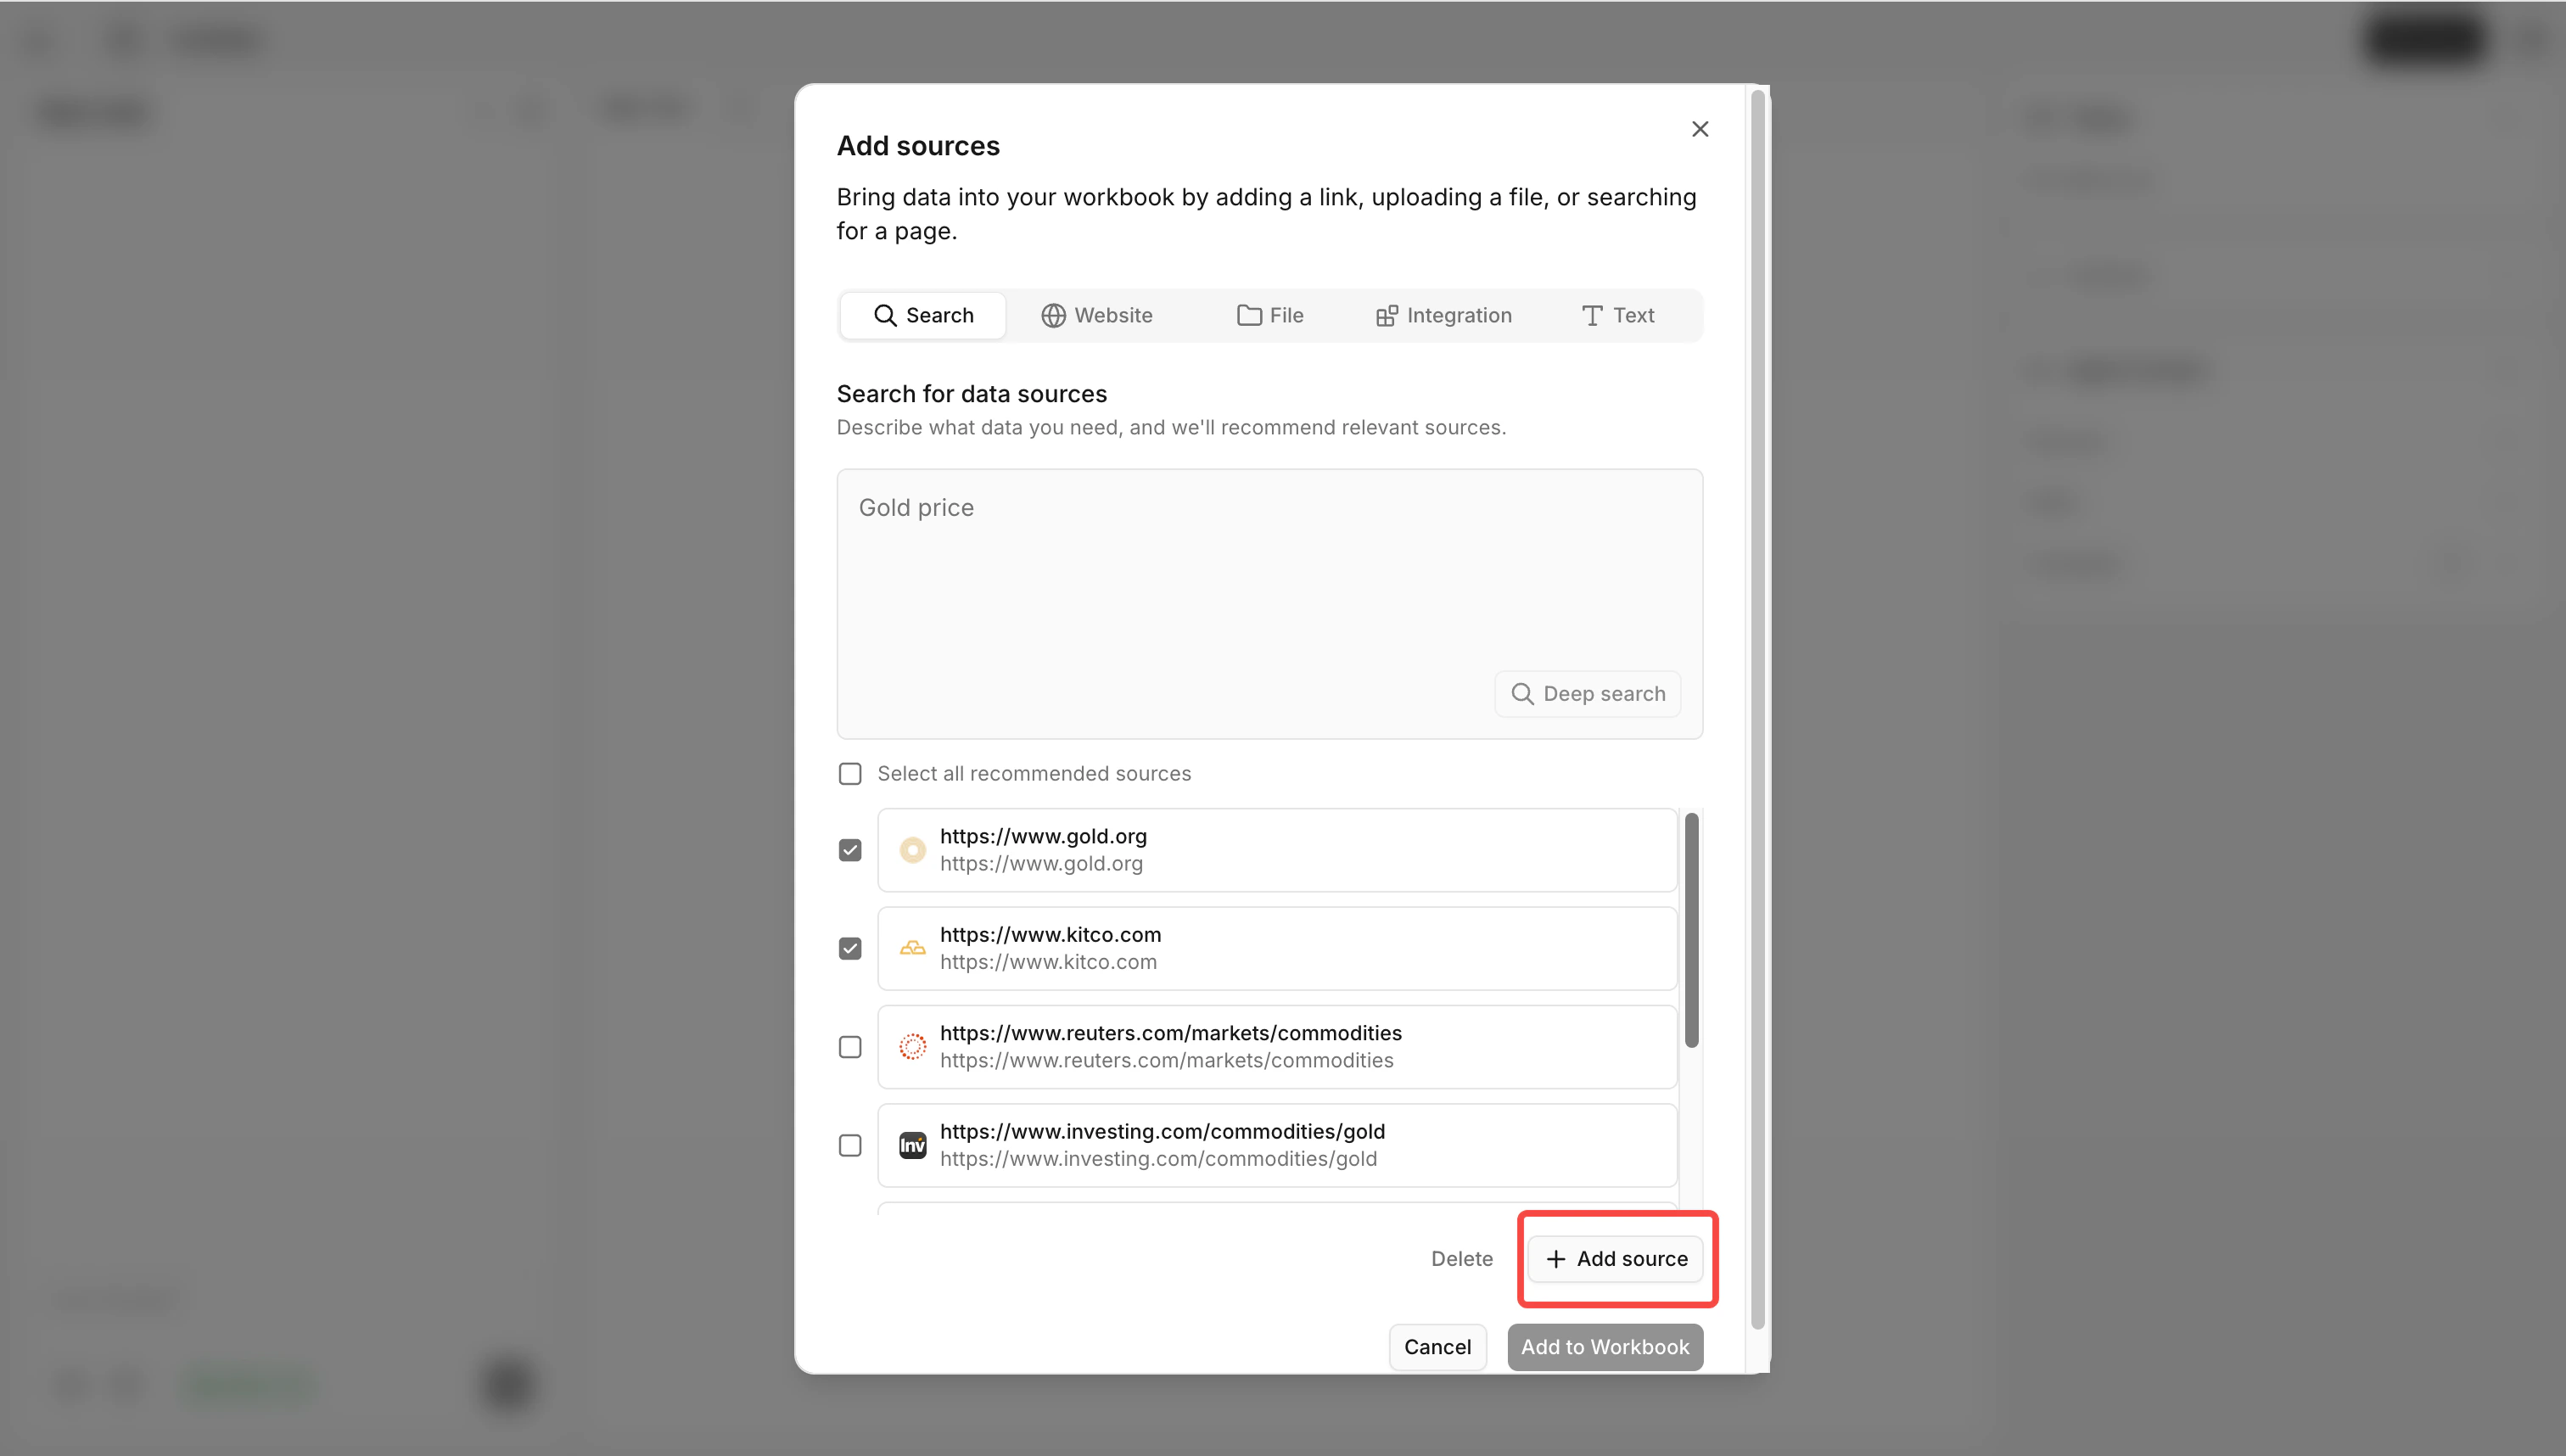
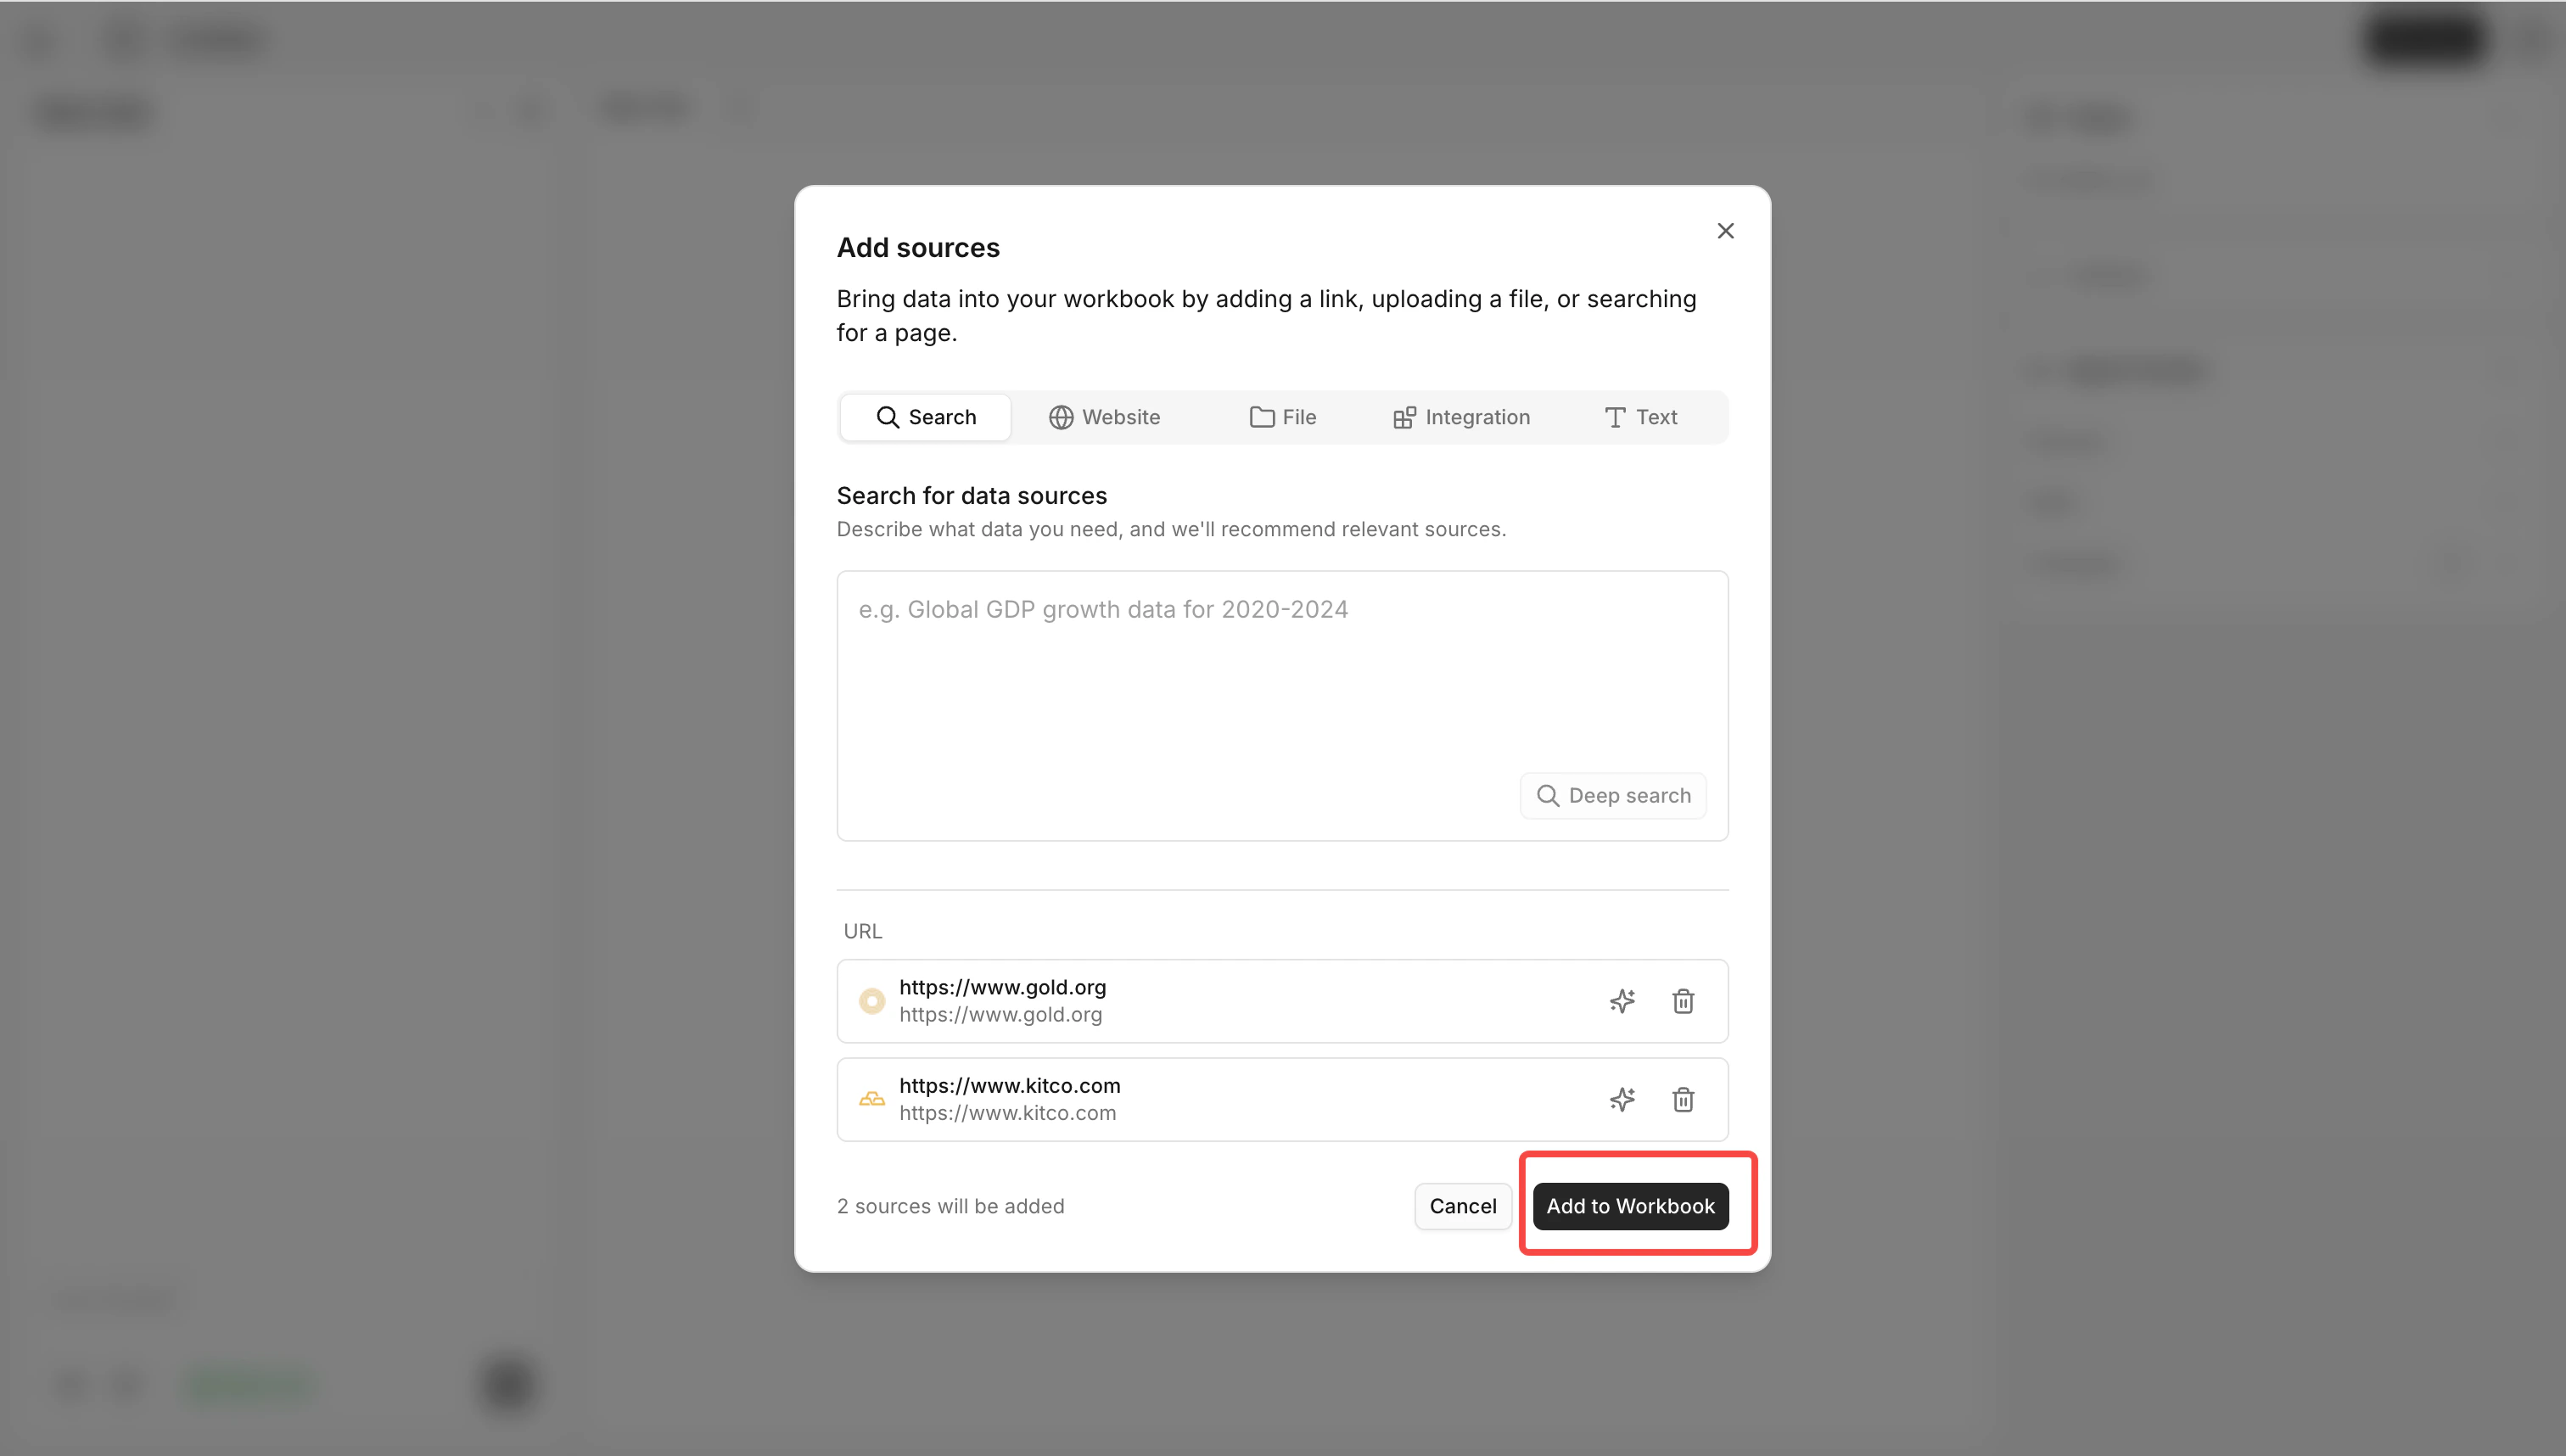
4. Search (Search Data Source) — Detailed steps
- When to use: You are not sure which website to go to to find data, but you can describe “what is needed” (e.g. “global GDP growth rate from 2020 to 2024”, “a company’s 2023 financial report”).
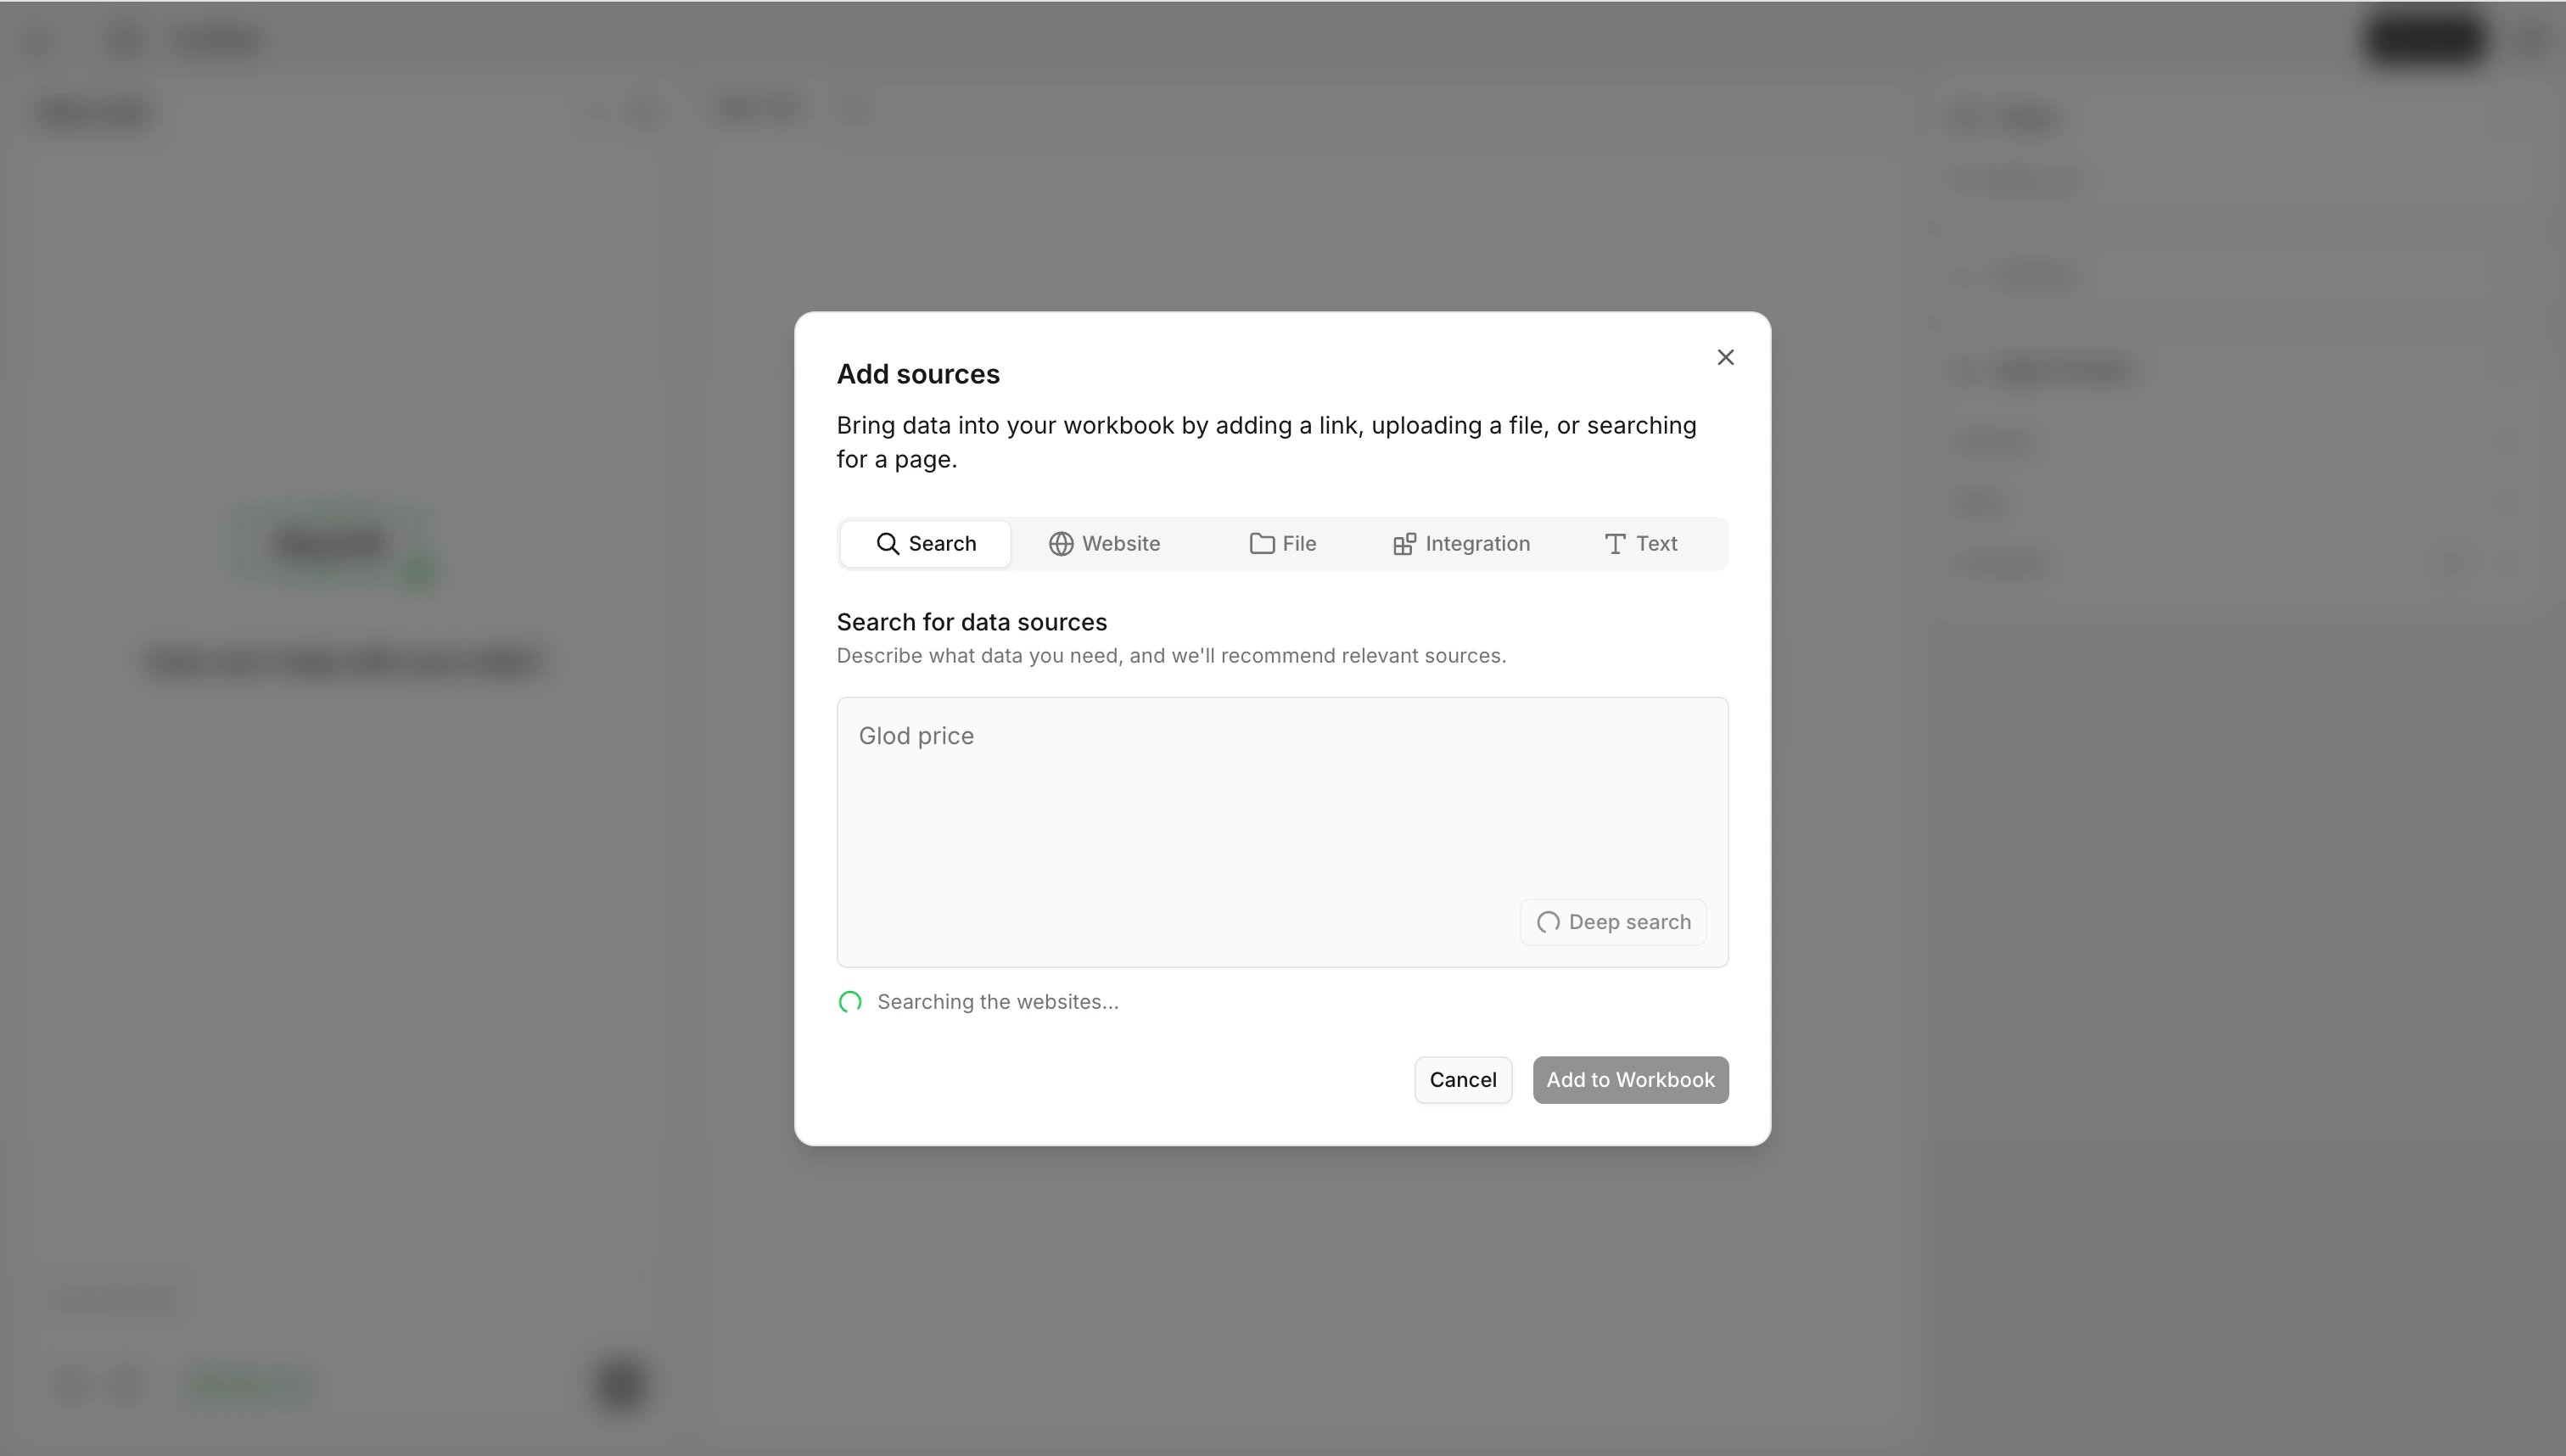
- Steps: Select Search tab → Enter search description (at least 3 characters, no more than 1000) → Click Deep search → View and select results → Click Add source → Click Add to Workbook.
- Search may take a few seconds to about 30 seconds. If it times out, try again with a modified description.
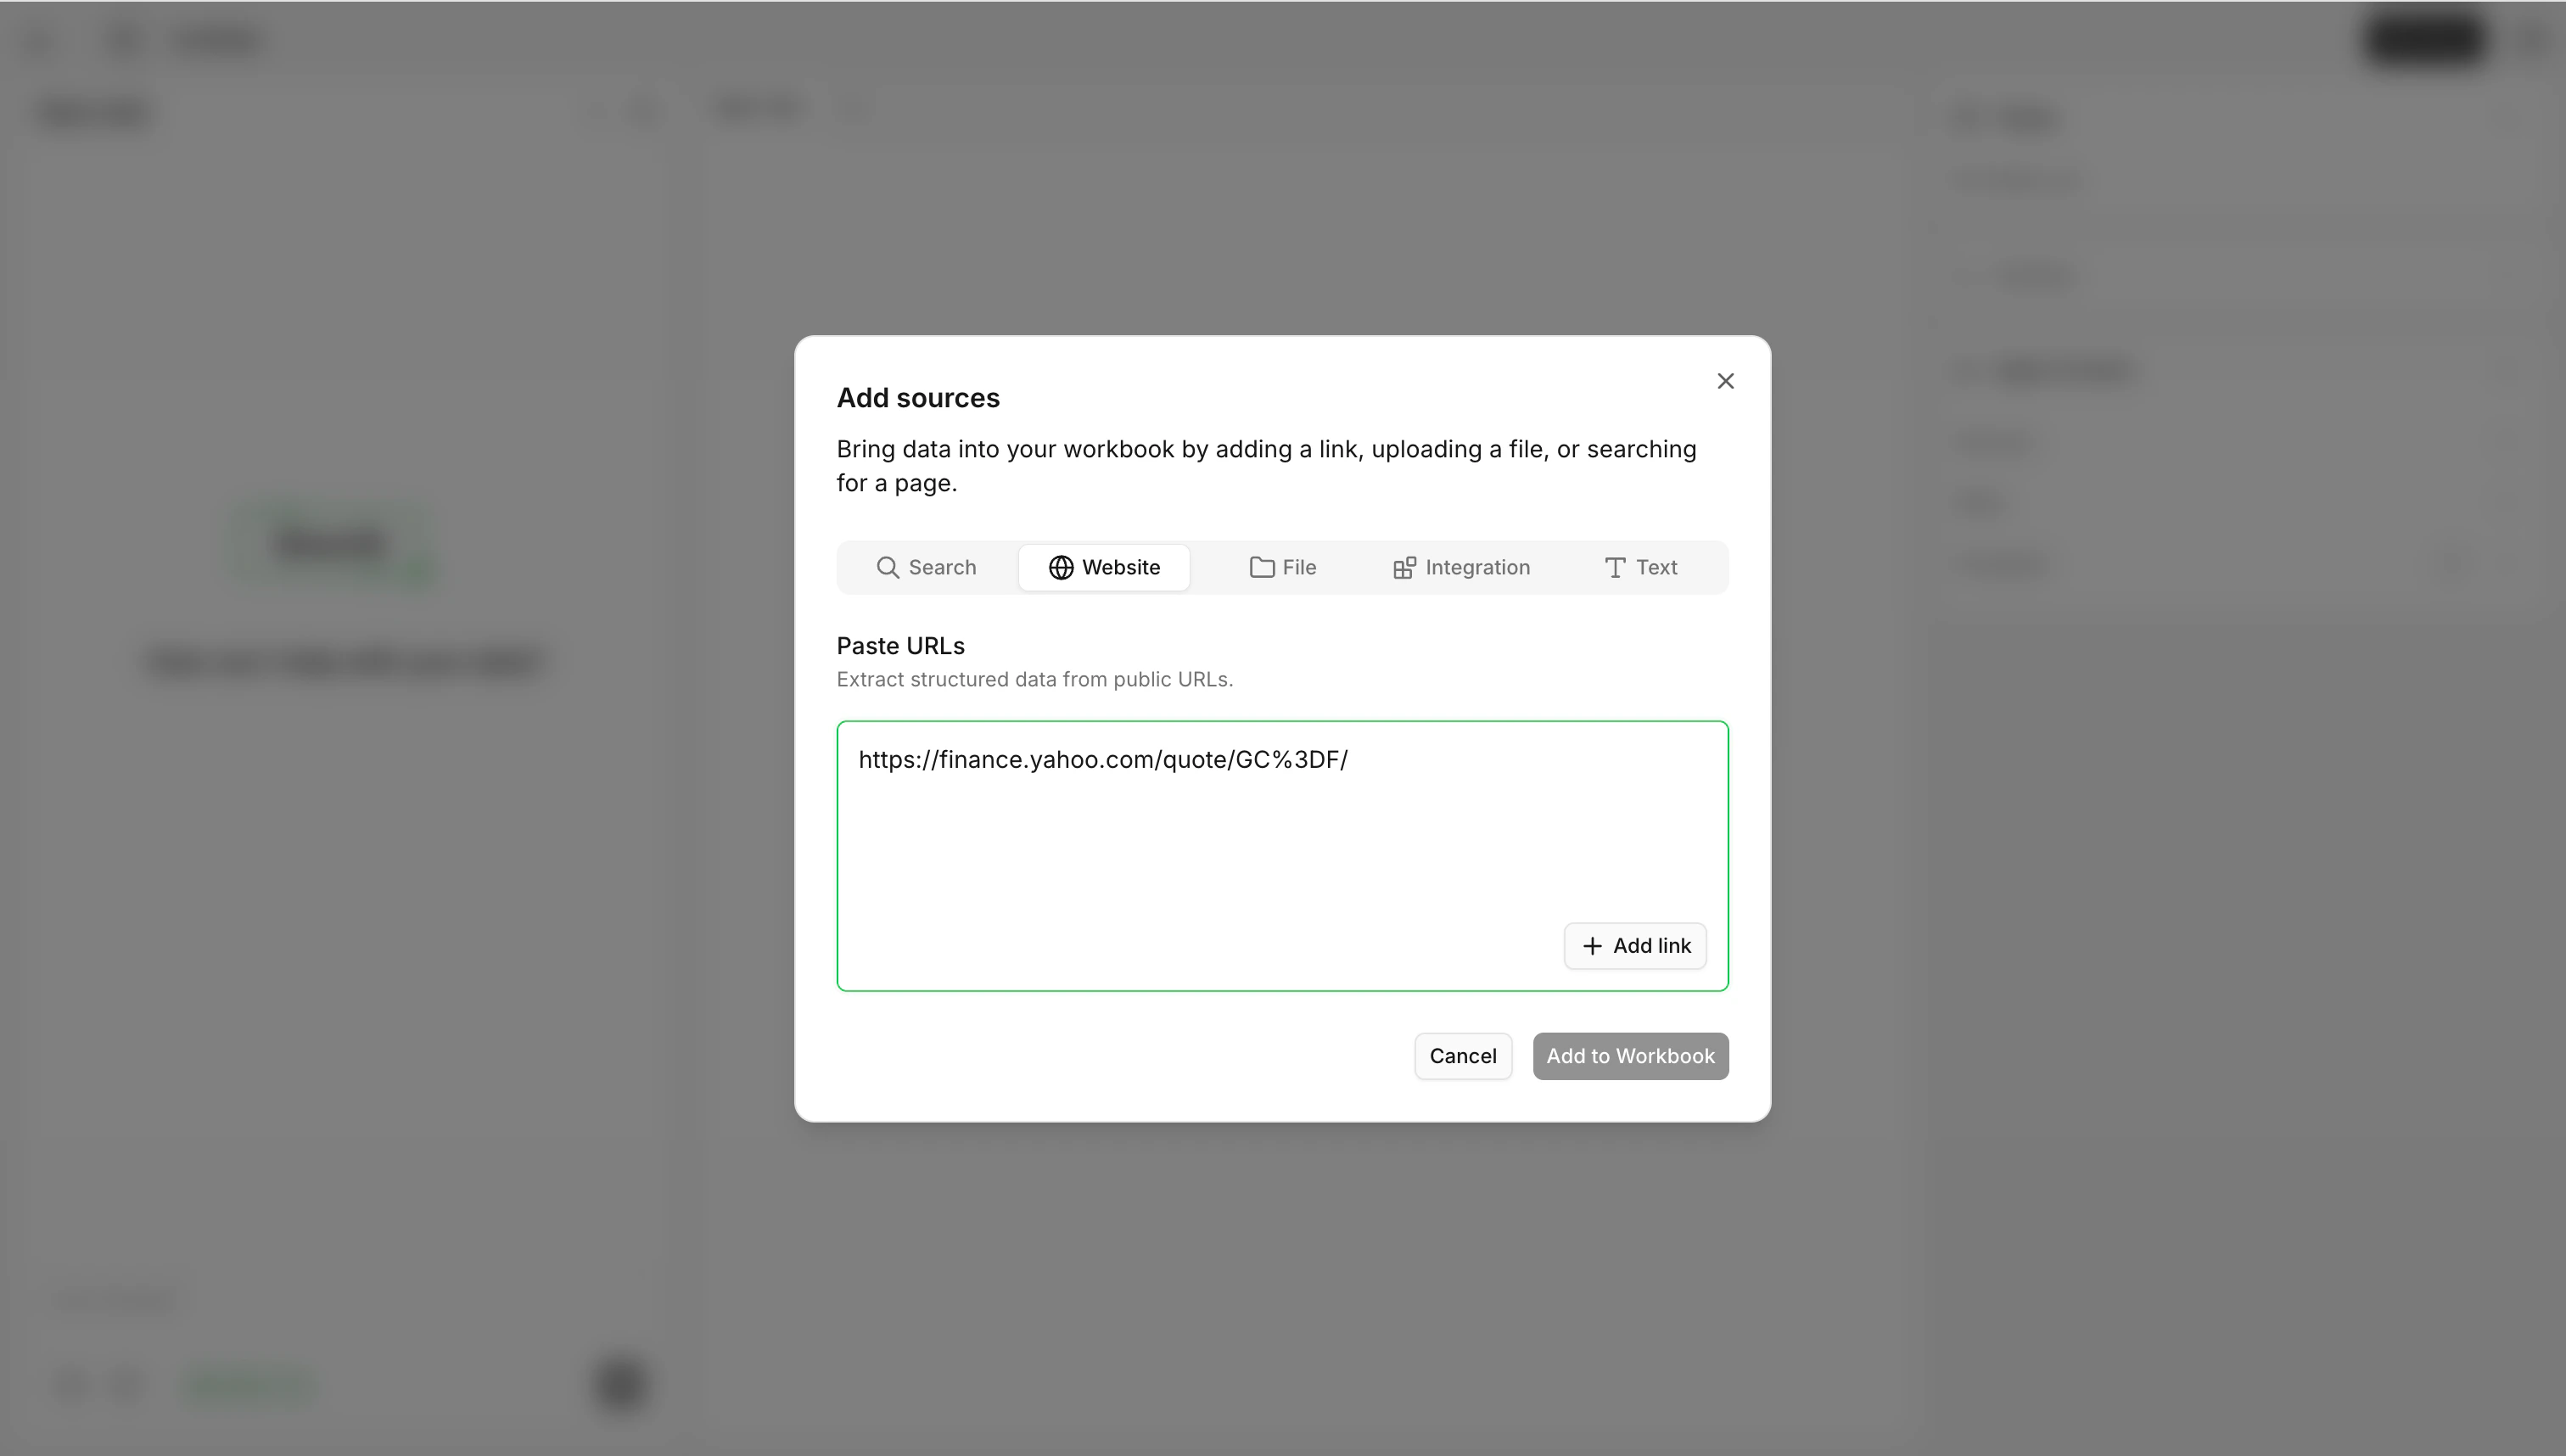
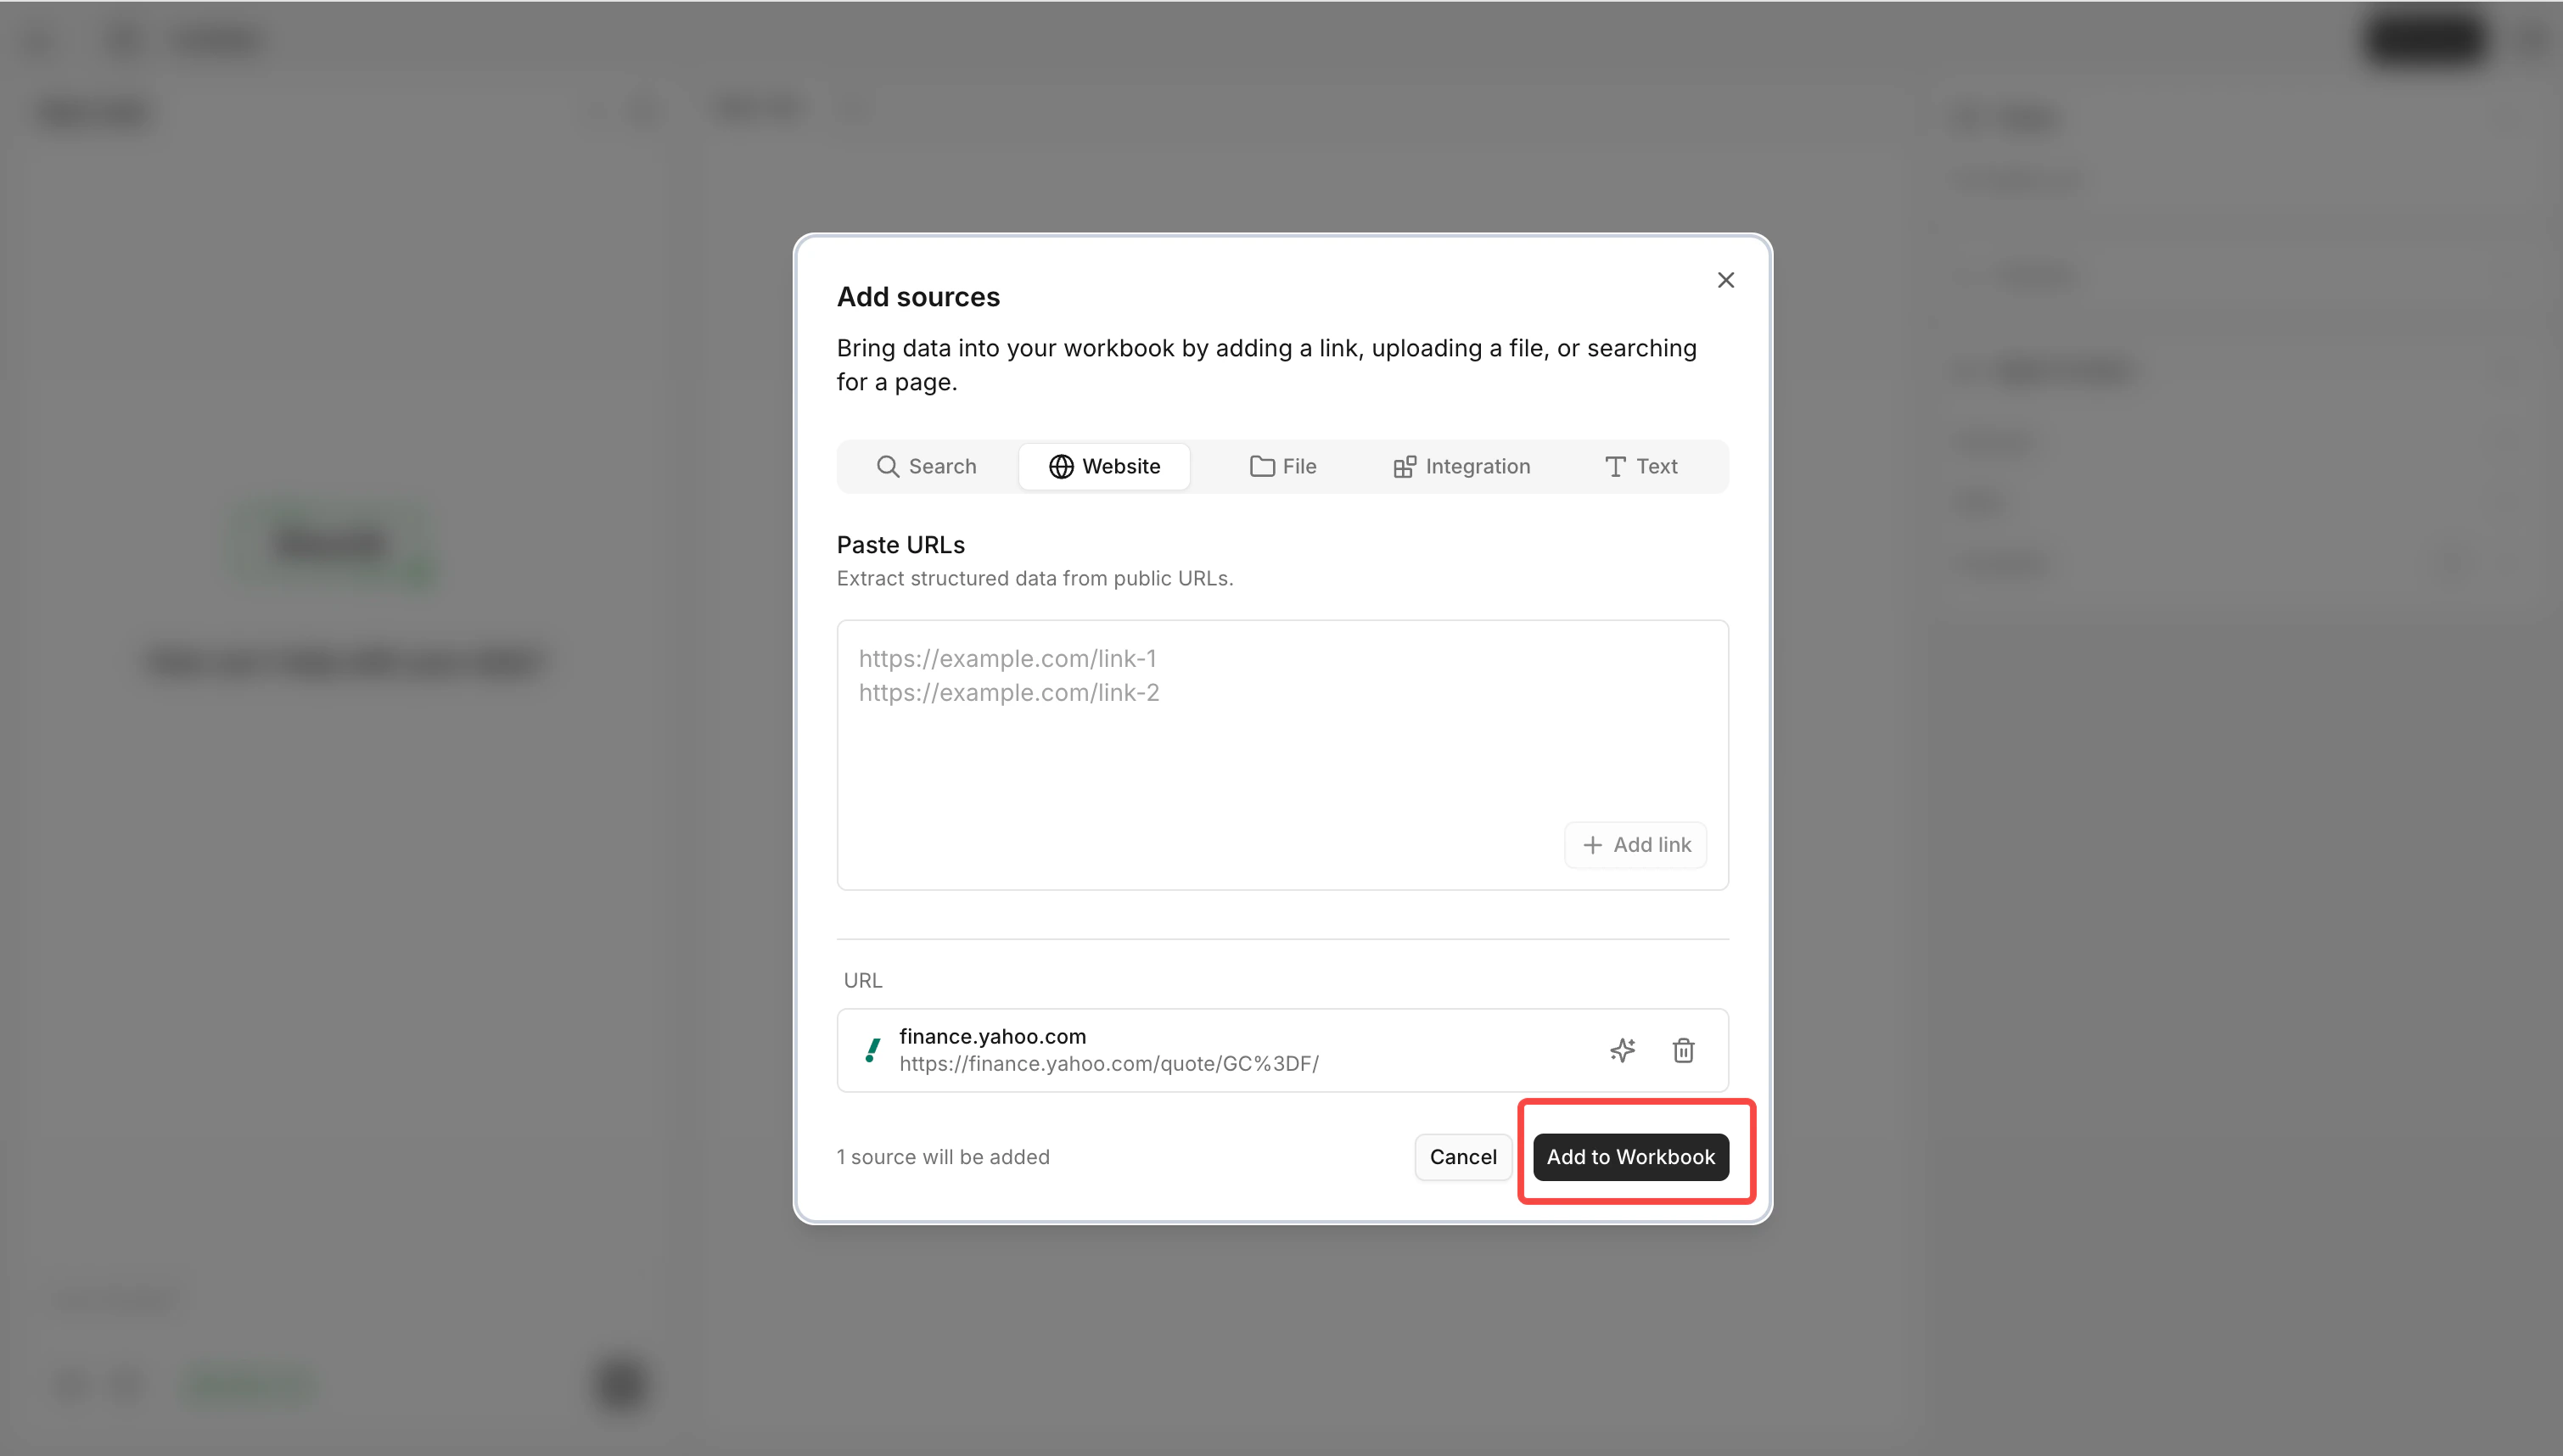
5. Website (Paste URL) — Detailed steps
- When to use: You already have explicit web addresses (one or more) from which you want to extract structured data.
- Steps: Select Website tab → Paste or enter URLs (one URL per line) → Click + Add link → Click Add to Workbook.
- Invalid URL will prompt “Invalid URL, please check again”. Duplicate URLs may prompt “Already added:…”.
6. File (Upload files/folders) — Detailed steps
- When to use: The data is already on your computer in file form (report PDF, table Excel, data CSV, images, Markdown notes, etc.), or you want to add all files in an entire folder at once.
- Steps: Select File tab → Choose files / Select folders / Drag and drop → Adjust in the to-add list if needed → Click Add to Workbook.
- Folder retains the internal structure of the relative path. If the folder contains subfolders, supported-format files in subfolders are also included.
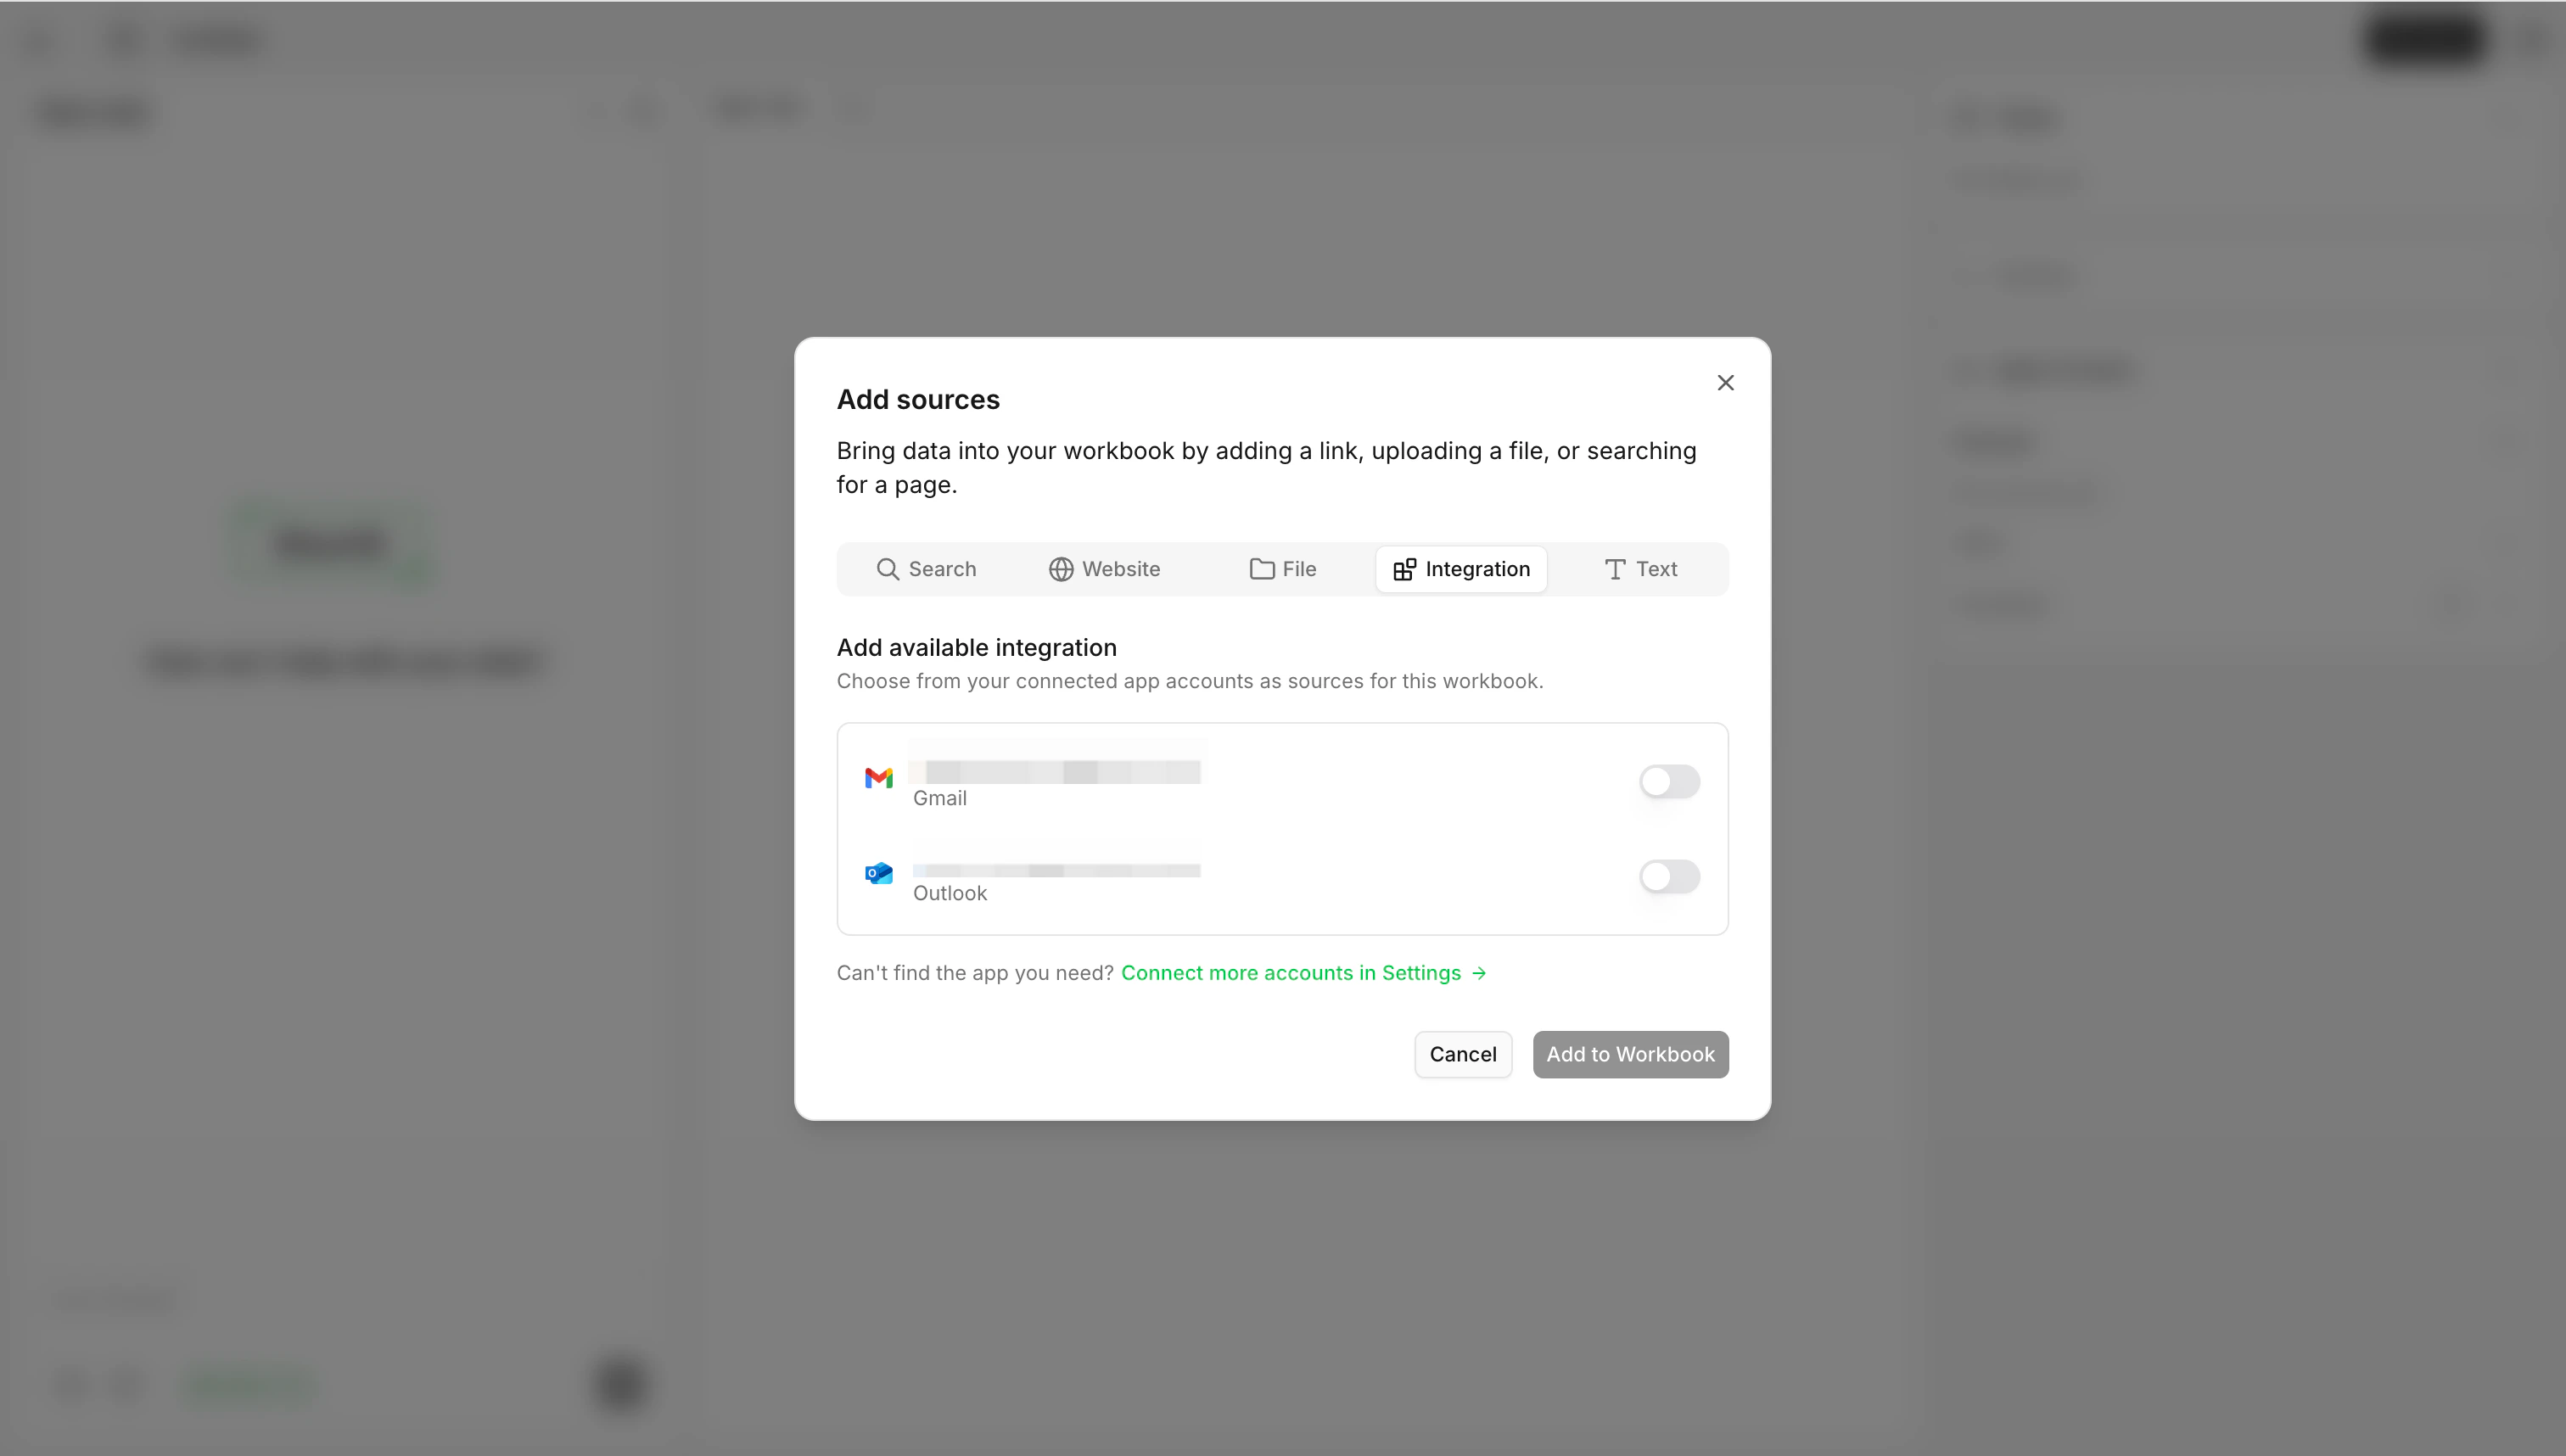
7. Integration (Connected Apps) — Detailed steps
- When to use: You have already connected an application account (e.g. Gmail, Outlook) in Settings and want to use it as a data source for this workbook.
- Precondition: First go to Settings → Integrations/Accounts to complete “Connect Accounts”.
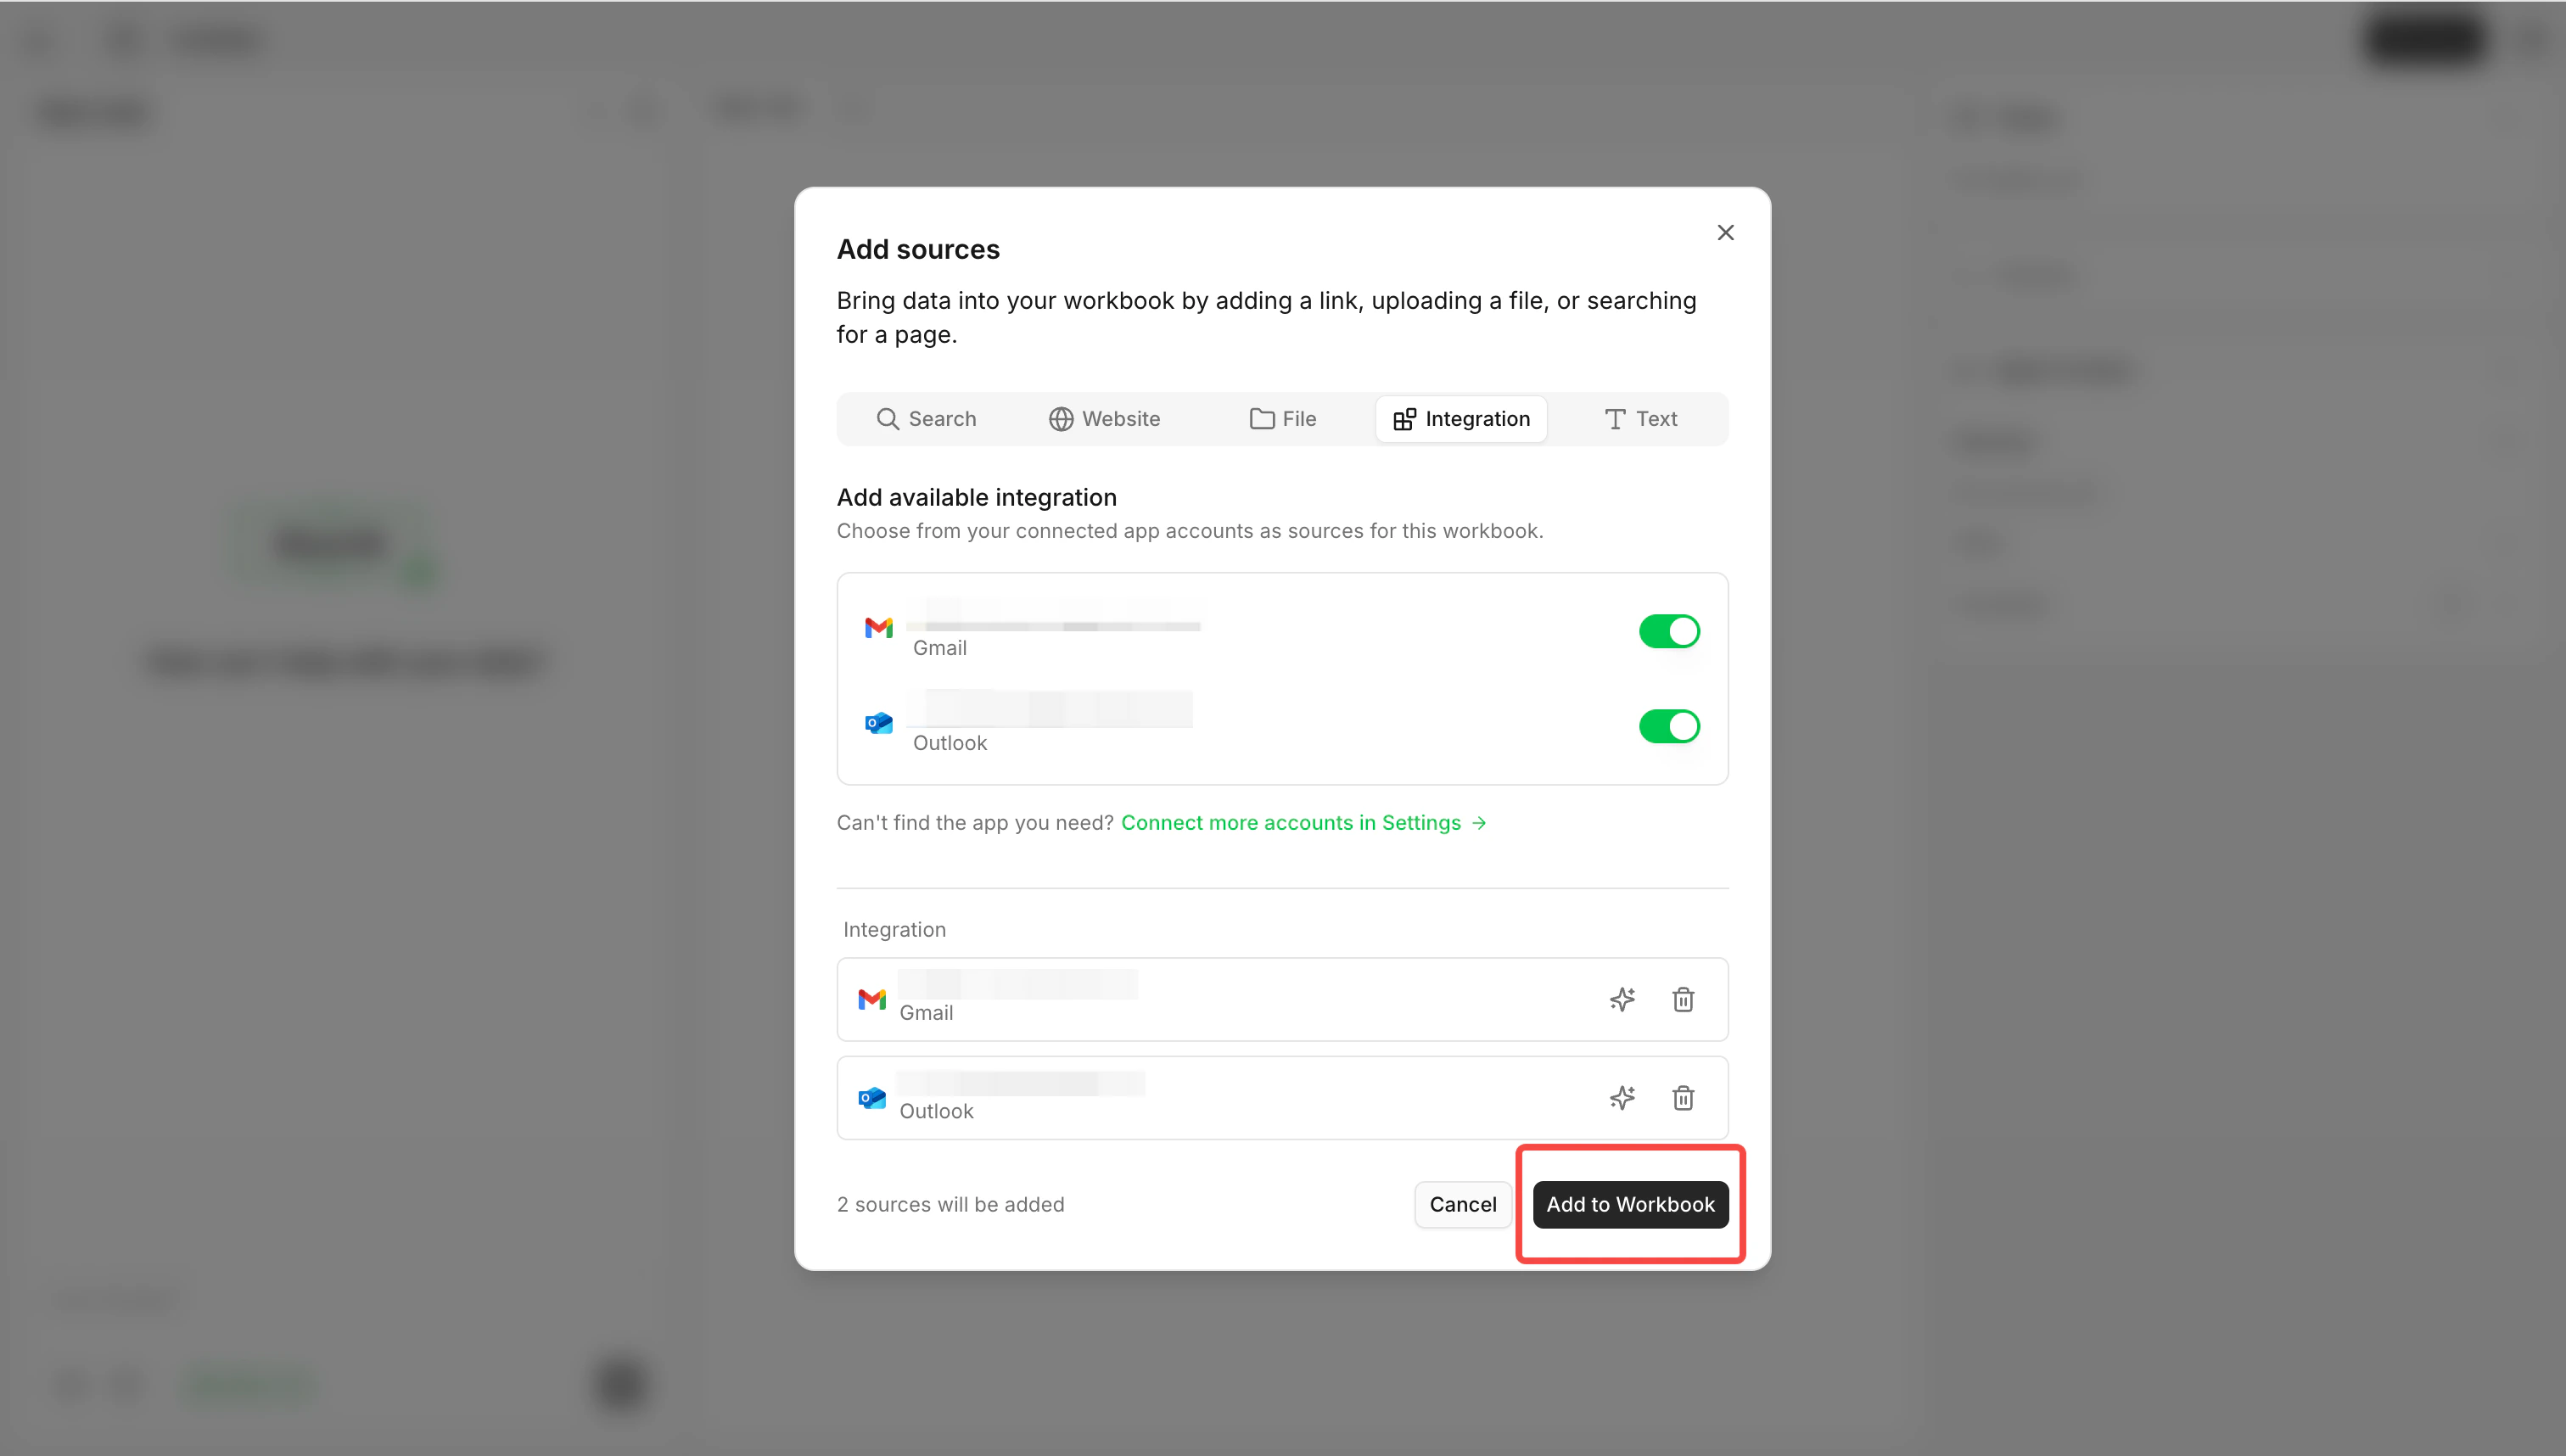
- Steps: Select Integration tab → View account list → Turn on the switch for the account(s) to add → Click Add to Workbook.
8. Text (Paste or Enter Text) — Detailed steps
- When to use: Data is just a piece of pure text (no website or ready-made file), e.g. meeting notes, excerpts, lists.
- Steps: Select Text tab → Type or paste content → Click + Add text (can add multiple) → Click Add to Workbook.
- Each piece of text is displayed as “Text note · date and time” in the workbook Sources.
9. List to be added and bottom bar (general behavior)
- List to be added: Temporary; only Add to Workbook saves to the workbook. Closing the pop-up clears the current to-add list. Grouped by type (URL, File, Folder, Integration, Text). Each item can have a note (annotation) or be removed.
- Bottom bar: “X source(s) will be added” on the left; Cancel and Add to Workbook on the right. Add to Workbook is disabled when the list is empty or when submitting.
10. What happens after submission?
- URL → “URL” type in Sources. File/Folder → uploaded and displayed as “File” or “Folder”. Integration → selected account as “Integration”. Text → saved as “Text” type with timestamp in title.
- If you added a note, it is saved with the item. The left Sources list refreshes; new sources appear under the corresponding group by type.
11. Scene quick check and combination use
| Your situation | Recommended method | Brief steps |
|---|---|---|
| Don’t know the URL, only describe what data you need | Search | Enter description → Deep search → Check results → Add source → Add to Workbook |
| Have specific webpage link(s) (one or more) | Website | One URL per line → + Add link → Add to Workbook |
| Data is in single/multiple files on your computer | File | Choose files or drag & drop files → Add to Workbook |
| Data is in an entire folder on your computer | File | Select folders or drag & drop folder → Add to Workbook |
| Use connected accounts such as Gmail / Outlook | Integration | Turn on the corresponding account switch → Add to Workbook |
| Only have one or more pieces of plain text | Text | Paste / enter text → + Add text (multiple times allowed) → Add to Workbook |
12. Common problems and solutions
| Problem | Solution |
|---|---|
| ”Invalid URL, please check again” | Check that each line has a complete URL (including http:// or https://); remove extra spaces or line breaks before clicking + Add link. |
| ”Already added:…” | The URL, file name/folder name, or text content already exists in the workbook or the list to be added. No need to add again. |
| Total file size exceeds 128MB limit | Reduce the number of files or total size; can be added in batches. |
| ”No results found. Try a different query.” (Search) | Change keywords, relax or narrow the description, then click Deep search again. |
| ”Request timeout, please try again” (Search) | Search did not return within ~30 seconds. Shorten the description or try again later. |
| Integration list is empty | Connect the corresponding application account in Settings first; then refresh or reopen the Add sources pop-up. |
| ”No supported files found in the folder” | The folder contains no currently supported extension files. Confirm the folder has supported formats (PDF, CSV, Excel, images, Markdown, etc.). |
| ”Add to Workbook” is gray | The current list to be added is empty. Complete at least one addition in a tab first. |
3-3 Core Concept — Sheet0 Skills
1. What are Skills?
- Overview: Skills are reusable capabilities used to extend the functionality of agents. They are like specialized “instructions” that teach Sheet0 how to consistently handle specific tasks. Example: The collect-reviews skill explicitly tells Sheet0 what data to extract from the product page, in what format, and how to ensure quality.
- Why use Skills? Once set up, you can directly reuse similar tasks without repeating the instructions—faster and save more credits.
2. Your first Skill: 3 steps
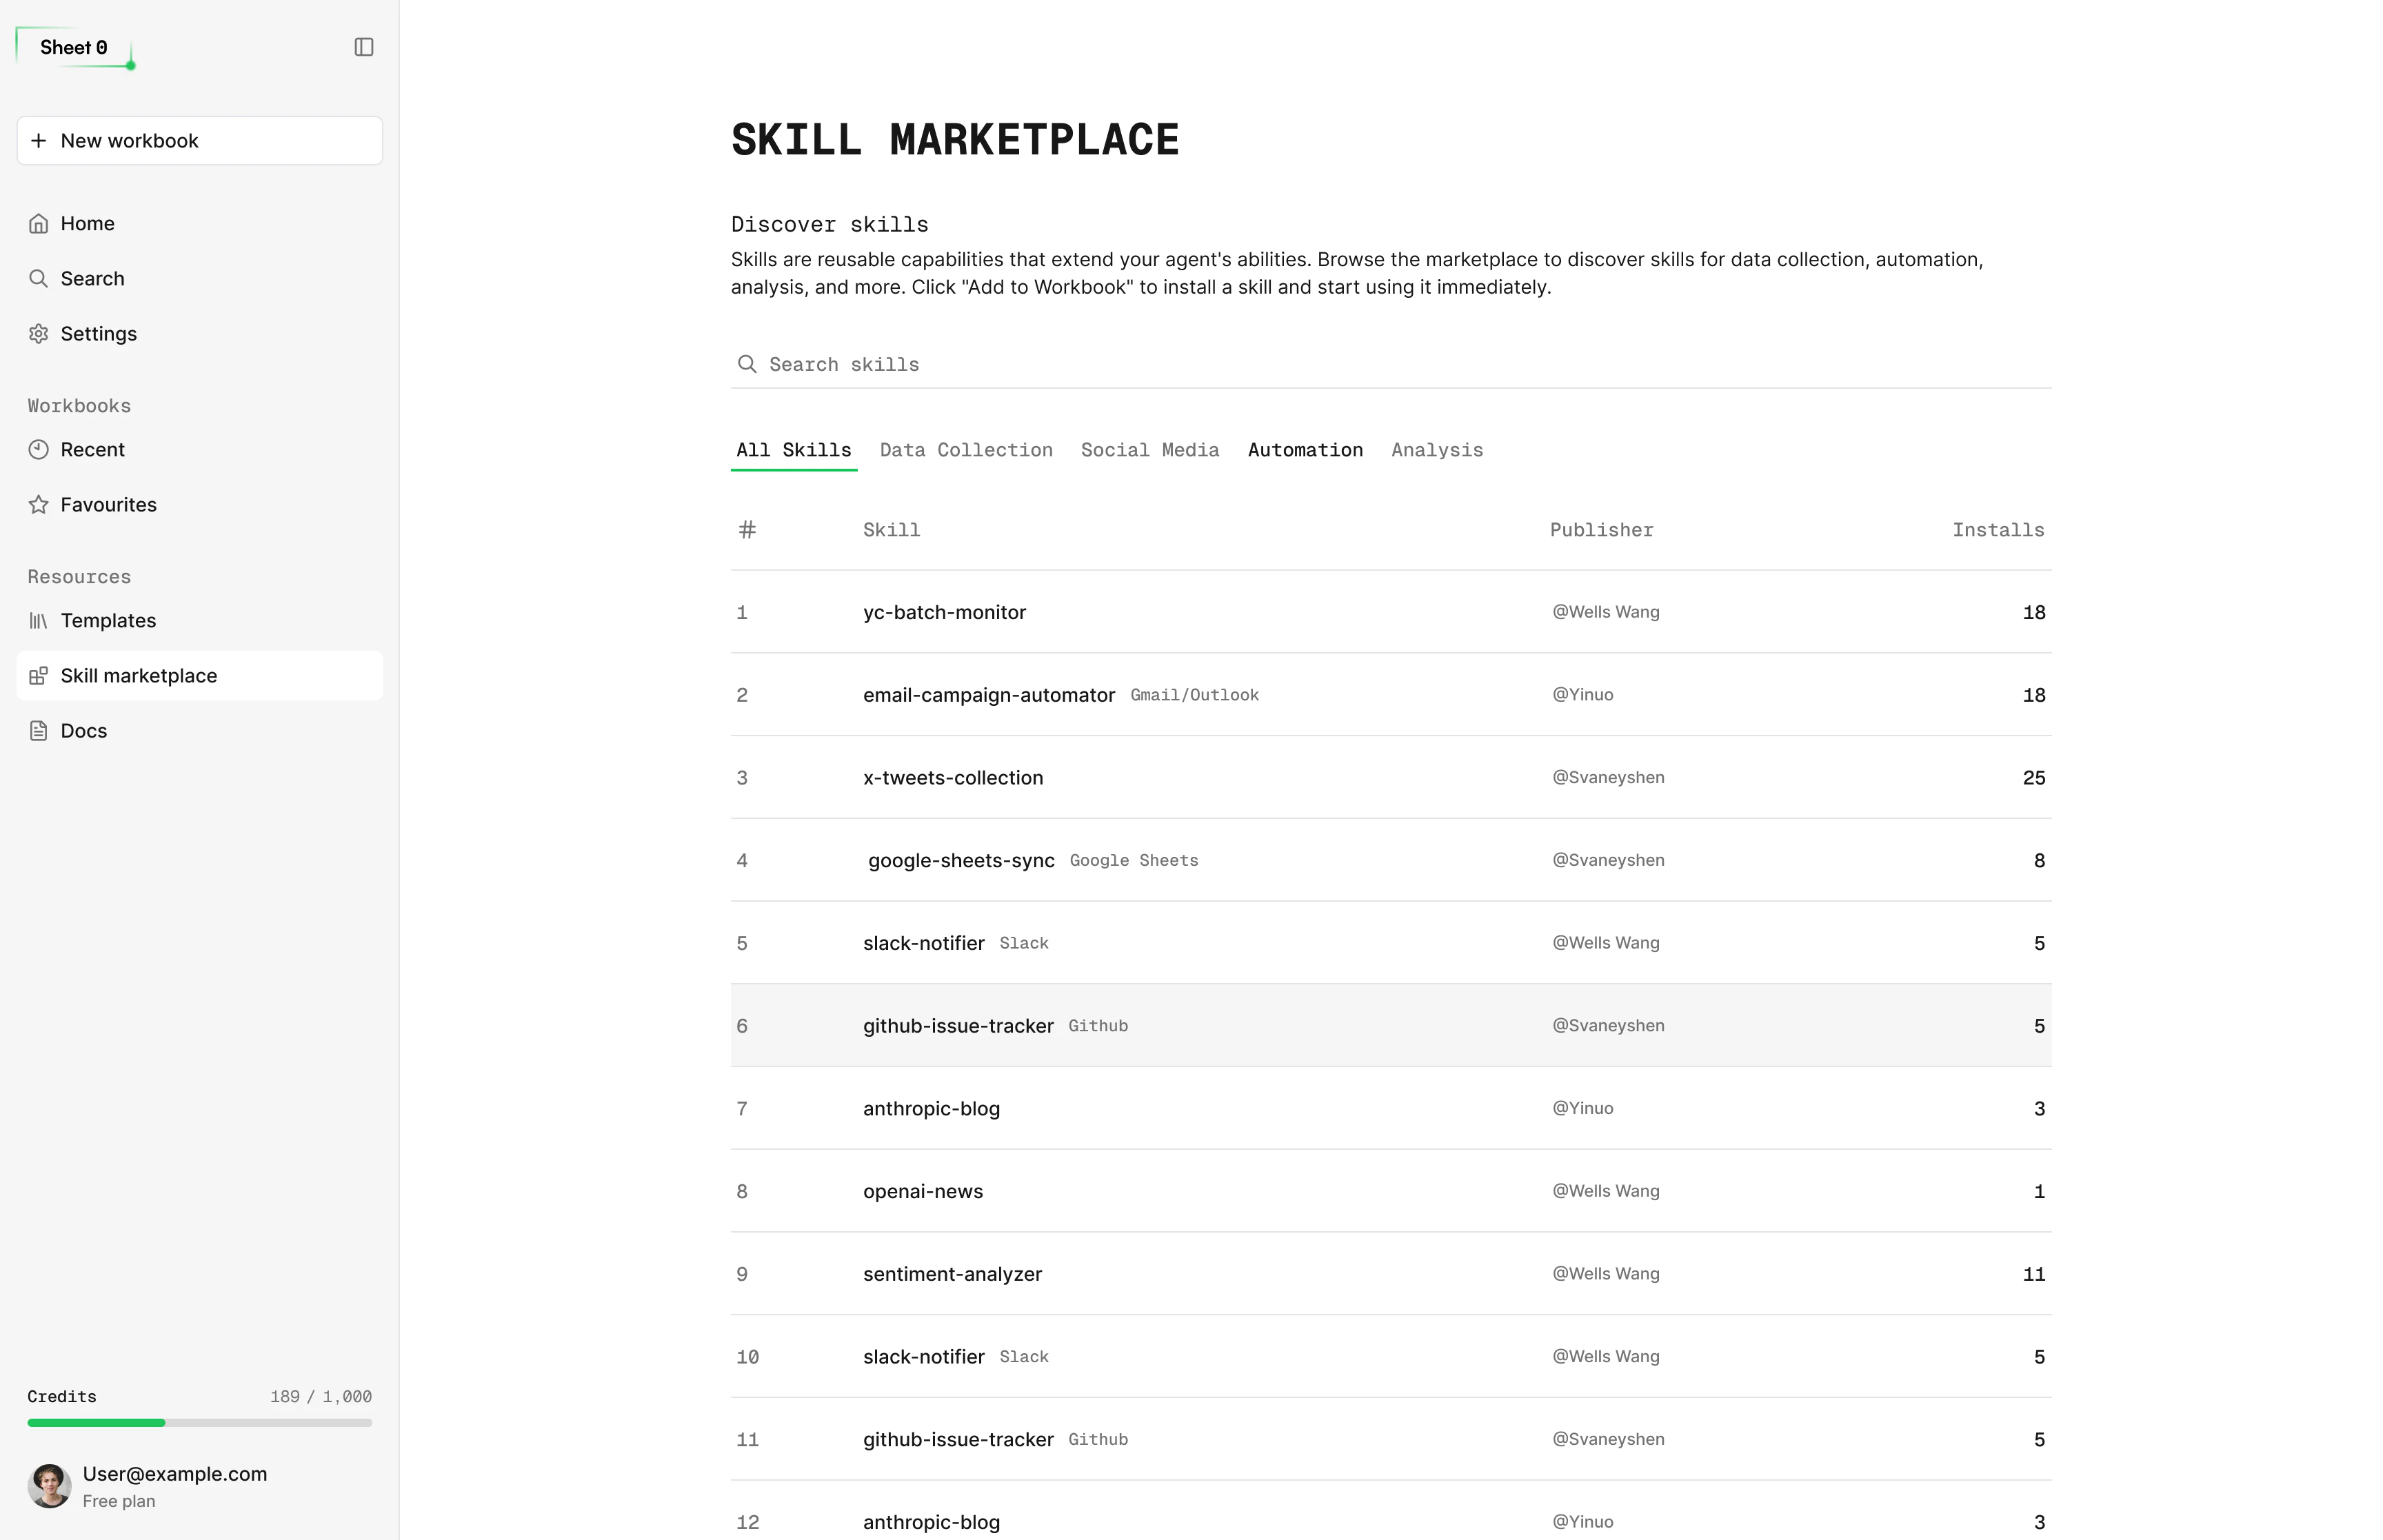
- Open Skill Marketplace — Click on Skill Marketplace in the sidebar.
- Find a skill — Browse categories or search (e.g.
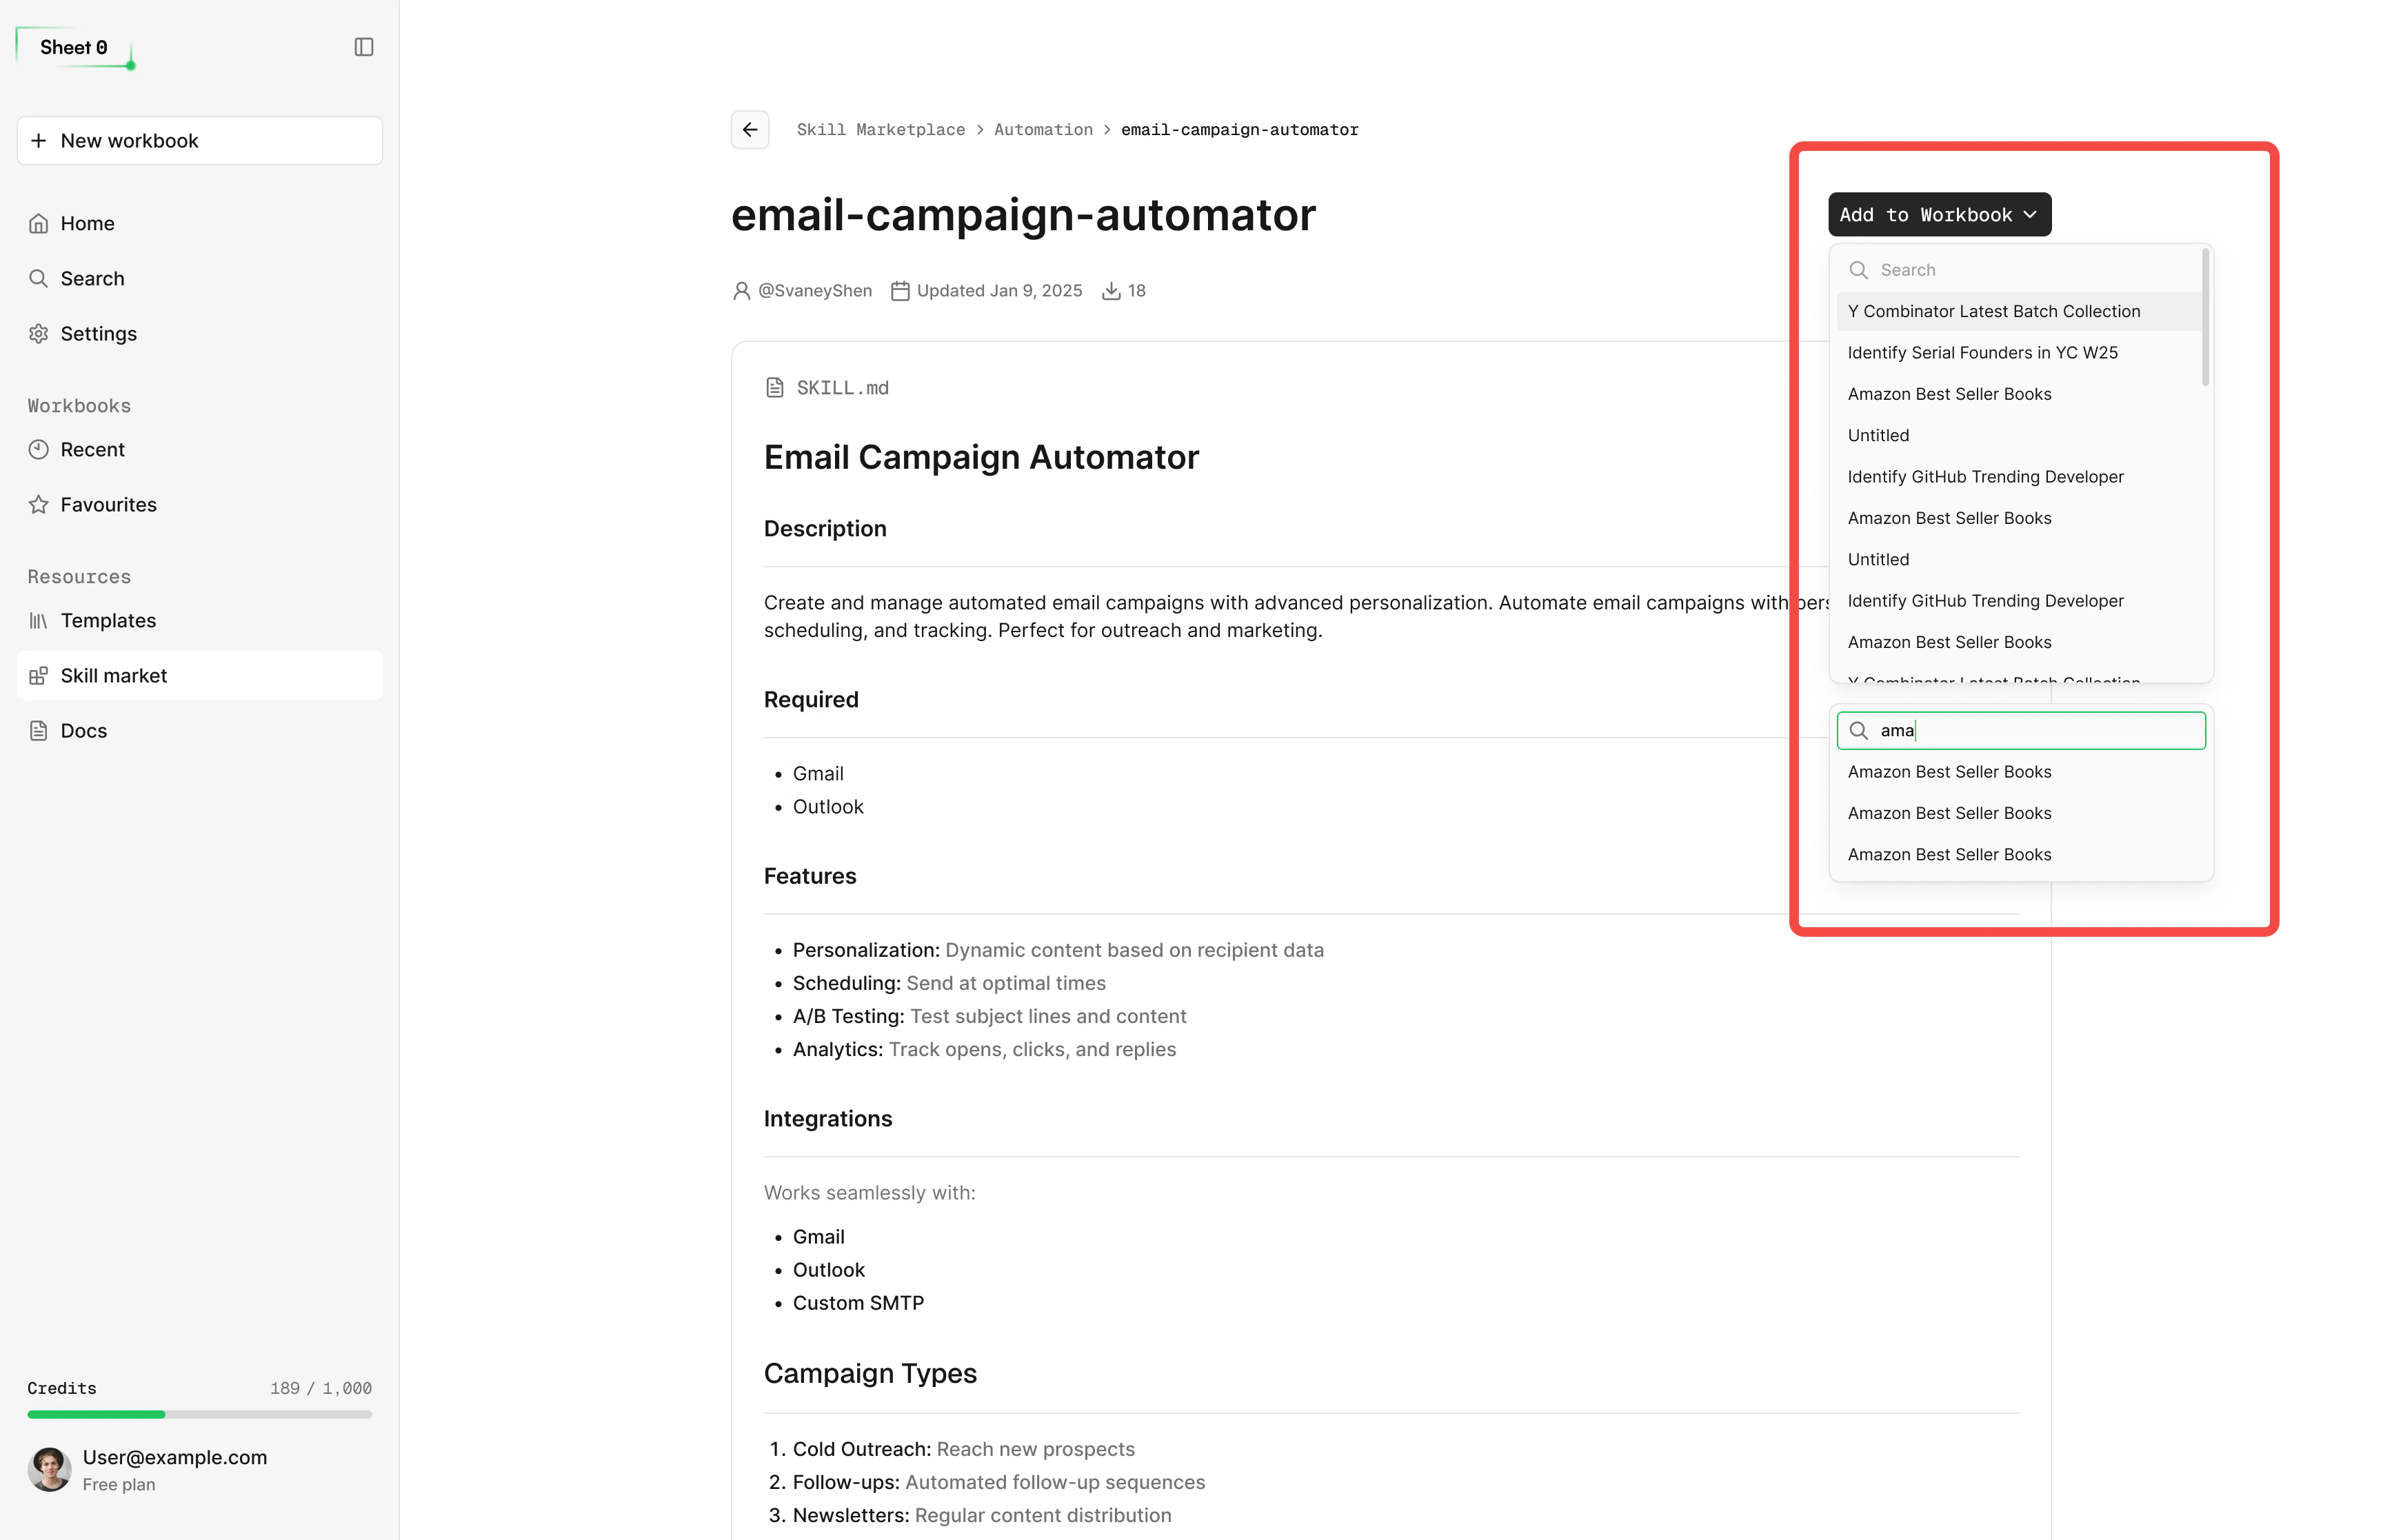
yc-batch-monitor,email-campaign-automator). - Add to Workbook — Click the skill → Add to Workbook → Select your workbook from the drop-down list.
3. How to use skills in Sheet0
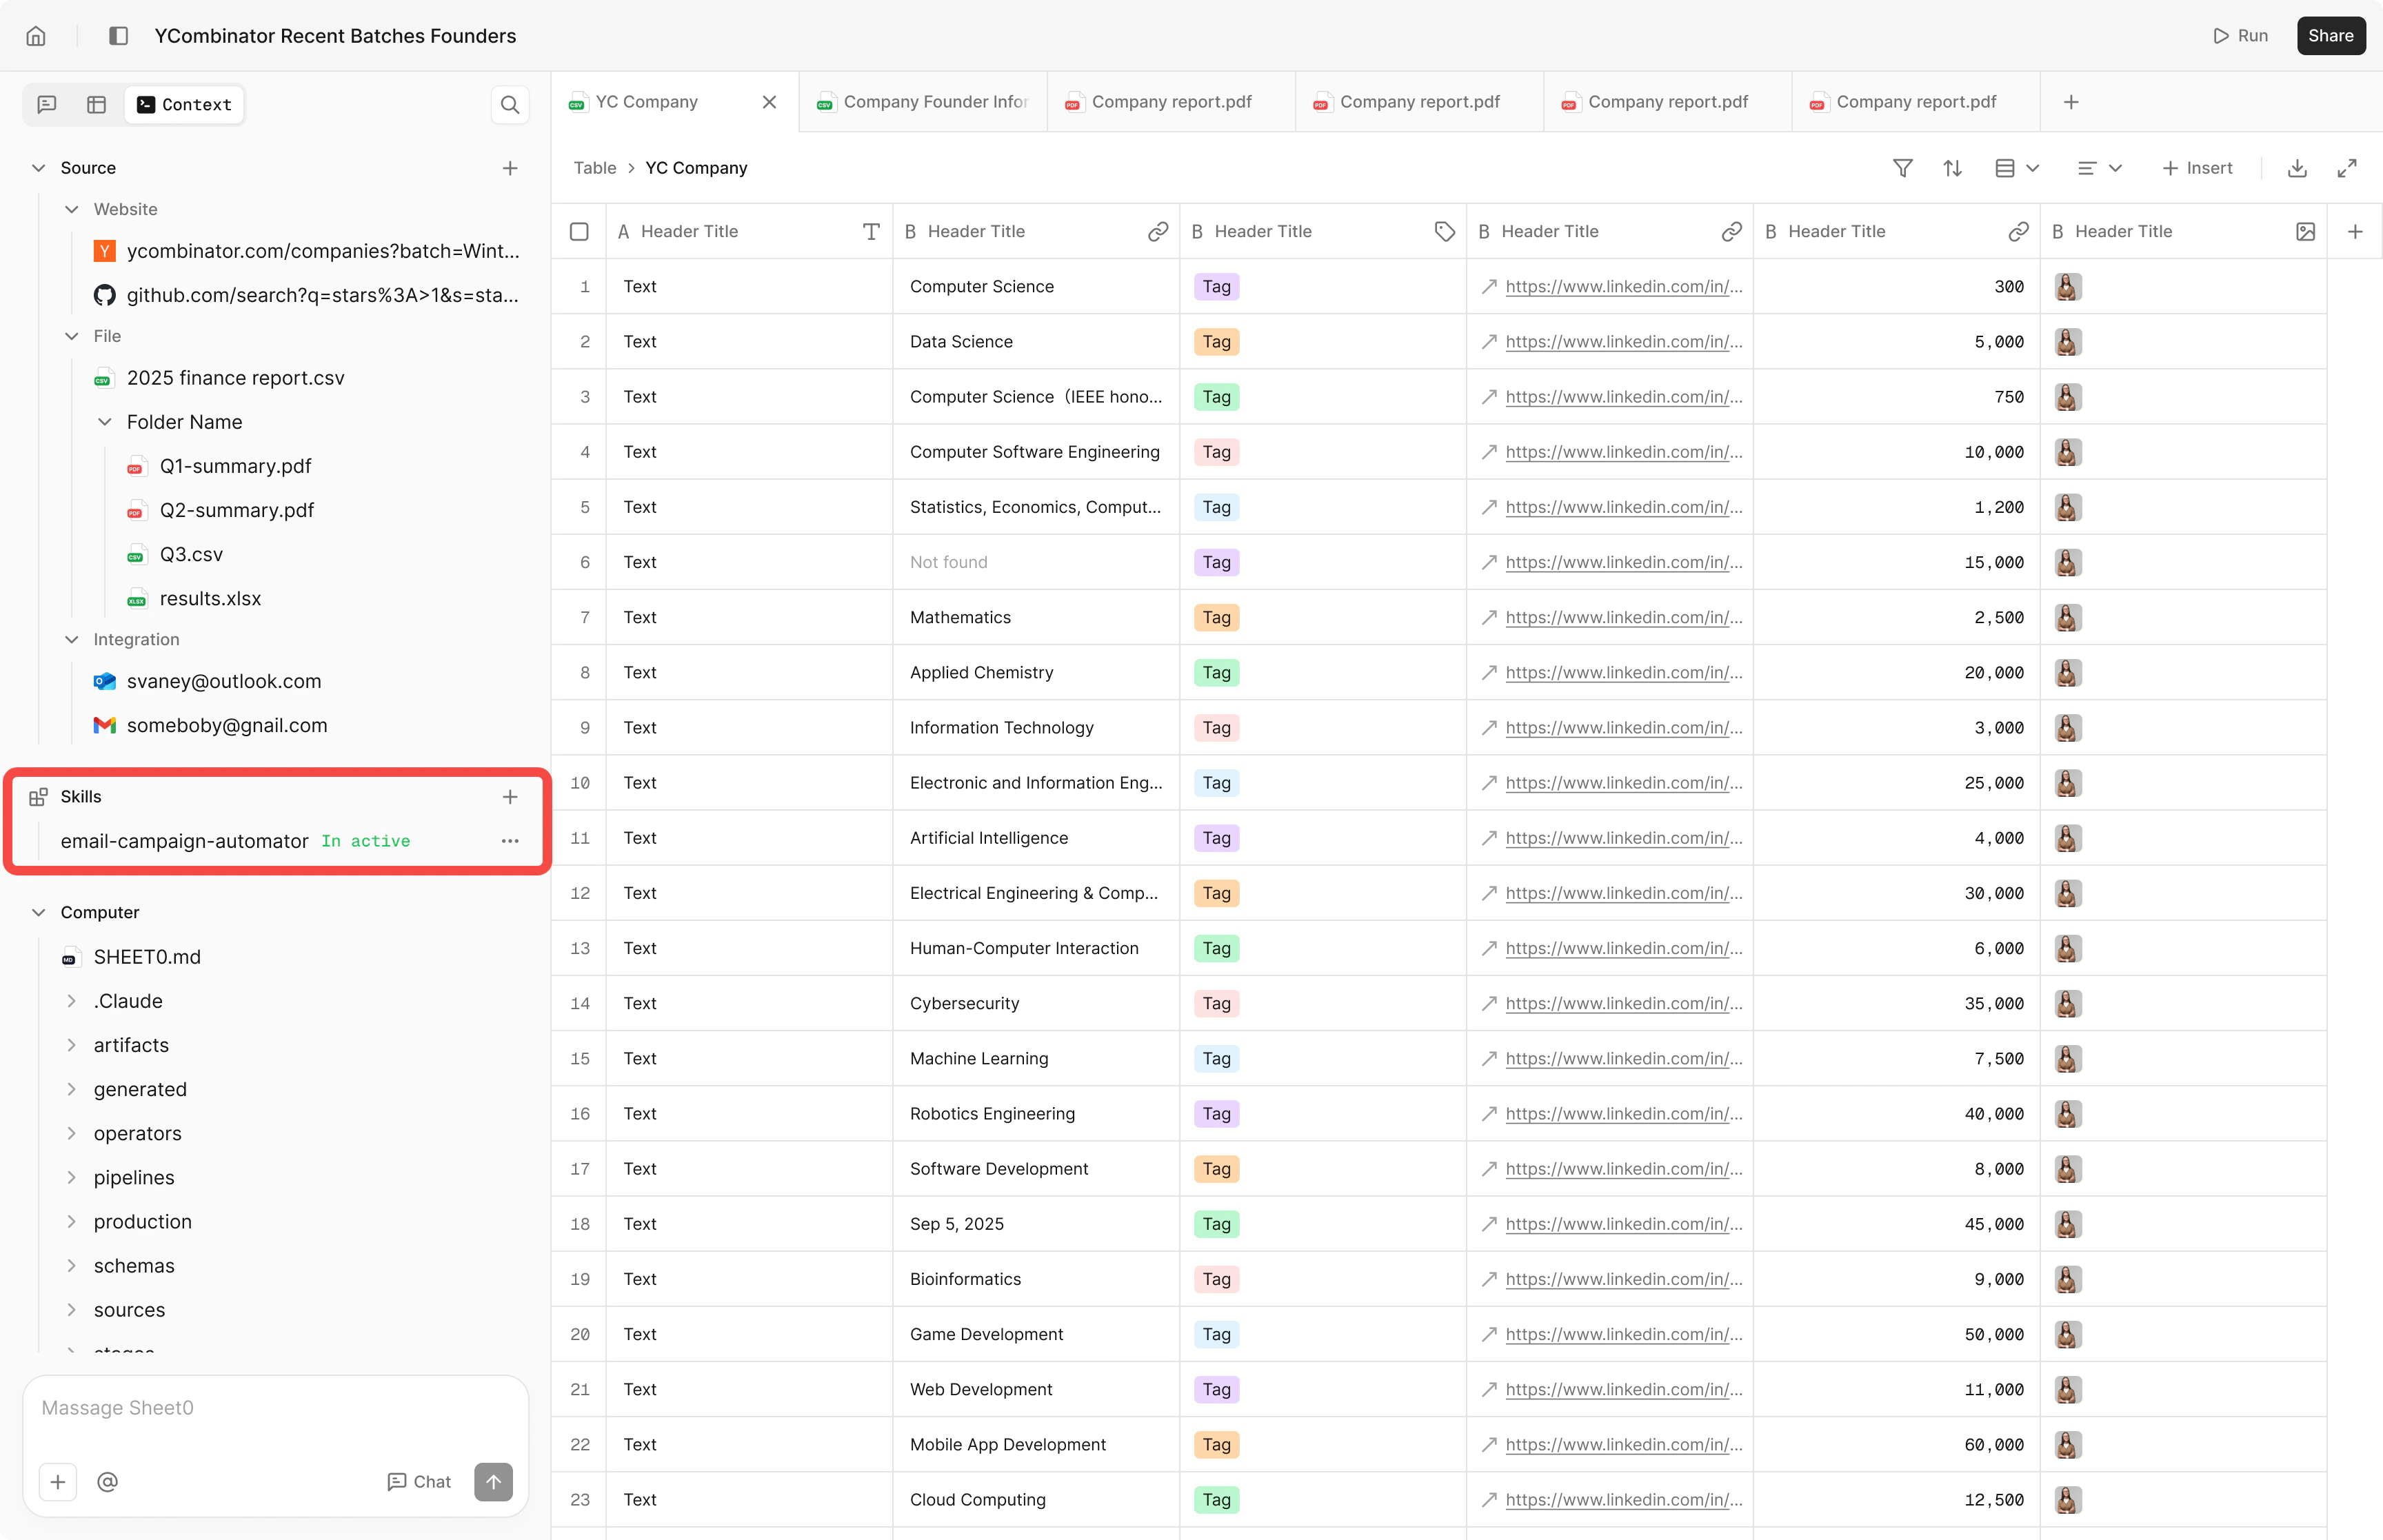
- Find Skills: Sidebar → Resources → Skills marketplace. Marketplace has search bar, categorization labels (All Skills, Data Collection, Social Media, Automation, Analysis), and skills list (name, publisher, installation times).
- View details: Click any skill to see name, publisher, update time, installation frequency, and SKILL.md content (description, required integration, function, etc.).
- Add to Workbook: On skill details page → Add to Workbook → Select workbook from drop-down → Skill installation complete.
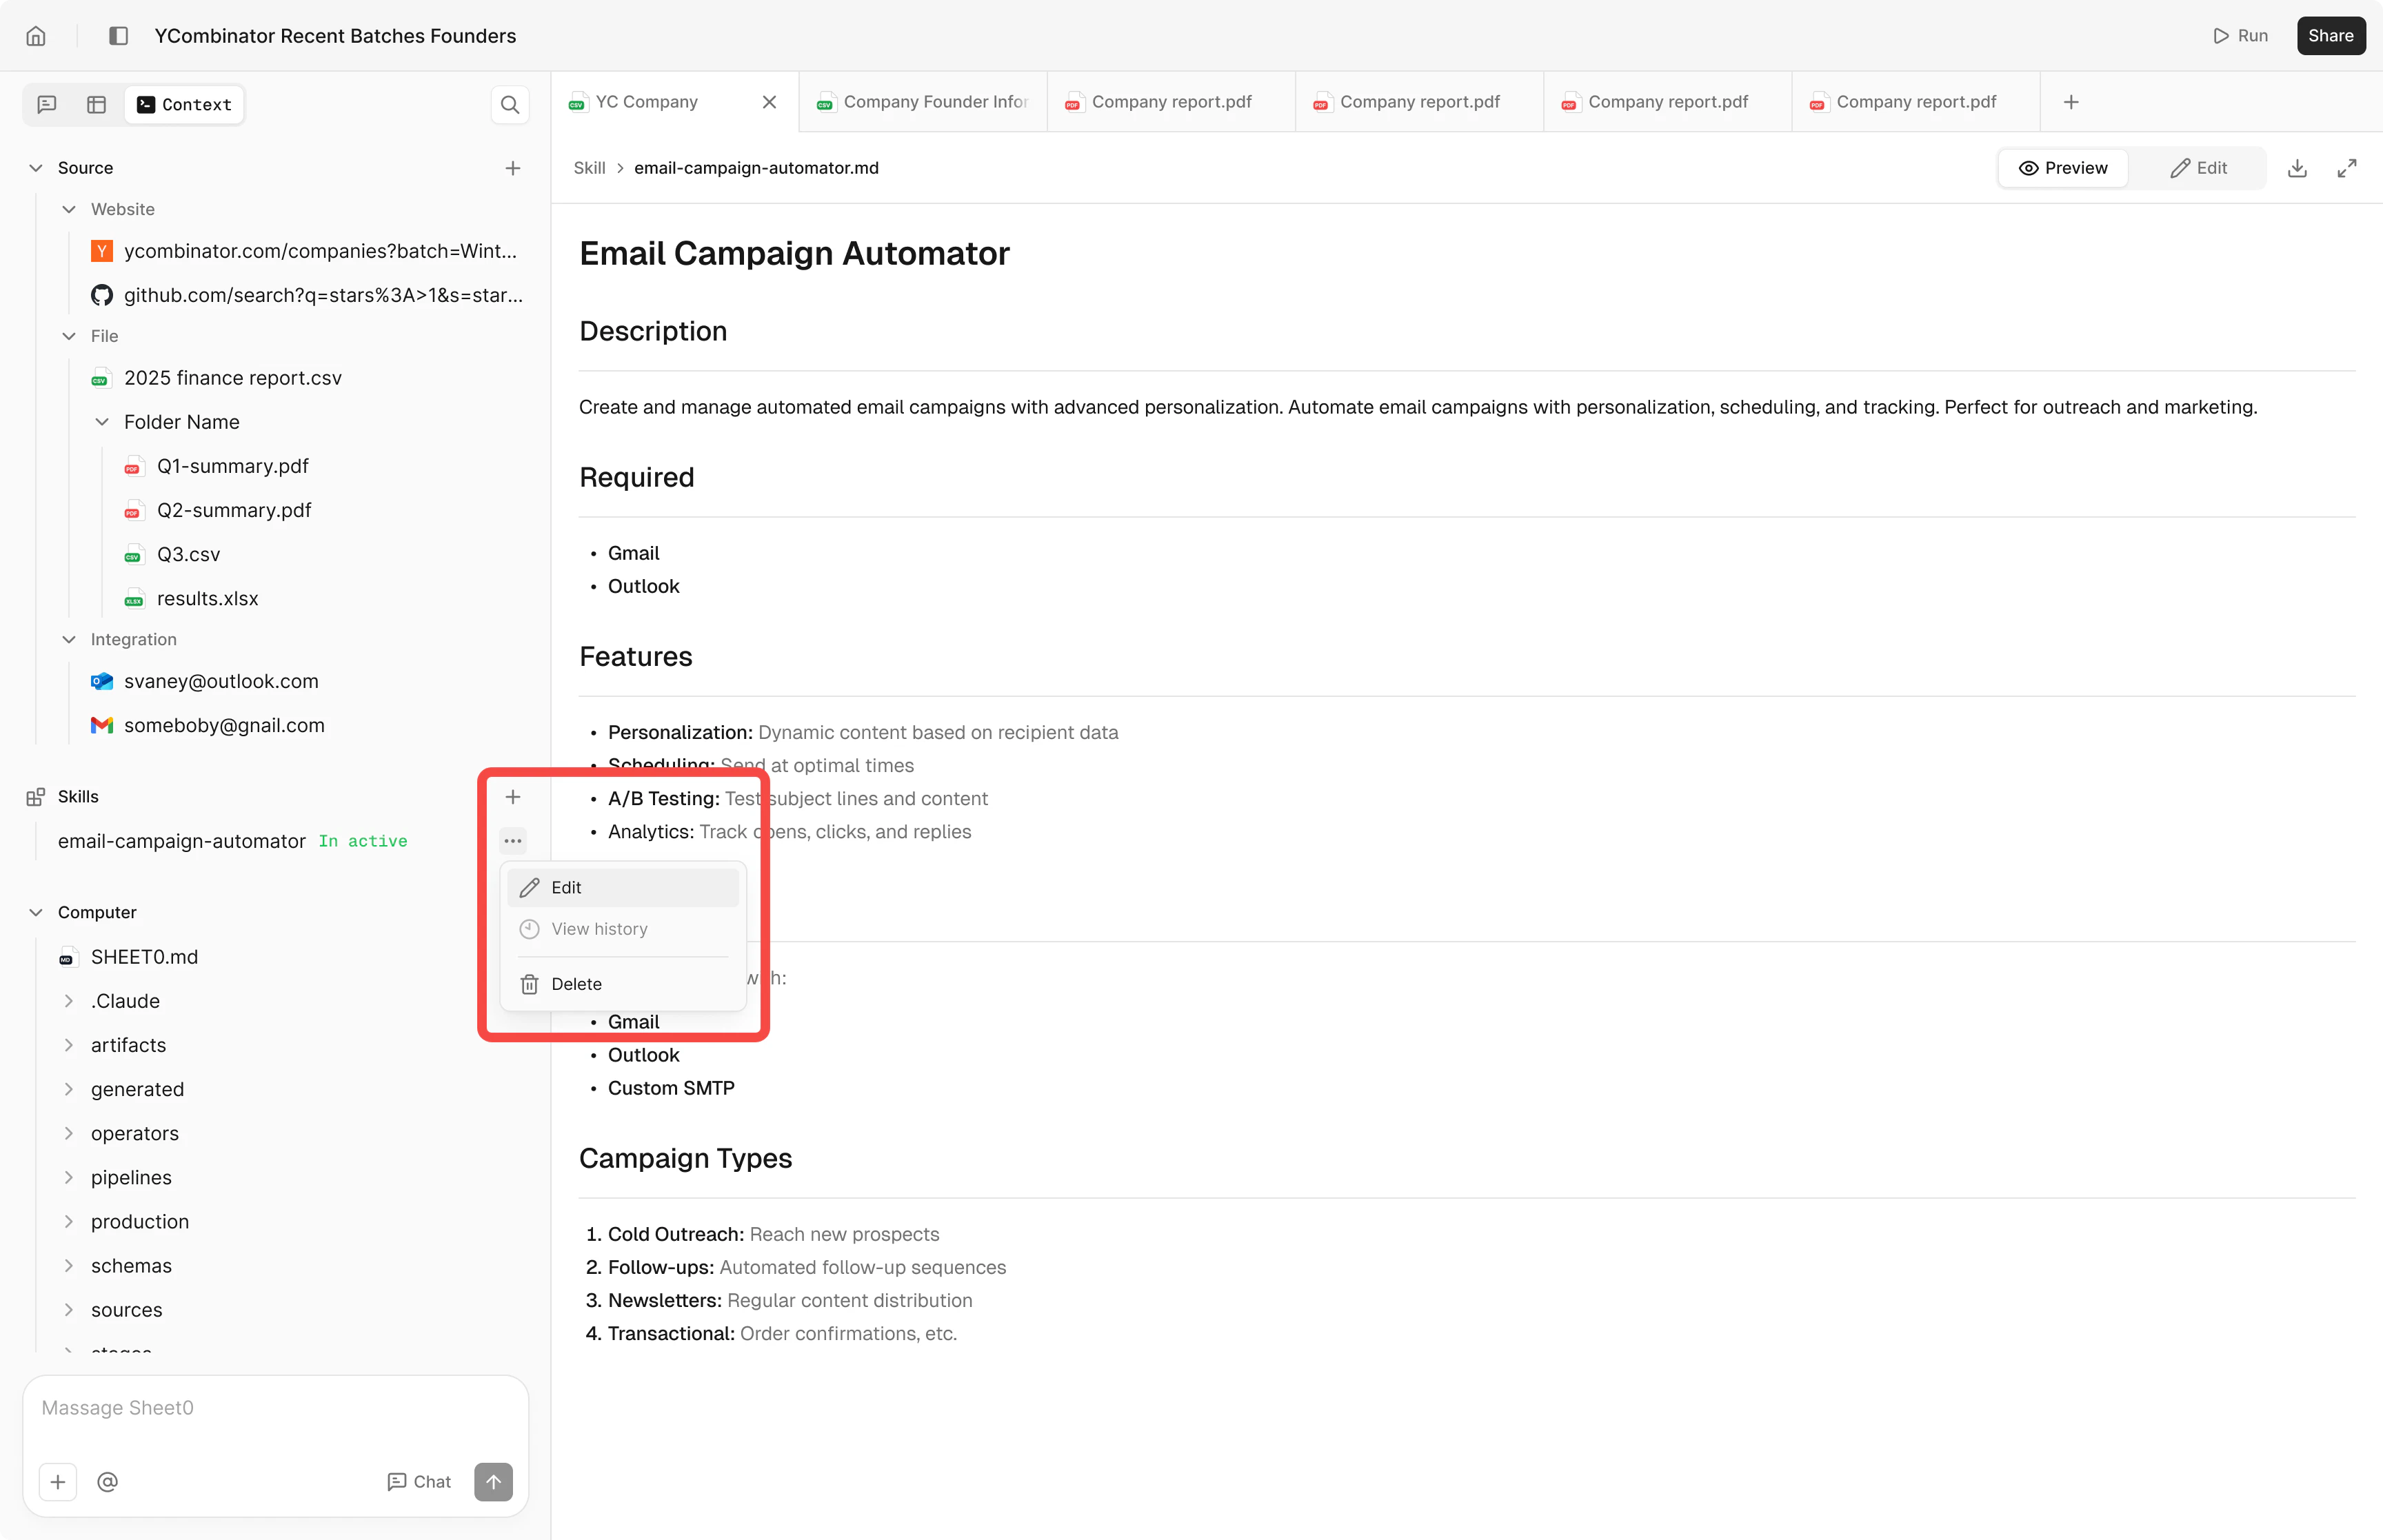
- Manage in workbook: Skills appear in Context sidebar → Skills. Available actions (click skill’s … menu): Edit (modify SKILL.md, creates local copy), View history, Delete (remove from current workbook).
4. Create your own Skills
Recommended process: Complete the task first, then create a skill.- Step 1: Complete the task with Sheet0 as usual (e.g. collect product reviews, extract company data, automate email campaigns).
- Step 2: In chat, type: @sheet0-skill-creator Create a skill from what we just did — or more specifically: @sheet0-skill-creator Create a skill called “collect-amazon-reviews” based on the review collection workflow we just completed.
- Step 3: The agent guides you: asks how skills work, identifies components to reuse (scripts, schemas, workflows), generates structurally correct SKILL.md, creates supporting files (references, scripts, assets), verifies format.
- Step 4: Test and iterate. To adjust: @sheet0-skill-creator Update the skill to also capture review dates.
5. Skill structure
- Folder structure:
skill-name/with SKILL.md (required), optional scripts/, references/, assets/. - SKILL.md: Frontmatter (YAML) with
name,description; body (Markdown) with instructions for the agent. - For Data Acquisition workflows, Sheet0 uses a Contract + Runbook pattern; @sheet0-skill-creator adopts this when applicable.
6. Publish to Marketplace
- Before release: Test in at least one real mission; SKILL.md describes clearly and includes trigger phrases; required chapters complete; no hardcoding only for local use.
- Publish: In workbook → Context → Skills → find skill → … → Publish → Fill name, description, categories, tags, visibility → Publish. Recommended: set to Private first, then change to Public after testing.
- Update: Edit skill → … → Publish Update → Fill Change Log. Unpublish: … → Unpublish (installed users keep copies). Fork: … → Edit to create a local editable copy; you can publish the fork with a new name. Version: New version each update (v1, v2, v3…); users can View history.
8. FAQ (Skills)
- Do I need to enter @skill-name to use a skill? No. Describe requirements naturally; the agent will match. @ prefix is only for built-in skills like @sheet0-skill-creator.
- What if multiple skills match? The agent evaluates and selects the most relevant. To specify: “Use collect-amazon-reviews skill to crawl comments on this page.”
- How many skills per workbook? No hard limit; progressive loading avoids slowdown.
- Same skill in multiple workbooks? Yes. Publish (even private), then install from Marketplace in other workbooks.
- How to turn a task into a skill? @sheet0-skill-creator Create a skill from what we just did.
- Where are created skills saved? Current workbook’s .claude/skills/. For other workbooks, publish to Marketplace.
- Can I edit Marketplace skills? Yes; Edit generates a local fork; original is unaffected.
- Skill not triggered? Check description for trigger phrases; confirm it’s added to current workbook (Context → Skills); make the request more specific or name the skill.
3-4 Core Concept — Sheet0 Tables
The Table is the place where data is stored in Sheet0. After the task is completed, the collected data will be entered into this table. It looks similar to Excel, but Sheet0’s table can be repeatedly run and automatically updated, and each piece of data comes with a source link—you can click to jump to the original page to verify.1. Recognize the interface of Table
Example: table interface after collecting the list of YC Winter 2026 companies.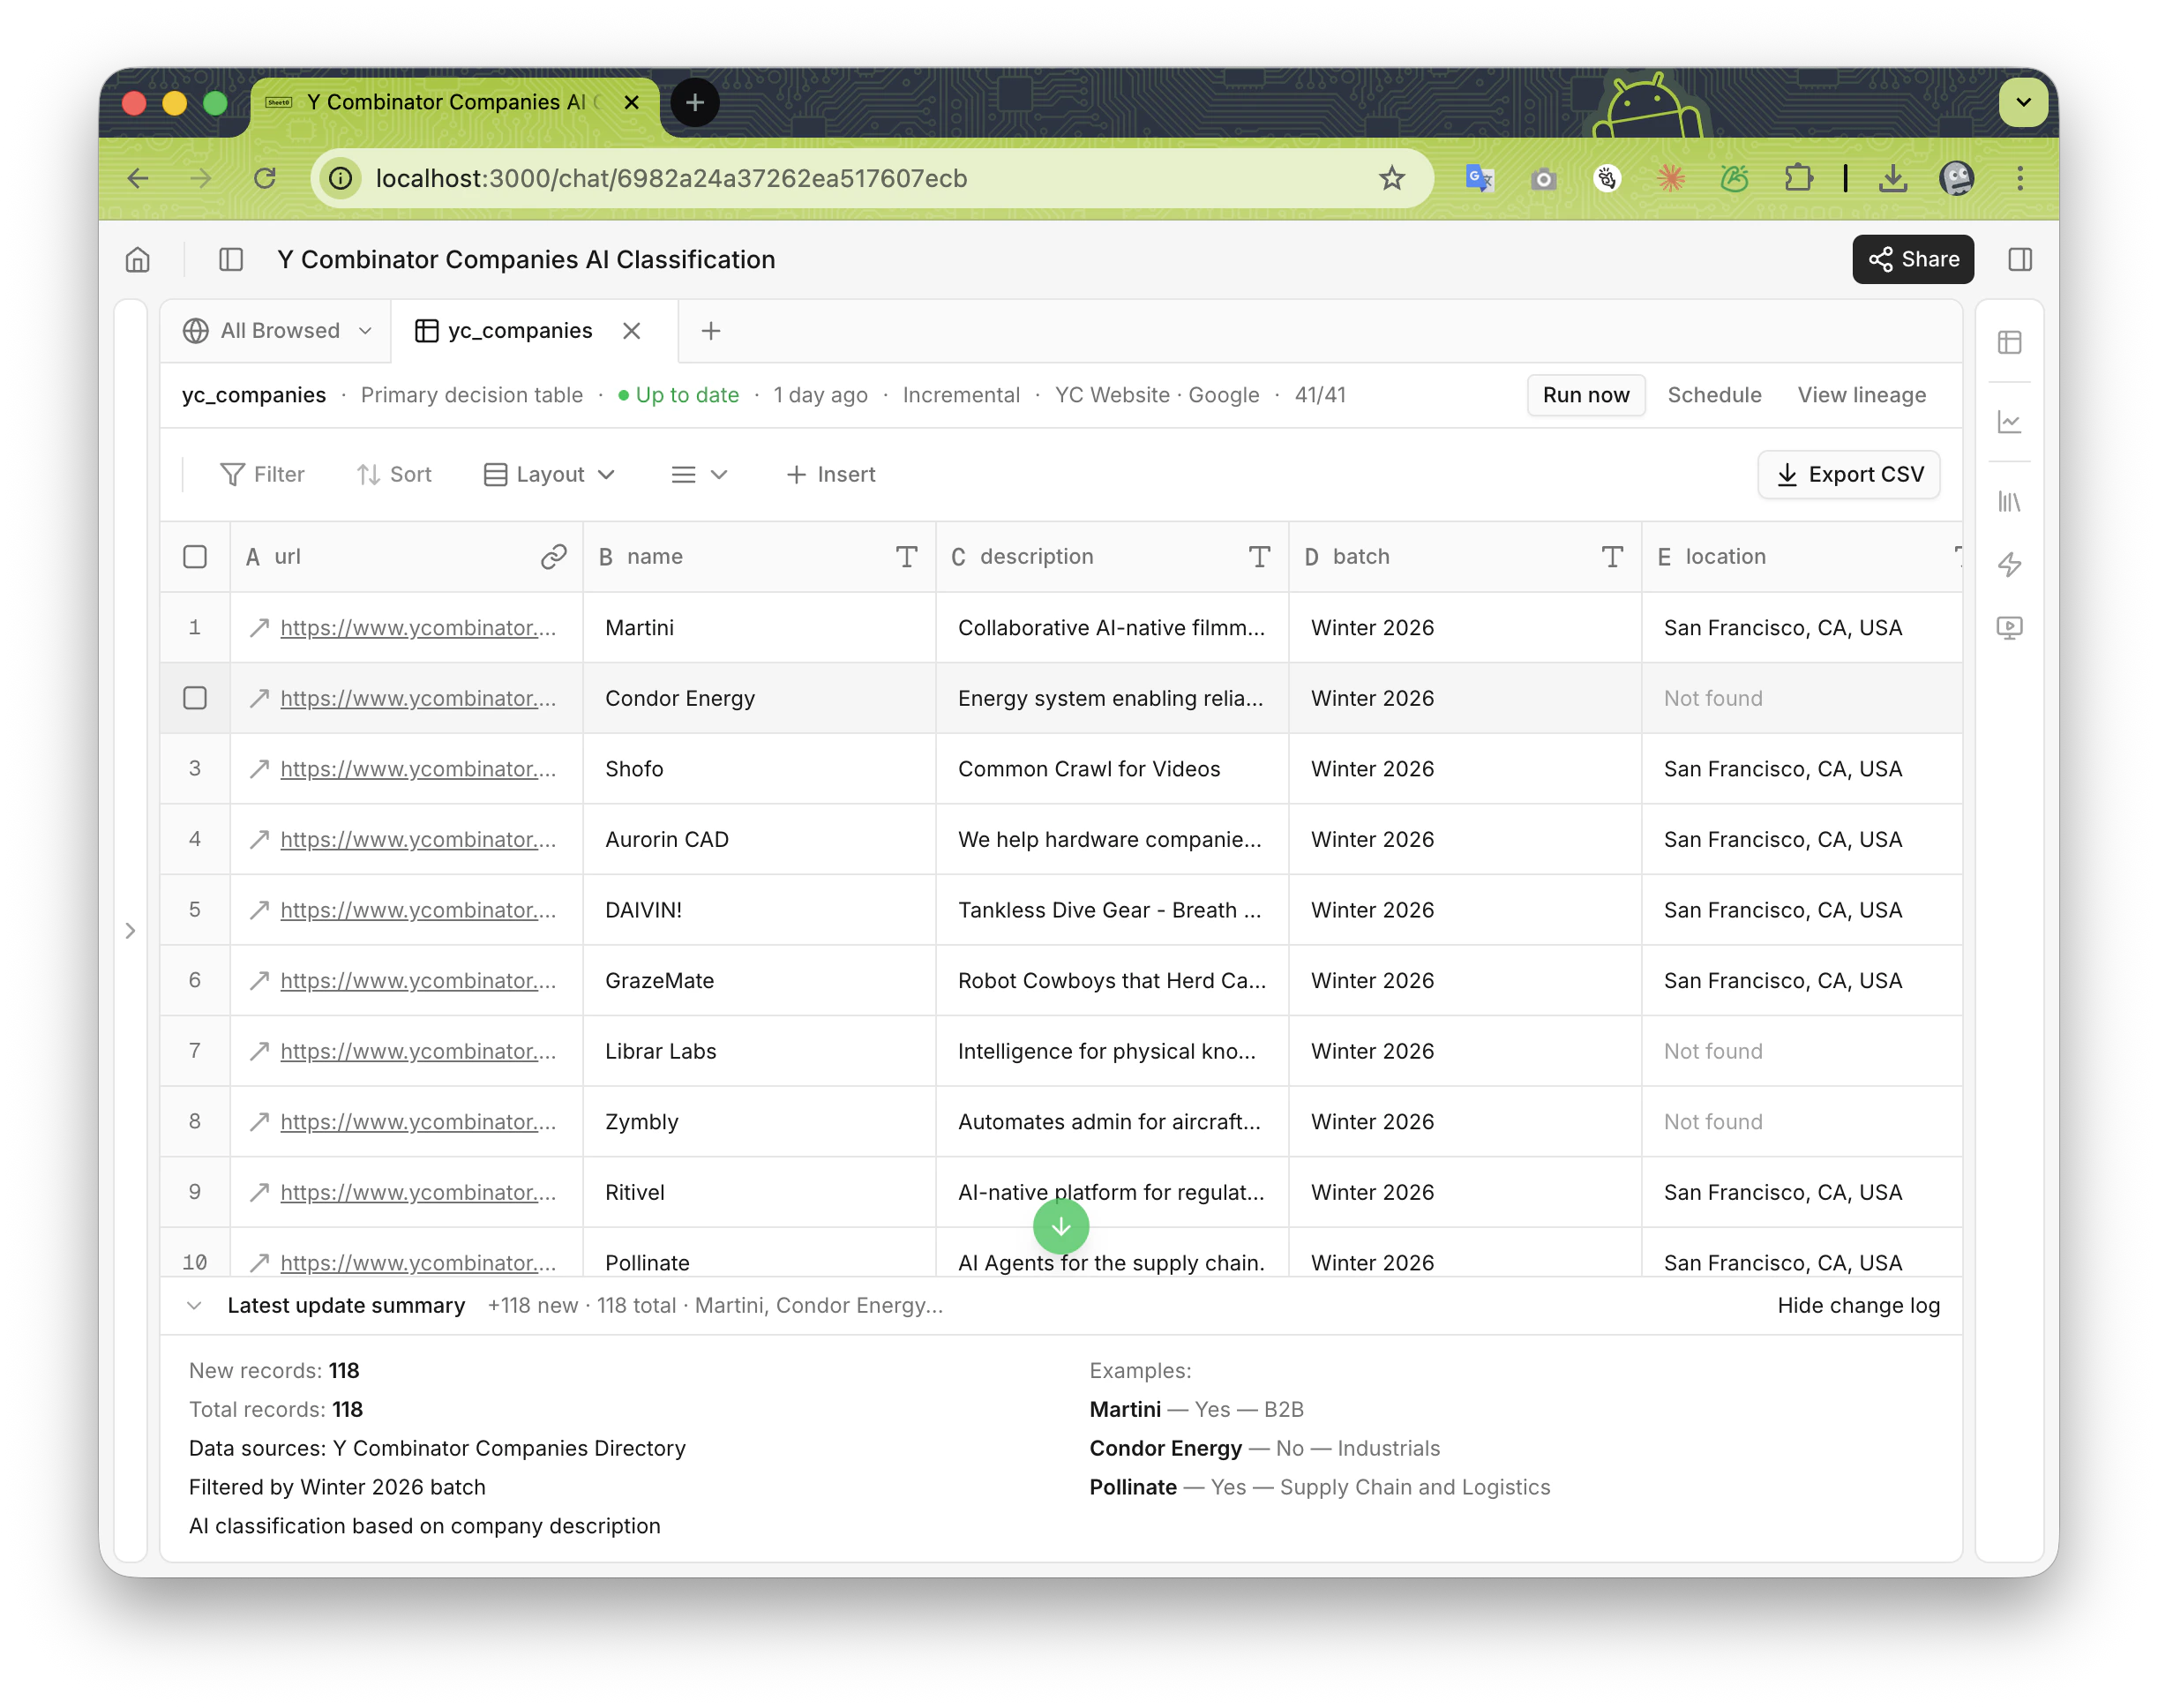
- Top status bar: Table name (e.g. yc_companies), update mode (Incremental/Full), status (e.g. “Up to date”), buttons: Run now, Schedule, View lineage (coming soon).
- Bottom update summary: e.g. “Latest update summary · +118 new · 118 total · …” and “View full change log”.
2. Columns and data types
Column header format: letter + column name + type icon. Sheet0 automatically creates columns and types based on your task. To add a column later (e.g. “Determine industry from company description”), say it in the conversation and Sheet0 will add and fill it. Supported column types: Text, Link, Number, Image, Tags, Boolean, Datetime, File.3. How data enters the table
- Testing phase: Only the first few pieces of data are processed; not written into the table. You can review; proceed after confirming.
- Formal stage: Data is written into the table in real time; you can see the row count at the bottom of the table increase.
4. Review table structure (Column Review)
Before formal collection, Sheet0 usually asks you to confirm the table structure (which columns, what type). A review card pops up in the chat; you can modify column names or types, add columns (Insert), delete columns, then Approve or Reject. If you don’t act, the review card may auto-approve after a countdown.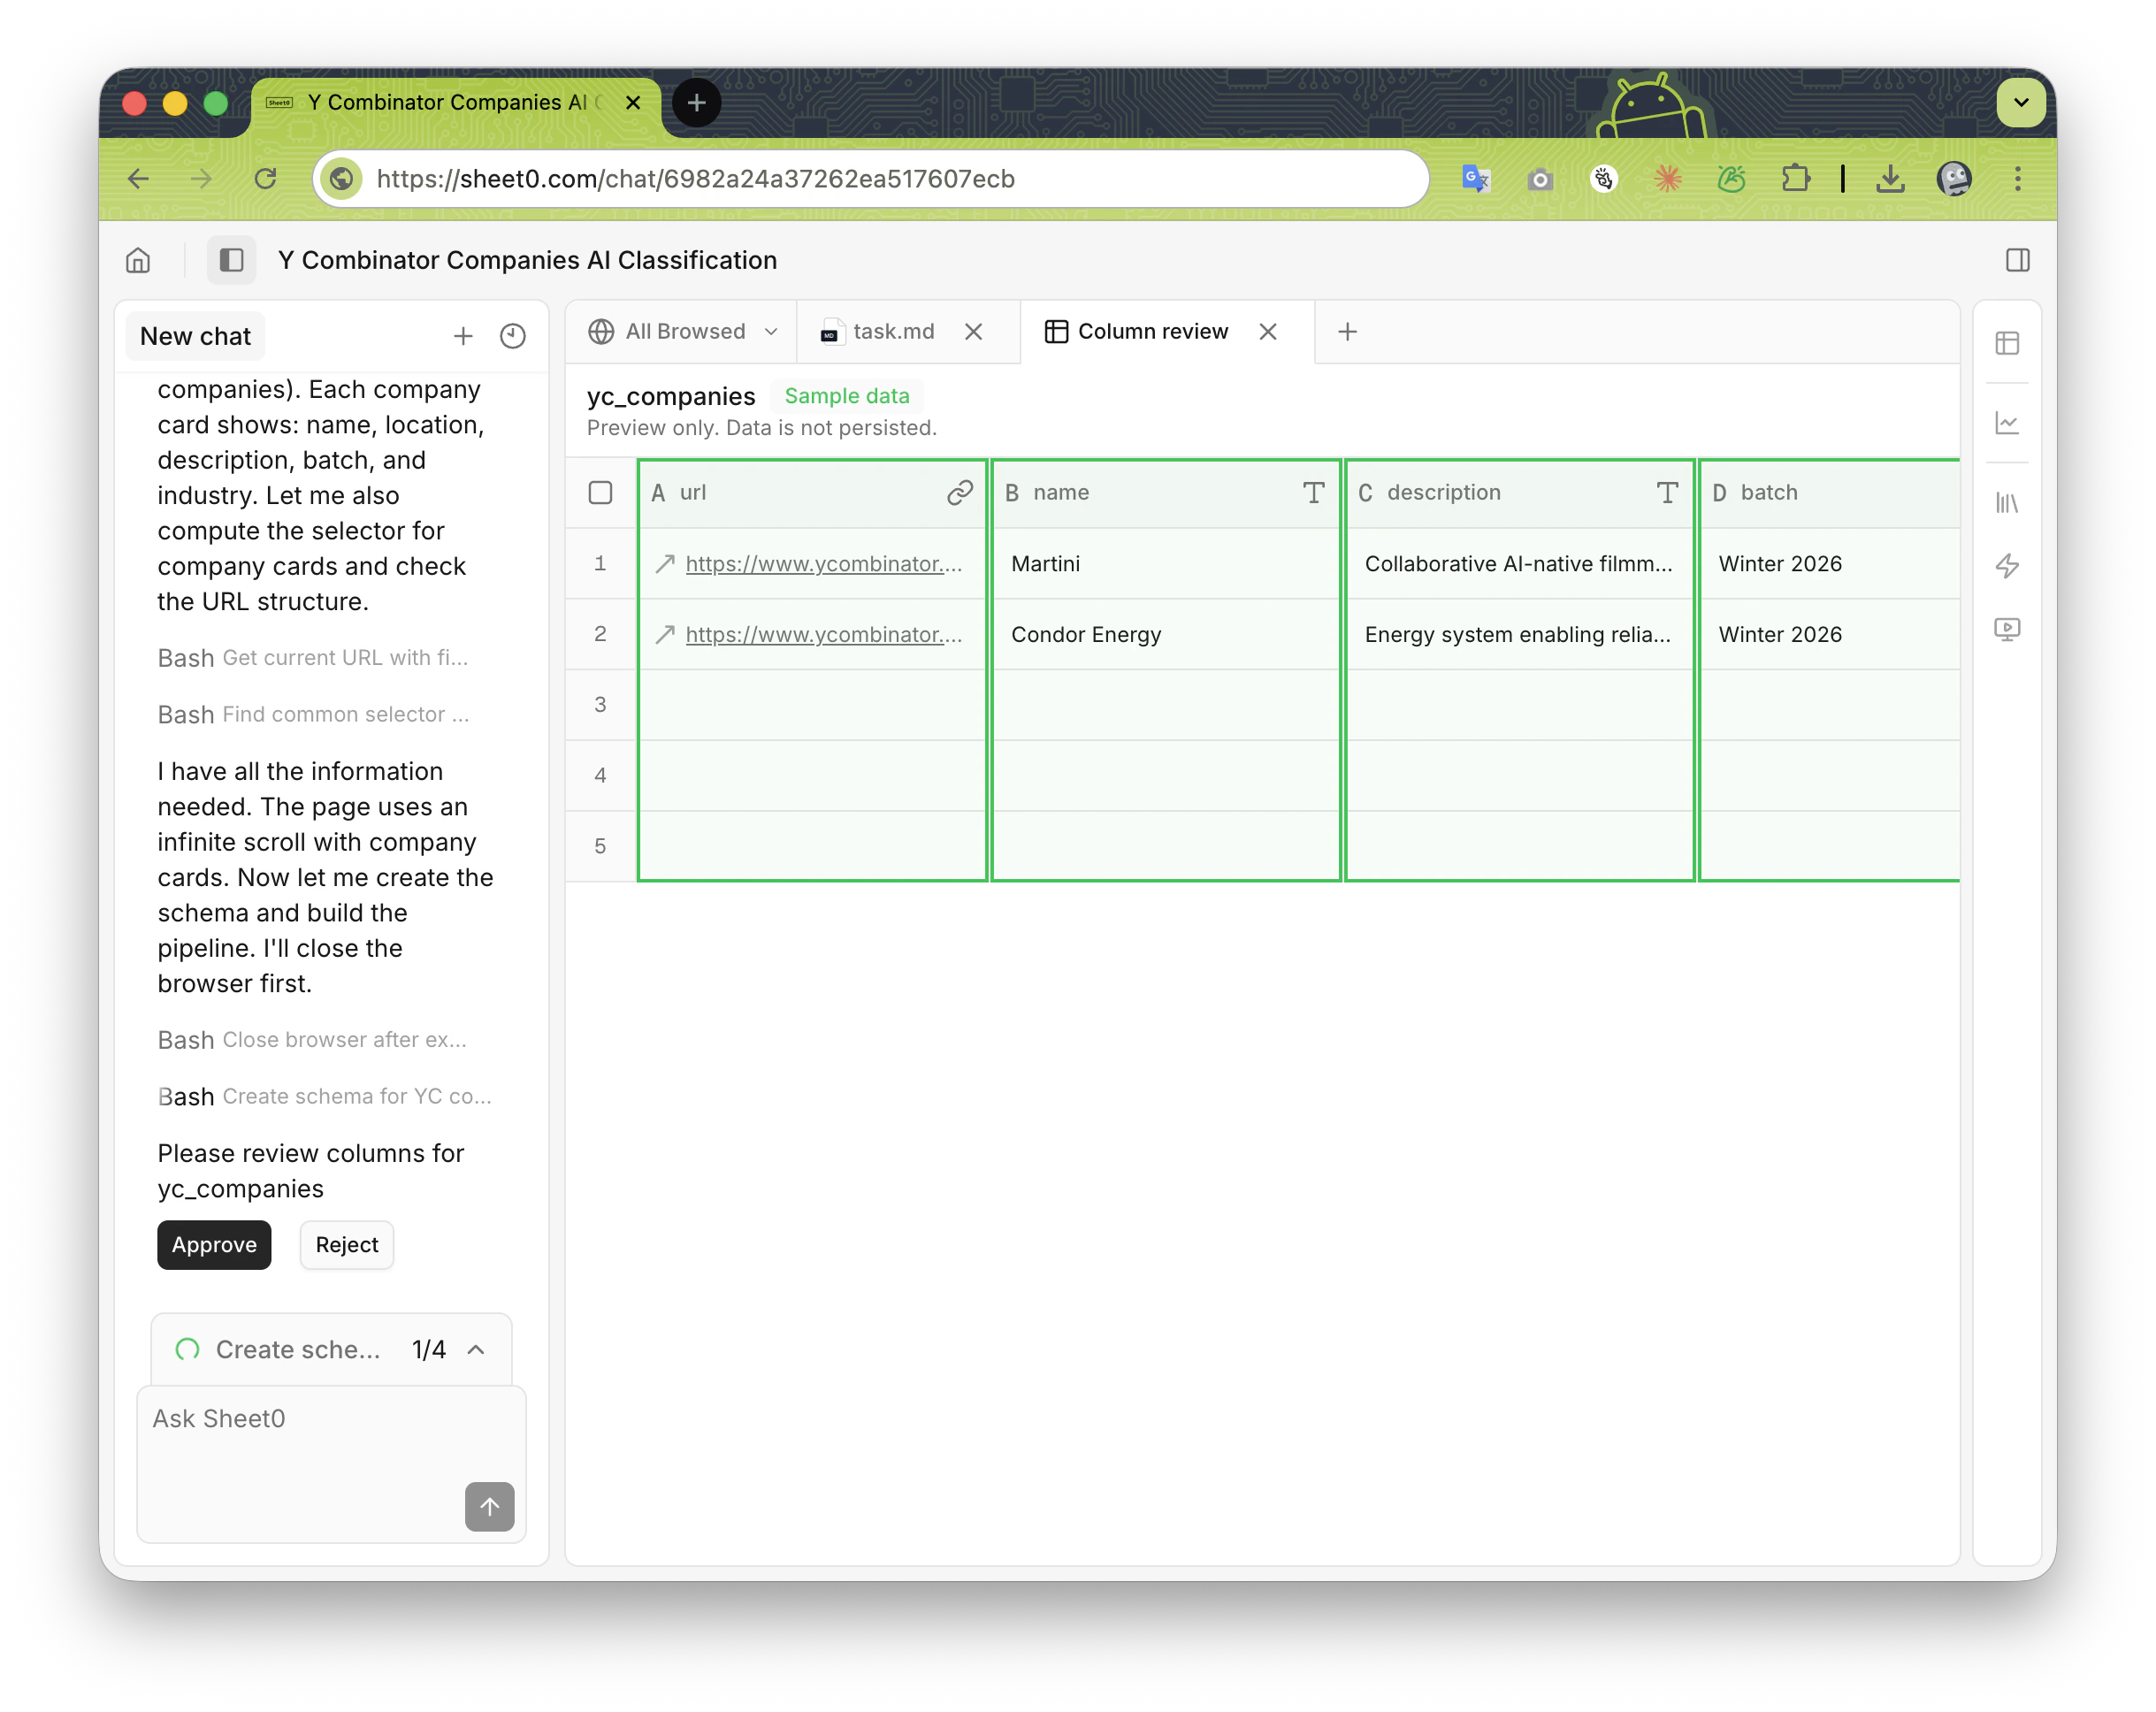
5. Incremental mode vs full mode
- Incremental: New data is appended; old data remains. Running multiple times stacks data. Suitable for continuous accumulation (e.g. Product Hunt new products weekly).
- Full: Each run replaces old data (old data is archived and can be rolled back). Suitable for “current state” (e.g. competitor prices).
6. Deduplication
Sheet0 determines duplicates based on a key column (e.g. URL). Existing rows are updated; new ones added. Summary shows e.g. “+25 new · 95 updated · 125 total”.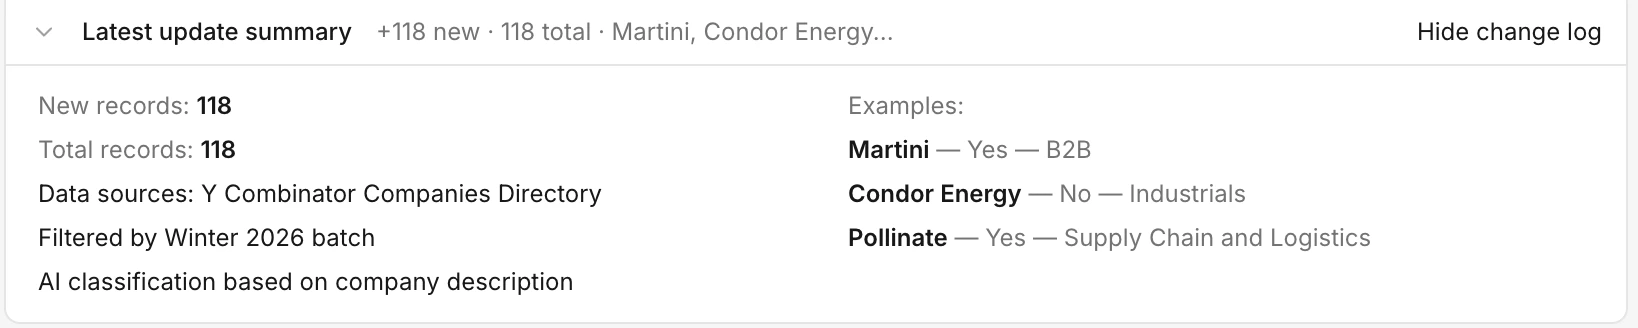
7. Toolbars
- Filter/Sort — Coming soon.
- Layout — Line height (compact/moderate/loose), column width.
- Insert — Insert row or column.
- Export CSV — Upper right; UTF-8 encoding, Chinese will not be garbled.
8. Edit data
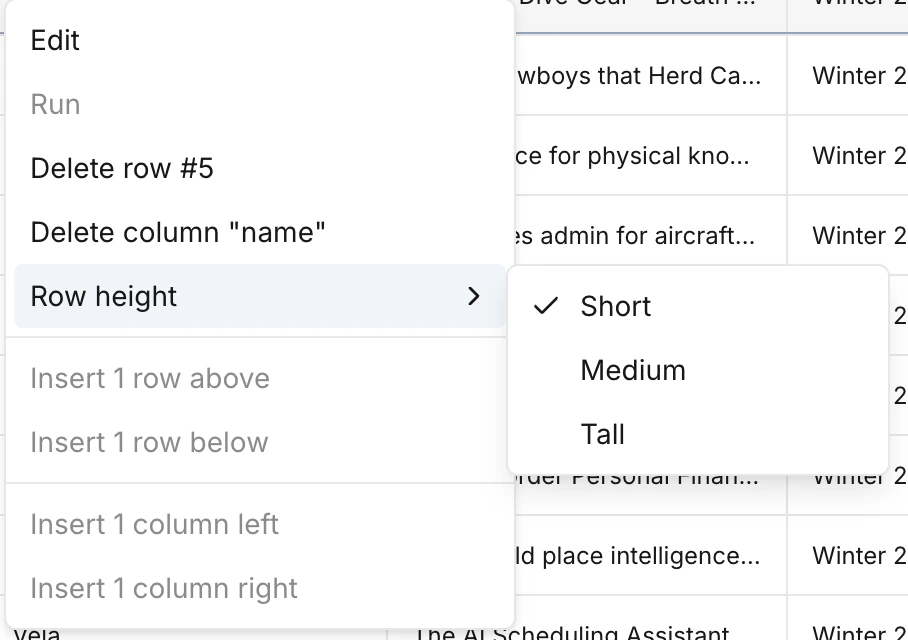
- Right-click cell: Edit, Delete row, line-height.
- Right-click column header: Change column name and type, delete column, Run/Re-run Column (agent repopulates). Drag to reorder columns or resize.
- Add a column: Insert → Insert Column → set a Prompt (e.g. “Determine the industry based on the company introduction”) → Sheet0 fills the column.
9. Multiple tables
A workbook can have multiple tables. In the Tables area of the right sidebar you see all tables (name, row count, last updated). Click to open in the main area.10. Not found and data verification
Sheet0 does not fabricate data. If a field cannot be found on the original webpage, “Not found” is displayed in the grid. Each piece of data usually has a source URL (Link column); click to jump to the original page to verify.11. Operation tips
- Table supports infinite scrolling; new rows appear automatically during collection.
- Select multiple rows: click checkbox for first row, then Shift + click last row.
- Double-click the right edge of the column header to reset column width to default.
- Most operations are in the right-click menu.
Part 4: FAQ
4-1 What are the differences in the new version of Sheet0?
- More flexible data sources — Deep Research recommendations, local file uploads (Excel/CSV/documents); searched sources and existing data can be used together in the same workbook.
- All tasks can be run multiple times for a long time — Tasks exist in the Workbook; data continues to accumulate; supports repeated runs and future automatic updates (monitoring, research, long-term projects).
- Switch from cloud browser to local browser plugin — New version provides a local browser environment via plugin; webpage access is closer to real users; stability and success rate improved. Install and enable Sheet0 Browser Extension; the agent selects the appropriate browser at runtime.
- Agent’s ability to handle complex tasks — Multi-page, multi-data-source, and complex filtering that were difficult before now run more stably (run time may be longer).
- Traceable data — Not found = marked “Not found”; incomplete = “Partial”; every result can be traced back to its source.
- Workbook and Skills — Reusable data workflows; same task doesn’t start from zero; faster and lower cost.
- Marketplace — Use workbooks and skills created by others; no need to build from scratch.
- New UI — Less reliance on chat; Plan Mode helps clarify needs; next-step suggestions after data is ready.
4-2 Encountered any usage issues?
If you encounter the following, please get in touch:- You have clear demands for data but don’t know where the data source is
- The task can run but the structure is not ideal
- You think a certain process can be made into a Template/Skill
- You want to turn your workbook into a long-term asset but don’t know how
- Sheet0 Assistant (WeChat): Hxrbusha
- Book a call: https://cal.com/wellssheet0/chat
4-3 End note
Sheet0 is still a young product and there are many areas where it can be improved. If you encounter any problems or have any suggestions during use, please feel free to let us know. Wish you a pleasant use! Stay updated:- Sheet0 | X | Instagram | LinkedIn | YouTube | Sheet0 Case Library
- Technical support: help@sheet0.com